
Use And Care Manual


Construction Guide | 17
MIXING
Mix no more compound than can be applied in the designated set
time. Place the amount of water recommended, (see mixing ratio) on
compound packaging in a clean mixing container. Add the compound
gradually to clean, drinkable water while stirring. Mix the compound free
of lumps with a mechanical mixer or by hand. Allow standing (soak) for
1 minute, and then remix until consistency is smooth and creamy. If a
thinner or thicker mix is desired, add water or powder sparingly. Careful
not to overmix as it could lead to shortened working times. DO NOT mix
with any other joint compounds (wet or dry) and not recommended
for use in automatic tools. Prior to application, surface areas should be
clean and free of dust and debris.
ESTIMATED WORKING AND SETTING TIMES
One of the most crucial things for selecting the proper ProForm
®
Quick
Set
™
Setting Compound is matching its working time and setting time
ranges to the project.
It should be noted that working time and setting time are not the same.
WORKING TIME
Working time refers to the period during which the ProForm Quick Set
is usable for application. At the end of this time, the material begins
to stiffen and can no longer be spread easily. Working time should
correspond to the required time for actual application.
SETTING TIME
Setting time refers to the time after which the applied ProForm Quick
Set will become adequately hardened so that another layer can be
applied. For manufactured or modular builders, the setting time should
match your timetable for moving a floor along the line.
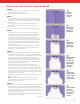
APPROXIMATE WORKING TIME
VERSUS SET/HARDENING TIME
Quick Set/
Quick Set Lite
Working Time
(Minutes)
Set/Hardening Time
(Minutes)
5 3–5 10–20
20 15–20 20–40
45 35–45 45–70
90 70–90 90–125
210 180–210 210–280
LIMITATIONS
•
Do not apply over moist surfaces or surfaces subject to direct moisture.
•
Do not mix with any other material. Use only clean, room
temperature, drinkable water.
•
Mixing equipment and tools must be thoroughly cleaned
between batches.
•
Each fresh batch of compound must be kept free of previous
batches; otherwise the working time will be shortened.
•
High-speed mixing or excessive mixing will shorten the working
time of the ProForm Quick Set setting compounds.
•
Do not add water or remix after compound begins to thicken
and harden.
•
Not recommended for use in automatic taping tools.
•
Close opened bag as tight as possible for storage or setting time
may be affected.
•
Shelf life up to 6 months in high humidity areas and 12 months under
good storage conditions. See production date code. To prevent spoilage
and freezing, maintain temperature at a minimum 50˚F (10˚C) and
protect container from exposure to extreme heat, sunlight and water.
•
The potential for finishing and decorating problems are minimized
when temperature, humidity and airflow remain constant and
as close to occupancy environmental conditions as possible.
A minimum temperature of 50˚F (10˚C) should be maintained
continuously for 48 hours prior to and throughout the finishing
process until applied materials are thoroughly dry.
FREQUENTLY ASKED QUESTIONS
1. Why is the product lumpy after mixing?
•
Water was added to the ProForm Quick Set, rather than the
compound being added to the water.
•
ProForm Quick Set was not allowed to soak (for approximately 1
minute) after initial mix before remixing was initiated.
2. Why is the product setting much faster than the
advertised range?
•
Dirty mixing water and/or application tools.
•
Excessive mixing of the compound.
•
Foreign material (accidentally or deliberately) added to the mixture.
•
Mixing water too hot.
3. Why is the product setting much slower than the
advertised range?
•
Too much water was used.
•
Impure water source (dissolved organics in the water generally
retard the set time).
•
Foreign material (accidentally or deliberately) added to the mixture.
•
Water too cold.
•
Product was remixed after initial stiffening began.
4. Why does the product display weak strength?
•
Too much water was used.
•
Foreign material (accidentally or deliberately) added to the mixture.
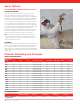
JOINT AND CORNER FINISHING APPLICATION
1. ProForm Quick Set setting compounds should be mixed in
accordance with the printed instructions on the package.
2. A uniformly thin layer of joint compound should be applied over the
joint approximately 4" wide. Tape should be centered over the joint and
embedded into the compound leaving sufficient joint compound under
the tape for proper bond. Ceiling and wall angles plus all inside corner
angles should be reinforced with tape folded to conform to angles and
embedded into the compound.
3. After compound is thoroughly dry or hard (approximately 24 hours
for Regular compound or 2 hours for Quick Set), joint tape should
be covered with a coat of joint or topping compound. The compound
should be spread over the tape approximately 3" on each side and
feathered out at edges. After thoroughly dry, another coat of joint or
topping compound should be applied with a slight uniform crown over
the joint. This coat should be smoothed and feathered approximately 3"
beyond the preceding coat.
4. All inside corners should be coated with at least one coat of joint or
topping compound and the edges feathered out.
5. All nail or screw head dimples should receive three coats. This may
be applied along with each joint coat.
6. Flanges of wallboard cornerbead should be concealed by at least
two coats of compound. The second coat should be feathered out
approximately 9" on both sides of the exposed metal nose.
7. For joint and corner treatment with Quick Set, fill joint and bed
tape simultaneously. After Quick Set has hardened, apply any
ProForm joint compound.
8. For wet sanding, allow each application of compound to dry or harden.
If dry sanding is performed, ventilate work area and/or use a NIOSH/
MSHA-approved respirator. Safety glasses are also recommended.
Caution should be used to avoid roughing the wallboard paper. All
wallboard and treated areas should be smooth and ready for decoration.
Setting Compounds