
Instructions / Assembly

National Tree Company 2 Commerce Drive, Cranford, New Jersey 07016 USA www.nationaltree.com
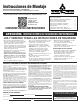
Shaping Instructions
Shaping the tree branches is the last step of
assembly. The care and attention given to this
final process will result in a genuinely beautiful
a
nd appealing holiday centerpiece.
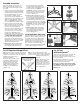
1. Every tree style is shipped from the factory
with the tips of each branch compressed to
t
he center (Figure 1).
2. Each branch tip must be shaped to it’s
proper position to give the tree a natural
look. This is done by gently grasping the left
and right wing tips and spreading them out
away from the center tip (Figure 2).
3. Each individual tip should then be spread out
separately. Tips should then be bent slightly
upward to add a more natural looking
appearance. Figure 3 shows a typical tree
branch after shaping.
4. As you shape closer to the top, the branches
will not have wing tips, but will otherwise
shape in the same manner as lower sections.
Memory Shape
®
Trees
Trees that feature Memory Shape tip technology do not require branch
s
haping. Tree branches are pre-shaped during manufacture and spring into
shape upon assembly.
Trees with Music Match
®
Bluetooth
®
Light System
OPERATING INSTRUCTIONS
1. Turn on power to the Music Match unit by pressing the ON/OFF button on the
front panel.
2
. Navigate to the Bluetooth screen of your Bluetooth enabled phone, tablet or
computer and select the option to search for devices.
3. A device called “Christmas Tree” will appear; select this to connect your
B
luetooth device to the Music Match unit. Your device will indicate that
“Christmas Tree” is connected and the Music Match unit will announce the
word ‘Connected’.
4. At this point, you can open any music program on your device and play a
song. The music will stream through the speaker of the Music Match unit and
the lights on the tree will ‘dance’ in sync with the music playing.
Removing the Music Match device for normal light operation: disconnect the
device cord from the tree light string cord, then disconnect the transformer.
Connect the transformer to the tree light string cord.
Dual Color
®
Lights Function (if equipped)
1. If your tree is equipped with Dual Color LED lights, the black button on the top
of the Music Match unit is used to control the light functions.
2. By default, the Music Match system allows for only three music-synced
functions: steady warm white, steady multicolor and steady alternating warm
white to multicolor.
3. Connect your Bluetooth device to the Music Match unit as described under
OPERATING INSTRUCTIONS.
4. Press the black button one time each to cycle through and choose one of the
nine functions.
Removing the Music Match device for normal light operation: disconnect the
device cord from the tree light string cord then disconnect the transformer.
Connect one end of the included foot switch cord to the tree light string cord,
then connect the transformer to the other end of the foot switch cord.
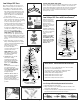
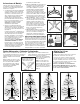
Bulb Replacement
Instructions
1. Unplug light string from power source.
2. Pull up on the Bulb Lock unlatching the bulb
from the bulb socket. Gently pull the bulb
straight out (Figure 4).
3. Before inserting the new bulb into
socket, make sure that the two
wires on either side of the the bulb
base are straight up and flush with
the base (diagram at right).
4. Carefully insert new bulb into socket and
push down Base Lock™ until it snaps into
place (Figure 5).
Fig. 4
Fig. 5
Fuse Replacement
Instructions
1. Unplug light string from power source.
2. Fuses are located in light string plug. Slide
the fuse access cover away from cord side
(in direction of arrow, Figure 6) exposing
fuses.
3. Remove fuses from compartment and
examine. Replace burnt out fuse with new
one.
4. Close fuse compartment by sliding access
cover back in towards cord side of plug
(Figure 7).
Fig. 6
Fig. 7
Trees with Light Parade
™
Multi-Function Light Sets
OPERATING INSTRUCTIONS
Trees pre-lit with Light Parade light strings include
40 light functions which are chosen by using the
push button controller.
Use the left side button to turn the lights ON and OFF.
The four directional buttons will move your light
choice up, down, left and right among the 39 listed
functions on the controller screen.
The fortieth and last function will cycle through all
39 functions one after the other. Press the button
inside the arrows for this function.
Note that after powering off, the last function in use
will be the start function when string is next
powered on.
Fig. 1
Fig. 2
Fig. 3
Storage
Remove all holiday decorations. Gently press tips back into center branch. Raise
a
ll branches to original upright position taking care not to place undue pressure
on the attached ends of the branches. When disassembling tree, a twisting motion
will help to separate the sections from each other. All tree parts can be replaced in
carton and should be stored in a cool, dry place.
4