
User's Manual
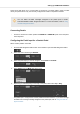

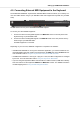
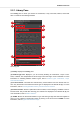
Table Of Contents
- _
- Table of Contents
- 1. Disclaimer
- 2. Welcome to KOMPLETE KONTROL
- 3. The KOMPLETE KONTROL Workflow
- 4. Setting up KOMPLETE KONTROL
- 5. Software Overview
- 6. Keyboard Overview
- 7. Global Controls and Preferences
- 8. MIDI Communication
- 9. Using the MIDI Assignment Editor
- 10. Host Integration
- 11. Browsing the Library
- 11.1. Browser Basics
- 11.2. Opening the Browser
- 11.3. Loading Preset Files
- 11.4. Choosing Between Factory Content and User Content
- 11.5. Filtering Preset Files by Product
- 11.6. Filtering Preset Files by Bank
- 11.7. Resetting the Product Selection
- 11.8. Types and Characters Tags
- 11.9. Working with Favorites
- 11.10. Performing a Text Search
- 11.11. Displaying Preset File Information
- 11.12. Auditioning your Preset Files
- 12. Working with Effects
- 13. Working with Loops and One-Shot Samples
- 14. Managing the Library
- 14.1. Saving Preset Files to the User Library
- 14.2. Deleting User Preset Files from the User Library
- 14.3. Editing the Tags and Properties of User Preset Files
- 14.4. Syncing Multiple Instances
- 14.5. Working with the Files Pane
- 14.6. Loading VST Plug-ins
- 14.7. Installing NKS Instruments
- 14.8. Importing KOMPLETE KONTROL-Compatible User Files
- 15. Controlling Instrument, Loop, One-shot and Effect Parameters
- 16. Smart Play – Playing and Editing Scales and Chords
- 17. Smart Play – Playing and Editing Arpeggiator Sequences
- 17.1. Playing Arpeggiator Sequences
- 17.2. Using a Sustain Pedal to Control the Arpeggiator
- 17.3. Using Arpeggiator Snapshots on the Keyboard
- 17.4. Editing the Arpeggiator
- 17.5. MAIN Parameters
- 17.6. RHYTHM Parameters
- 17.7. OTHER Parameters
- 17.8. ADVANCED Parameters
- 17.9. RANGE Parameters
- 17.10. HOLD Parameter
- 18. Envelopes

Configuring the Pedal Input for an Expression Pedal
When a continuous pedal is connected:
1. Click the MIDI Assignment editor button in the Header to open the MIDI Assignment editor.
2. Select the control element type PEDALS.
3. Select the pedal input you want to configure, either Pedal A or Pedal B.
4. Select Continuous from the Mode drop-down menu.
The pedal input is configured for a continuous pedal with expression behavior. If you need to
change the MIDI Control Change message assigned to the pedal input, refer to Using the
MIDI Assignment Editor.
Depending on the type of pedal, you need to make further adjustments by using the provided op-
tions. The following table gives you an overview of these options:
Option Description
Invert toggle switch Some continuous pedals internally support the inverted pedal range but cannot be configured
on the pedal directly. The Invert Range function allows you to invert the range of the pedal
connected to the keyboard.
Swap T/R toggle switch Allows you to use pedals with inverted tip/ring connectivity.
Recalibrate button Allows you to recalibrate the input.
When using the MIDI Assignment editor, all keyboard controls (i.e. navigation, trans-
port, etc.) are blocked.
Setting up KOMPLETE KONTROL
19