
User's Manual


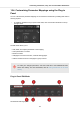


Table Of Contents
- _
- Table of Contents
- 1. Disclaimer
- 2. Welcome to KOMPLETE KONTROL
- 3. The KOMPLETE KONTROL Workflows
- 4. Setting up KOMPLETE KONTROL
- 5. Software Overview
- 6. Keyboard Overview
- 7. Global Controls and Preferences
- 8. MIDI Communication
- 9. Using the MIDI Assignment Editor
- 10. Host Integration
- 11. Browsing the Library
- 11.1. Browser Basics
- 11.2. Opening the Browser
- 11.3. Loading Preset Files
- 11.4. Choosing Between Factory Content and User Content
- 11.5. Filtering Preset Files by Product
- 11.6. Filtering Preset Files by Bank
- 11.7. Resetting the Product Selection
- 11.8. Types and Characters Tags
- 11.9. Working with Favorites
- 11.10. Performing a Text Search
- 11.11. Displaying Preset File Information
- 11.12. Auditioning your Preset Files
- 12. Working with Effects
- 13. Working with Loops and One-Shot Samples
- 14. Managing the Library
- 14.1. Saving Preset Files to the User Library
- 14.2. Deleting User Preset Files from the User Library
- 14.3. Editing the Tags and Properties of User Preset Files
- 14.4. Syncing Multiple Instances
- 14.5. Working with the Files Pane
- 14.6. Loading VST Plug-ins
- 14.7. Installing NKS Instruments
- 14.8. Importing KOMPLETE KONTROL-Compatible User Files
- 15. Controlling Instrument, Loop, One-shot and Effect Parameters
- 16. Smart Play – Playing and Editing Scales and Chords
- 17. Smart Play – Playing and Editing Arpeggiator Sequences

Each page (1) of the Control section on the KOMPLETE KONTROL keyboard shows up as a label
at the top of the Plug-in panel.
1. Click on a label to view and edit the controls on this page. The current page is highlighted.
2. To delete a page, click on the cross icon next to its label.
The Add Page button (2) allows you to add more pages to the Control section for the current Pre-
set file, while the Learn button (3) enables Learn mode for the Plug-in panel.
• In Learn mode, select a control in the Plug-in panel and move any parameter on the Instru-
ment’s panel to learn this parameter to the selected control (highlighted in blue).
Controls can be grouped to sections (4) to show related parameters in a coherent manner.
1. Double-click on the empty space above a parameter, enter a name, and then press [enter] or
click elsewhere to create a new section starting with the chosen parameter.
2. To rename an existing section, double-click on it and enter a new name. Press [enter] or click
elsewhere to confirm the changes.
The name of each control is shown below the corresponding knob in the Plug-in panel (5).
• To change the name of a control, double-click on it and enter a new name. Press [enter] or
click elsewhere to confirm the changes.
If you place the mouse over a control (6) in Edit mode, additional options allow for changing the
parameter mapping of this control.
1. Click on the arrow icon at the left of the control’s knob and select a parameter from the drop-
down menu to map it to this control.
2. Click on the cross icon at the right of the control’s knob to delete this control from the current
page.
Controlling Instrument, Loop, One-shot and Effect Parameters
122