
User's Manual
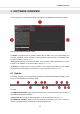

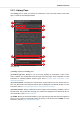
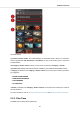
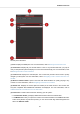
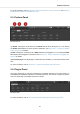
Table Of Contents
- _
- Table of Contents
- 1. Disclaimer
- 2. Welcome to KOMPLETE KONTROL
- 3. The KOMPLETE KONTROL Workflows
- 4. Setting up KOMPLETE KONTROL
- 5. Software Overview
- 6. Keyboard Overview
- 7. Global Controls and Preferences
- 8. MIDI Communication
- 9. Using the MIDI Assignment Editor
- 10. Host Integration
- 11. Browsing the Library
- 11.1. Browser Basics
- 11.2. Opening the Browser
- 11.3. Loading Preset Files
- 11.4. Choosing Between Factory Content and User Content
- 11.5. Filtering Preset Files by Product
- 11.6. Filtering Preset Files by Bank
- 11.7. Resetting the Product Selection
- 11.8. Types and Characters Tags
- 11.9. Working with Favorites
- 11.10. Performing a Text Search
- 11.11. Displaying Preset File Information
- 11.12. Auditioning your Preset Files
- 12. Working with Effects
- 13. Working with Loops and One-Shot Samples
- 14. Managing the Library
- 14.1. Saving Preset Files to the User Library
- 14.2. Deleting User Preset Files from the User Library
- 14.3. Editing the Tags and Properties of User Preset Files
- 14.4. Syncing Multiple Instances
- 14.5. Working with the Files Pane
- 14.6. Loading VST Plug-ins
- 14.7. Installing NKS Instruments
- 14.8. Importing KOMPLETE KONTROL-Compatible User Files
- 15. Controlling Instrument, Loop, One-shot and Effect Parameters
- 16. Smart Play – Playing and Editing Scales and Chords
- 17. Smart Play – Playing and Editing Arpeggiator Sequences

(4) Preset display: Displays the name of the loaded Preset file or KONTAKT key switch. The ar-
row buttons on the right skip to the next Preset file in the Browser’s Results list.
(5) Perform panel button: Shows or hides the Perform panel, which gives you access to the pa-
rameters of the Scale engine and the Arpeggiator. The Perform panel button lights up blue when
the Scale engine and/or the Arpeggiator are enabled. For more information, refer to Perform Pan-
el.
(6) Plug-in panel button: Shows or hides the Plug-in panel, which allows you to customize the
parameter mapping for the Control section on the keyboard for every Preset file. For more informa-
tion, refer to Plug-in Panel.
(7) Plug-in chain panel button: Shows or hides the Plug-in chain panel and lights up white when
enabled. For more information, refer to Plug-in Chain Panel.
(8) View button: Switches between Default view and Additional view of the loaded Instrument.
The View button only appears if the loaded Instrument contains an Additional view. The View but-
ton is not available when an Effect is selected.
(9) Keyboard button: Shows the currently connected keyboard, A25, A49, or A61. If multiple in-
stances of the KOMPLETE KONTROL software are running (for example in a host), clicking the
button connects the keyboard to this instance. This indicator only appears if at least one compati-
ble device is connected. When a third-party keyboard is used, the MIDI button will be displayed
instead of the Keyboard. Use the MIDI button to assign third-party controllers to Native Map. For
more information, refer to Switching Instances.
(10) Transport controls: Lets you start, stop, and reset the internal clock. When KOM-
PLETE KONTROL is loaded as a plug-in in a host, the transport automatically follows the host
transport and this feature is greyed out. For more information, refer to Transport and Tempo.
(11) Tempo control: Lets you adjust the tempo in BPM (beats per minute). For more information,
refer to Transport and Tempo.
(12) Master Volume control: Lets you adjust the overall output volume of KOMPLETE KON-
TROL. The meter shows the current peak level of the output signal. For more information, refer to
Adjusting Master Volume.
(13) CPU meter: Represents the current load on your computer’s processor; it should not go
above 70% to avoid clicks and interruptions.
(14) NI logo: The NI logo opens the About screen, which shows the version number of the KOM-
PLETE KONTROL software.
5.2. Browser
The Browser provides you access to your KOMPLETE KONTROL Library and lets you add, edit,
and organize Preset files. It consists of the Library pane together with the Product selector, and of
the Files pane which are explained in the following overviews.
For more information on using the Browser and managing your Preset files, refer to Browsing the
Library, Working with Effects, and Managing the Library.
Software Overview
19