
User Manual
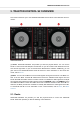
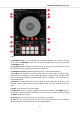
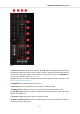
Table Of Contents
- _
- Table of Contents
- 1. Disclaimer
- 2. Welcome to TRAKTOR KONTROL S2
- 3. Concepts
- 4. Setting up TRAKTOR KONTROL S2
- 5. TRAKTOR KONTROL S2 Overview
- 6. Mixing Your First Tracks using SYNC
- 7. Tutorials
- 7.1. Browsing and Loading Tracks
- 7.2. Controlling Track Playback
- 7.3. Adjusting Volume Levels
- 7.4. Using the Equalizer to Tweak Your Sound
- 7.5. Adjusting Track Tempo
- 7.6. Locking the Key of Tracks
- 7.7. Playing with Mixer Effects
- 7.8. Playing with Cue Points
- 7.9. Playing with Loops
- 7.10. Snap Mode and Quantize Mode
- 7.11. Using Flux and Reverse Modes
- 7.12. Previewing Tracks using the CUE Channel
- 7.13. Working with the Preparation List
- 7.14. Adding Samples to Your Mix
- 7.15. Correcting Beatgrids of Tracks
- 7.16. Mixing Tracks Using Jog Wheels
- 8. Preferences
- 9. Integrating a Microphone
- 10. Setting the TRAKTOR KONTROL S2 as Your Default Audio Interface

(4) LOW knob: Emphasizes, or attenuates, or removes the low frequency band of the audio sig-
nal.
(5) Mixer FX Amount knob: The Mixer FX Amount knob controls the amount of the Mixer FX to
be applied to the audio signal. In the center position the Mixer FX is disabled for that Mixer chan-
nel.
(6) Channel Fader: Adjusts the volume level for the Mixer channel before the audio signal is sent
to the crossfader.
5.4. Front View
The front panel of your S2 hosts the PHONES OUT socket for the CUE channel. Here you can
connect a pair of headphones using a stereo 1/4" jack.
Front view.
5.5. Rear View
This section describes all the sockets and controls available on the rear panel of your TRAK-
TOR KONTROL S2.
Rear view.
(1) Kensington Lock slot: Attaches a Kensington Lock to protect your S2 against theft.
(2) MIC GAIN: Adjusts the level for the incoming microphone signal.
(3) MIC 1/4" socket: Connects a microphone using a 1/4" jack.
(4) MAIN OUT 1/8" socket: Connects the S2 to active speakers.
(5) MAIN OUT RCA R / L: Connects the S2 to a power amplifier.
(6) iOS: Connects an iOS device for future iOS compatibility.
(7) USB: Connects your S2 with your computer using the included USB cable.
(8) Power Supply socket: Connects the optional Native Instruments Power Supply to be pur-
chased separately on the Native Instruments online shop.
TRAKTOR KONTROL S2 Overview
17