
User's Manual


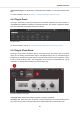


Table Of Contents
- _
- Table of Contents
- 1. Disclaimer
- 2. Welcome to KOMPLETE KONTROL
- 3. The KOMPLETE KONTROL Workflow
- 4. Setting up KOMPLETE KONTROL
- 5. Software Overview
- 6. Keyboard Overview
- 7. Global Controls and Preferences
- 8. MIDI Communication
- 9. Using the MIDI Assignment Editor
- 10. Host Integration
- 11. Browsing the Library
- 11.1. Browser Basics
- 11.2. Opening the Browser
- 11.3. Loading Preset Files
- 11.4. Choosing Between Factory Content and User Content
- 11.5. Filtering Preset Files by Product
- 11.6. Filtering Preset Files by Bank
- 11.7. Resetting the Product Selection
- 11.8. Types and Characters Tags
- 11.9. Working with Favorites
- 11.10. Performing a Text Search
- 11.11. Displaying Preset File Information
- 11.12. Auditioning your Preset Files
- 12. Working with Effects
- 13. Working with Loops and One-Shot Samples
- 14. Managing the Library
- 14.1. Saving Preset Files to the User Library
- 14.2. Deleting User Preset Files from the User Library
- 14.3. Editing the Tags and Properties of User Preset Files
- 14.4. Syncing Multiple Instances
- 14.5. Working with the Files Pane
- 14.6. Loading VST Plug-ins
- 14.7. Installing NKS Instruments
- 14.8. Importing KOMPLETE KONTROL-Compatible User Files
- 15. Controlling Instrument, Loop, One-shot and Effect Parameters
- 16. Smart Play – Playing and Editing Scales and Chords
- 17. Smart Play – Playing and Editing Arpeggiator Sequences
- 17.1. Playing Arpeggiator Sequences
- 17.2. Using a Sustain Pedal to Control the Arpeggiator
- 17.3. Using Arpeggiator Snapshots on the Keyboard
- 17.4. Editing the Arpeggiator
- 17.5. MAIN Parameters
- 17.6. RHYTHM Parameters
- 17.7. OTHER Parameters
- 17.8. ADVANCED Parameters
- 17.9. RANGE Parameters
- 17.10. HOLD Parameter
- 18. Envelopes

5.9. Audio Plug-In
When you load a sample of content type Loop from the Browser, the sample is automatically loa-
ded into the Audio plug-in so you can play it immediately. The Audio plug-in specializes in keeping
audio loops playing in-sync with the project in your host software and has the optional ability to do
so without influencing the key of the loop. Furthermore, you can transpose the loop while it plays
so that it fits the key of your song. Important parameters can be accessed via the GUI, but all pa-
rameters for the Audio plug-in can be accessed via the Plug-in panel or a connected keyboard. As
for any Instrument or the Sampler plug-in, the Audio plug-in uses the first Plug-in slot in the Plug-in
chain.
For more information on using the Audio plug-in, refer to Working with Loops and One-Shot Sam-
ples.
The Audio plug-in provides you with the following elements and parameters:
Audio plug-in.
(1) Timeline: Shows the timeline of the loop in musical units, including bars and beats.
(2) Waveform display: Shows the waveform of the loaded loop. When a sample is played back, a
playhead is shown in the waveform display. With the scroll wheel of your mouse, you can zoom in
and out the waveform display. Right-clicking on the waveform display opens a context menu for
finding the loop on your computer.
(3) Start Marker: Determines the start point of the loop by moving it left or right. You can adjust the
Start Marker only from within the software.
(4) End Marker: Determines the end point of the loop by moving it left or right. You can adjust the
End Marker only from within the software.
(5) Fade: Sets a simple fade-in/fade-out amount to avoid pops or clicks that may occur when play-
ing loops with the Audio Plug-in.
(6) Tune: Transposes the tune of the loop within the range of -36 to +36 semitones. You can use
this control to set the playback pitch of the loop to 'C', and then the loop's pitch will match the pitch
of notes programmed into the host sequencer. This parameter is only available in Stretch and
Formant Engine mode (8).
(7) Pitchbend: Sets the Pitchbend range of the loop from -12 to +12 which is relative to the Tune
parameter. This parameter controls the effect of the Pitch Wheel/Slider on your MIDI controller.
This parameter is only available in Stretch and Formant Engine mode (8).
Software Overview
33