
User's Manual
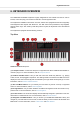

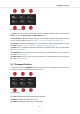


Table Of Contents
- _
- Table of Contents
- 1. Disclaimer
- 2. Welcome to KOMPLETE KONTROL
- 3. The KOMPLETE KONTROL Workflow
- 4. Setting up KOMPLETE KONTROL
- 5. Software Overview
- 6. Keyboard Overview
- 7. Global Controls and Preferences
- 8. MIDI Communication
- 9. Using the MIDI Assignment Editor
- 10. Host Integration
- 11. Browsing the Library
- 11.1. Browser Basics
- 11.2. Opening the Browser
- 11.3. Loading Preset Files
- 11.4. Choosing Between Factory Content and User Content
- 11.5. Filtering Preset Files by Product
- 11.6. Filtering Preset Files by Bank
- 11.7. Resetting the Product Selection
- 11.8. Types and Characters Tags
- 11.9. Working with Favorites
- 11.10. Performing a Text Search
- 11.11. Displaying Preset File Information
- 11.12. Auditioning your Preset Files
- 12. Working with Effects
- 13. Working with Loops and One-Shot Samples
- 14. Managing the Library
- 14.1. Saving Preset Files to the User Library
- 14.2. Deleting User Preset Files from the User Library
- 14.3. Editing the Tags and Properties of User Preset Files
- 14.4. Syncing Multiple Instances
- 14.5. Working with the Files Pane
- 14.6. Loading VST Plug-ins
- 14.7. Installing NKS Instruments
- 14.8. Importing KOMPLETE KONTROL-Compatible User Files
- 15. Controlling Instrument, Loop, One-shot and Effect Parameters
- 16. Smart Play – Playing and Editing Scales and Chords
- 17. Smart Play – Playing and Editing Arpeggiator Sequences
- 17.1. Playing Arpeggiator Sequences
- 17.2. Using a Sustain Pedal to Control the Arpeggiator
- 17.3. Using Arpeggiator Snapshots on the Keyboard
- 17.4. Editing the Arpeggiator
- 17.5. MAIN Parameters
- 17.6. RHYTHM Parameters
- 17.7. OTHER Parameters
- 17.8. ADVANCED Parameters
- 17.9. RANGE Parameters
- 17.10. HOLD Parameter
- 18. Envelopes

(7) Keybed and Light Guide: Reflect the Smart Play functions by switching LEDs on or off to indi-
cate active and inactive keys. The Light Guide also reflects the settings of the loaded Instrument
and can be very helpful to illustrate e.g., BATTERY or KONTAKT mappings. For more information,
refer to Keybed and Light Guide.
(8)Touch Strip: The Touch Strip can be assigned to parameters via the MIDI learn function of the
loaded Instrument. For more information, refer to Touch Strip.
(9) Pitch and Modulation Wheels: The Pitch Wheel on the left lets you adjust the pitch of the loa-
ded Instrument. The Modulation Wheel on the right lets you adjust the default modulation parame-
ter of the loaded Instrument.
(10) Transpose and Fixed Velocity buttons: The FIXED VEL (TS Mode) button sets the note ve-
locity for all keys to a fixed value of 127. The OCTAVE (Semi) down / up buttons transpose the
entire keybed an octave down / up. Pressing SHIFT + OCTAVE (Semi) down / up transposes the
entire keybed a semitone down / up. For more information, refer to Transpose and Fixed Velocity
Buttons.
(11) Preset and Page buttons: The PRESET up / down buttons let you skip to the next or previ-
ous Preset file of the loaded Product. The Page left / right buttons let you skip to the next parame-
ter page and thus remap the knobs and displays to another set of parameters.
Rear View
KOMPLETE KONTROL S49 rear view.
(1) Kensington Lock: Allows you to attach a Kensington Lock to secure your device from theft.
(2) MIDI IN/OUTsocket: Connect devices for MIDI control. For more information, refer to Connect-
ing External MIDI Equipment to the Keyboard.
(3) Pedal A and Pedal B sockets: Connects sustain and expression pedals. For more informa-
tion, refer to Connecting Pedals to the Keyboard.
(4) PSU socket (15V - 1.2A): Connects the optional power supply which can be purchased sepa-
rately in the Native Instruments online shop.
(5) USB connector: Connects the keyboard to your computer with the supplied USB cable.
(6) Power button: Switches the keyboard on and off.
6.1. Perform and Edit Section
The buttons in the Perform and Edit section on the far left of the KOMPLETE KONTROL keyboard
allow you to activate the Scale engine, the Arpeggiator, and also access their parameters. The pa-
rameters are visible in the display and can be adjusted using the knobs in the Control section.
Keyboard Overview
36