
User's Manual
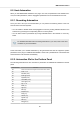
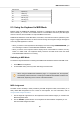


Table Of Contents
- _
- Table of Contents
- 1. Disclaimer
- 2. Welcome to KOMPLETE KONTROL
- 3. The KOMPLETE KONTROL Workflow
- 4. Setting up KOMPLETE KONTROL
- 5. Software Overview
- 6. Keyboard Overview
- 7. Global Controls and Preferences
- 8. MIDI Communication
- 9. Using the MIDI Assignment Editor
- 10. Host Integration
- 11. Browsing the Library
- 11.1. Browser Basics
- 11.2. Opening the Browser
- 11.3. Loading Preset Files
- 11.4. Choosing Between Factory Content and User Content
- 11.5. Filtering Preset Files by Product
- 11.6. Filtering Preset Files by Bank
- 11.7. Resetting the Product Selection
- 11.8. Types and Characters Tags
- 11.9. Working with Favorites
- 11.10. Performing a Text Search
- 11.11. Displaying Preset File Information
- 11.12. Auditioning your Preset Files
- 12. Working with Effects
- 13. Working with Loops and One-Shot Samples
- 14. Managing the Library
- 14.1. Saving Preset Files to the User Library
- 14.2. Deleting User Preset Files from the User Library
- 14.3. Editing the Tags and Properties of User Preset Files
- 14.4. Syncing Multiple Instances
- 14.5. Working with the Files Pane
- 14.6. Loading VST Plug-ins
- 14.7. Installing NKS Instruments
- 14.8. Importing KOMPLETE KONTROL-Compatible User Files
- 15. Controlling Instrument, Loop, One-shot and Effect Parameters
- 16. Smart Play – Playing and Editing Scales and Chords
- 17. Smart Play – Playing and Editing Arpeggiator Sequences
- 17.1. Playing Arpeggiator Sequences
- 17.2. Using a Sustain Pedal to Control the Arpeggiator
- 17.3. Using Arpeggiator Snapshots on the Keyboard
- 17.4. Editing the Arpeggiator
- 17.5. MAIN Parameters
- 17.6. RHYTHM Parameters
- 17.7. OTHER Parameters
- 17.8. ADVANCED Parameters
- 17.9. RANGE Parameters
- 17.10. HOLD Parameter
- 18. Envelopes

8.4. Using the Keyboard as Stand-Alone MIDI Controller
If you power up the KOMPLETE KONTROL keyboard without a USB connection (while the power
supply is connected), you can use it as a stand-alone MIDI controller by connecting MIDI devices
to the 5-pin DIN MIDI sockets on the keyboard’s rear panel.
The keybed and the controls on the keyboard send out the following MIDI messages:
Control Element Message
Type
CC# Mode / Type Range /
Values
Control Function
Pedal A Controller Tip 64
Ring 65
Gate 0-127 Damper Pedal On /
Off (Sustain)
Pedal B Controller 11 - 0-127 Expression Control-
ler
Pitch Wheel Pitch Bend - - 0-16384 Pitch Bend
Modulation Wheel Controller 1 - 0-127 Modulation Wheel or
Lever
Touch Strip Controller 11 Mode: Standard
Display: Unipolar
LED Mode: Bar
0-127 Expression Control-
ler
Knob 1 Controller 14 Absolute 0-127 Undefined
Knob 2 Controller 15 Absolute 0-127 Undefined
Knob 3 Controller 16 Absolute 0-127 General Purpose
Controller 1
Knob 4 Controller 17 Absolute 0-127 General Purpose
Controller 2
Knob 5 Controller 18 Absolute 0-127 General Purpose
Controller 3
Knob 6 Controller 19 Absolute 0-127 General Purpose
Controller 4
Knob 7 Controller 20 Absolute 0-127 Undefined
Knob 8 Controller 21 Absolute 0-127 Undefined
Button 1 Controller 112 Toggle (Action on
Down)
Off 0 / On 127 Undefined
Button 2 Controller 113 Toggle (Action on
Down)
Off 0 / On 127 Undefined
Button 3 Controller 114 Toggle (Action on
Down)
Off 0 / On 127 Undefined
Button 4 Controller 115 Toggle (Action on
Down)
Off 0 / On 127 Undefined
Button 5 Controller 116 Toggle (Action on
Down)
Off 0 / On 127 Undefined
Button 6 Controller 117 Toggle (Action on
Down)
Off 0 / On 127 Undefined
Button 7 Controller 118 Toggle (Action on
Down)
Off 0 / On 127 Undefined
Button 8 Controller 119 Toggle (Action on
Down)
Off 0 / On 127 Undefined
MIDI Communication
67