
User's Manual


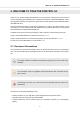

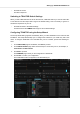
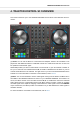
Table Of Contents
- _
- Table of Contents
- 1. Disclaimer
- 2. Welcome to TRAKTOR KONTROL S3
- 3. Setting up TRAKTOR KONTROL S3
- 4. TRAKTOR KONTROL S3 Overview
- 5. Tutorials
- 5.1. Mixing Your First Tracks using Sync
- 5.2. Browsing and Loading Tracks
- 5.3. Controlling Track Playback
- 5.4. Previewing Tracks using the Cue Channel
- 5.5. Adjusting Volume Levels
- 5.6. Using the Equalizer to Tweak Your Sound
- 5.7. Adjusting Track Tempo
- 5.8. Locking the Key of Tracks
- 5.9. Playing with Mixer Effects
- 5.10. Playing with Cue Points
- 5.11. Playing with Loops
- 5.12. Mixing Tracks Using Jog Wheels
- 5.13. Using Flux and Reverse Modes
- 5.14. Working with the Preparation List
- 5.15. Correcting Beatgrids of Tracks

3. SETTING UP TRAKTOR KONTROL S3
To configure the S3 for use, you should have already installed TRAKTOR PRO 3 software using
NATIVE ACCESS. If this is not the case, follow the instructions under this link Registering and In-
stalling a Native Instruments Product using NATIVE ACCESS.
This section describes how to set up the TRAKTOR KONTROL S3. When all devices are connec-
ted your setup will look like a typical setup as depicted in the following illustration:
TRAKTOR KONTROL S3 setup.
3.1. Connecting to the Computer
To connect the TRAKTOR KONTROL S3 to your computer:
1. Connect the device end of the included USB cable to the USB socket on the rear panel of
your S3.
2. Connect the computer end of the USB cable to an available USB 2.0 port (or later) on your
computer.
3.2. Connecting an Amplification System
To connect your power amplifier system to the TRAKTOR KONTROL S3:
• Connect the MAIN OUT XLR or RCA outputs on the rear panel of the TRAKTOR KONTROL
S3 to the inputs of your amplification system using the appropriate cables.
Setting up TRAKTOR KONTROL S3
3