
Installation & Assembly


E. APRON FRONT SINK INSTALLATION:
1. Make a template and cutout. For built-up mount, cut countertop along
the outside line of basin prole. After centering the basin and allowing for
faucets, handles and backsplashes, use a pencil to outline the basin as your
guide for the cut-out, allowing for any reveal (if desired) before the actual cutting.
Depending on the installation type, make proper cut-out in the countertop.
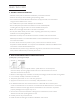
2. Create a custom support using 2x4’s that will adequately hold the weight
of the sink from underneath. We highly recommend using a professional
installer to install your Native Trails sink.
3. Place the sink on top of cabinet or into the cabinet front cut-out.
Apply silicone as a gasket between sink and cabinet.
4. Apply a bead of silicone around top edge of sink. Place countertop on the sink.
Make sure that it is centered properly. Remove any excess silicone from
the lip or any surfaces.
5. Install the drain according to the drain’s installation instructions. When cleaning
up after installation do not use abrasive cleaners, as they may scratch and
alter the sink surface and nish. Use warm water, a soft cloth and a non-abrasive
soap (such as dish soap) to clean the surface. Refer to Care and Maintenance
Instructions for further information.
G. BATHTUB INSTALLATION:
Before Installation:
• Unpack and inspect the tub for damage. Place on throw rug or other
protective oor covering to prevent damage to the bath or oor.
• Make sure the ooring oers adequate support for the tub, and verify
that the sub oor is at and level.
• Ensure proper access to the nal plumbing connections.
• For tub protection, position a clean drop cloth or similar material in the
bottom of the tub. Be careful not to scratch the surface of the tub.
Installation:
1. Place the tub onto an adequately supported level oor.
2. Install the drain to the bath according to the drain manufacturer’s instructions.
DO NOT connect the trap at this time.
3. With help, carefully move the tub into place.
4. Provide access to all plumbing connections to simplify future maintenance.
5. Insert the drain tailpiece into the trap.
6. Connect the trap to the drain according to the drain’s installation instructions.
7. Install the faucet valving according to the faucet manufacturer’s instructions.
8. Open the hot and cold water supplies and check all connections for leaks.
9. Fill the tub to the overow and check for leaks.
After Installation:
• When cleaning up after installations, DO NOT USE ABRASIVE CLEANERS,
as they may scratch and change the tub surface.
• Use warm water, a soft cloth and a non-abrasive soap (such as dish soap) to clean the surface.
• Refer to the Care and Maintenance instructions for further information.
Please visit nativetrailshome.com for more information and to download product specications