
Installation Guide

COMMERCIAL AND RESIDENTIAL INSTALLATION INSTRUCTIONS
UNICLIC Installation Video available on YouTube
Monday, January 11, 2021
15. BOWED FLOORS BOARDS We aim to manufacture boards that are flat lengthwise to make the floor easy to lay.
However, a board that bows can be installed without it affecting the finished floor. Do not forget to stagger the end
joints in accordance with the installation instructions. Contact Us.
16. MAXIMUM FLOOR SIZE Note: Larger rooms require additional expansion space. Add 1/16” to the width of the
expansion space for every 3’ the room extends beyond 25’. Dimensions exceeding 40’in length or width – it is
recommended to use a T-Molding for proper expansion.
FLOATING ENGINEERED FLOOR
REQUIREMENTS
PRE-INSTALLATION CHECK LIST MUST BE FOLLOWED
A FLOATING FLOOR EXPANDS AND CONTRACTS WITH SEASONAL CHANGES. Do not put fasteners (nails, screws, etc.) through the floor or
“pinch” the floor under doorways, etc. This could cause the floor to pull apart or buckle because it is not allowed to “float” freely.
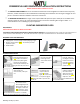
REQUIRED TOOLS AND MATERIALS
1. Pull bar - used at ends of installation in tight areas.
2. Tapping block -used to engage boards by tapping tongue
3. Wood or plastic spacers (1/4”) -to maintain perimeter
expansion space.
4. Rubber Mallet
INSTALLATION PROCEDURE
1: First board, first row.
Leave an expansion gap of
1/4” width to the left and
position the plank against
the starter wall. (Helpful
Hint: Skip to review step 10
notes below regarding the last row, then come
back to continue.)
2. Second board,
first row. Place this
board tight to the
short end of the first
board.
4: At the end of the
first row, measure
the length of the last
board to fit. Be sure
leave the expansion
space of 1/4” at the
end of the row.
3: Once you have
determined your
measurement, make your
cut.
4. Second row. The
first board (in any
row) should be at
least 8” in length.
Again, be sure to leave
an expansion gap of
1/4” against the wall as you start the
second row.
5. After 3 rows are
installed, slightly pull
the entire 3 rows
away from the long
wall to for your 1/4”
expansion. Then
continue installing each additional row
as instructed above.
6. For the last row, you
will need to cut the
board lenghtways to fit
against the far wall. Do
not forget to leave the
1/4” expansion, and it
is not reccomended for
the last board to be less than 1 ¼” in width
(which may mean adjustments to the first row.