
Installation Guide

3! !
NAIL DOWN INSTALLATION FOR SOLID STRAND WOVEN
BAMBOO
Make sure subfloor is tested for moisture content first and is
properly prepared.
IMPORTANT: Due the extreme hardness of solid strand woven
bamboo, particular care must be taken by the installer to ensure
that the appropriate nailer, proper cleats nails, and the correct PSI
settings are used to create a successful installation without
damaging the floor. Natural Floors takes no responsibility for
damage incurred to the floor as a result of improper installation.
This includes damage to the surface or tongue of the plank.
Natural Floors recommends using ONLY 18 gauge cleat nailer and
cleat nails 1-1/4” to 1-1/2” depending on whether the subfloor is
plywood or OSB. Failure to adhere to Natural Floors’
recommended cleat nailer and cleat nail guidelines may void the
warranty. Choice of appropriate power nailer and selection of
proper PSI settings are the sole responsibility of the home
owner/installer.
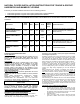
Natural Floors has successfully tested the power nailers listed
below. The PSI settings can range from 65-100 so it is important
to test nail a plank or planks to determine the correct PSI required
to install the floor without incurring damage. Check with the
power nailer manufacturer for specific PSI recommendations for
installing solid strand woven bamboo flooring.
Nailer
Adapter
Shoe
Manufacturer URL
Porta-Nailer 402
Hammerhead Floor
Nailer Kit
Yes
www.porta-nails.com
Powernail 50P and
50M
Yes
www.powernail.com
Bostitch MIIIFN –
Hardwood Flooring
Cleat Nailer
Yes
www.bostitch.com
Senco SHF10 &
SHF15 Manual
Hardwood Flooring
Cleat Nailer/SHF50
Pneumatic Hardwood
Flooring Cleat Nailer
N/A
www.senco.com
Porter-Cable
N/A
www.deltaportercable.com
Make sure subfloor is tested for moisture content first and is properly
prepared. Use an air nailer compatible with profile of flooring material
(or) a nailer of your choice. Test on a sample to make sure that nailing
will not cause dimpling (localized raised edges) in the finished floor or
damage to the tongue. (Note: be sure to look at the face of the
installed flooring at a low angle from a distance to see if dimpling
is occurring as it is hard to see when directly above the floor.) If
dimpling does occur, STOP and adjust the nailer shoe and angle/place
of cleat entry in order to avoid it. NATURAL FLOORS is not
responsible for dimpling or damage to the tongue.
For the first and second starting rows: lay first plank inside chalk line
with grooved edge toward wall. Install entire first row in the same
manner. Always leave at least a 3/8” expansion space between
flooring and all walls and vertical objects (such as pipes and cabinets).
Use wood or plastic spacers during installation to maintain this
expansion space. In order to affix the first rows, as it is difficult to get
the nail gun in place next to the wall, you will need to face nail them or
glue them to the floor. If face nailing, you must fill nail holes with wood
putty that matches the floor. You may wish to set these rows in mastic
and glue them down rather than face nailing them and leaving
unsightly nail holes which must be filled with putty to match the wood
floor.
After gluing down these starting rows with manufacturer’s
recommended adhesive, set weight on top of these rows and allow
them to set before commencing stapling/nailing the additional rows, as
nailing the adjacent rows may cause the starting rows to subsequently
move. Make sure the starting rows are straight and drawn tight.
Subsequent rows: Lay by using floor nailer/stapler to blind-nail top
inside edge of tongue at a 45 degree angle. Nail each board every 8”
and within 2” of each end. Remember to stagger end joints from row
to row at least 8” apart and use a tapping block to fit boards together.
It may be necessary to face-nail in doorways or tight areas where the
nailer can’t fit, (or glue down in these areas and weight them while the
mastic sets). The last two rows will need to be face-nailed, (or glued
down), in the same manner as the first two rows.
Always make sure to visually check the installed floor as you go to
ensure that the nailing is not causing dimpling on the face. (Note: be
sure to look at the face of the installed flooring at a low angle
from a distance to see if dimpling is occurring as it is hard to see
when directly above the floor.) If dimpling does occur, STOP and
adjust the stapler/nailer shoe and angle/place of staple entry in order to
avoid it. NATURAL FLOORS is not responsible for dimpling.
GLUE DOWN INSTALLATION
Make sure subfloor is tested for moisture content first and is
properly prepared.
On concrete subfloors, which are on or above grade (ground level),
always assume the worst even if they measure dry. We recommend
taking the following installation steps to ensure a trouble-free
installation:
! Testing and documenting moisture content prior to
installation
! Applying a sealer to the subfloor as needed.
Use flooring adhesive recommended by NATURAL FLOORS. Use of
another manufacturer’s adhesive may result in failure and void
warranty. Follow adhesive manufacturer’s instructions for proper trowel
size, minimum temperature, adhesive set time and open time before
beginning installation of flooring.
Once the spread adhesive has setup sufficiently per adhesive
manufacturer’s instructions, lay the first row of flooring with groove
facing the wall, and continue laying flooring. Always check your
working lines to be sure the floor is still aligned. Use tapping block to
fit planks together, but be careful not to let installed floor move on the
wet adhesive while you are working. Always leave at least a 3/8’’
expansion space between flooring and all walls and vertical objects
(such as pipes and cabinets). Use wood or plastic spacers during
installation to maintain this expansion space. Remember to stagger
end joints from row to row at least 8” apart.
When first section is finished, continue to spread adhesive and lay
flooring section by section until installation is complete. Use a damp
cloth to IMMEDIATELY REMOVE ANY ADHESIVE that gets on the
flooring surface. If adhesive cannot be completely removed with a
damp cloth, use the manufacturer’s recommended adhesive remover.
Never let flooring adhesive dry completely on the finished surface.
Walk each section of flooring in order to make sure it is well bonded to
the subfloor with the adhesive working time. Flooring planks on the
perimeter of the room may require weight on them until adhesive cures
enough to hold them down.
FLOATING INSTALLATION
Make sure subfloor is tested for moisture content first and is
properly prepared.
Floating installation method should only be used on engineered
floors measuring at least 5” in plank width.
When using Natural Cork CorkShield underlayment, no additional
moisture barrier is necessary. If using an alternative 1/8” thick pad and
installing below or on grade, polyfilm is required.
Laying polyfilm: Lay 6-mil polyfilm with seams overlapped 8”. Fasten
seams every 18-24” with duct tape. Run the outside edges of film up
perimeter of each wall 4”. Trim after flooring installation is complete.
Laying pad: Lay underlayment by butting edges, not overlapping.
Tape full length of the seam with duct tape. Leave ½” space between
pad and all walls and permanent vertical fixtures.
Installing the floor: start first row with groove toward wall. Glue end
joints of first row by applying a small but continuous bead tongue and
groove adhesive or PVAC glue to bottom side of the groove. Always
leave at least a 3/8” expansion space between flooring and all walls
and vertical objects such as pipes and cabinets. Use wood or plastic
spacers during installation to maintain this expansion space. Lay
subsequent rows of flooring by applying glue to side and end joints and
fitting planks together with a tapping block. Remember to stagger end
joints from row to row at least 8” apart.
Clean up any adhesive that is on the face of the floor by using a damp
rag – DO NOT allow adhesive to dry on the flooring face as it is difficult
to remove without damaging the finish.