
Installation Guide

Tile Roof Inst allation
10821 North 23rd Avenue, Suite 1, Phoenix, Arizona, 85029
office 602-485-5984 toll-free 800-363-9865 www.nltubular.com
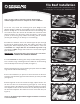
1. On the roof, locate the centering hole (from Step 4 of the
tubular skylight installation) and carefully remove surrounding tiles.
Remove enough tiles to accommodate the skirt. Place flashing over
the location where the unit will be installed and mark around the
flashing footprint onto the furring strips (see Figure 1). Remove the
portion of the furring strips where the flashing will be installed
(allowing the flashing to sit directly on roof sheathing).
2. Outline the diameter of the hole that the pipe will pass through
by turning the flashing upside down and marking the inside of the
flashing unit. With a reciprocating saw, cut the diameter of the hole
a minimum of 1” larger than the area marked in previous step
(see Figure 2). NOTE: A larger hole can be cut to accomodate angled
pipe installations.
IMPORTANT:
The light pipe must pass between the roof rafters.
DO NOT CUT THROUGH ANY FRAMING MEMBER.
3. Caulk underside of flashing with the provided caulking material.
Two concentric rings of caulking material is sufficient. Secure flashing
with the Phillips head screws provided (see Figure 3).
4. Install the flashing skirt over the flashing and press down the rubber
ring all around the installed flashing.
5. For S-tile installations, an optional 3” turret extension can be used.
Slip turret over the flashing lip and secure with the (4) screws provided
(see Figure 4).
6. At the high side of the roof towards the ridge, replace the tiles over
the skirt. Cut tiles to fit around flashing (see Figure 4). Some furring
strips may need to be replaced on top of flashing footprint to support
tiles. Replace the tiles on the low side of the roof, but keep skirt above
the tiles and reshape the skirt aluminum to form around the tiles (see
Figure 5).
Return to the Natural Light Tubular Skylight installation instructions
to finish installation.
Figure 2
Figure 1
Figure 3
cut tiles to fit
around flashing
Figure 4
Figure 5
Please use this install in conjunction with the Natural Light
Tubular Skylight instructions to complete the entire installation.