
User Guide


1. Visit www.trackir.com to download the latest version of the TrackIR software. Save the installer to your
desktop.
2. Right click on the installer and select "Run as Administrator" then follow installation instructions.
3. (Note: Windows Security may display a warning message that it can’t verify the publisher of the driver
software. Click to install the driver software anyway. The drivers WILL NOT harm your system.)
4. When installation is complete, a TrackIR icon will appear on your desktop.
5. Plug the TrackIR into a USB port on your computer. For best results, directly connect the TrackIR into a
USB port on your computer. We do not recommend using a USB hub of any kind.
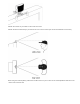
6. Place the unit on top of your monitor with the front facing the same direction as the monitor screen.
7. Double click on the newly created TrackIR icon on your desktop to open the TrackIR software program.
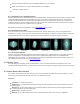
8. Hold the TrackClip in front of the TrackIR unit. With the reflective material facing the TrackIR unit, slowly
move the vector clip back and forth in front of the TrackIR unit from about an arm’s length away. If the left
green indicator light comes on, you have installed the TrackIR unit and software correctly. If the light
does not come on, please consult the troubleshooting guide at the back of this manual.
9. If you encounter further problems with this procedure, please consult the troubleshooting guide at the end
of this manual.
10. To ensure compatibility with recently released TrackIR Enhanced games, check for software and game
updates immediately after installation. If updates are installed, restart the software.
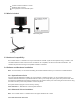
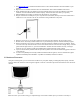
3.5 Hardware Placement
Using the mounting base, you can secure the TrackIR to any computer display, including flat panel, laptop, and CRT
screens. Attach the camera to base using the magnetic connector. The base may be disconnected from the camera as
needed.
Place the unit on your monitor facing you. Adjust the legs on the base to either clip to your monitor or sit atop it.