
Instructions/Assembly Guide


25
From the PowerUp Mode screen, push the User button to select one of the User Pro¿les. The Console will display the
name of the User Pro¿le and the User Pro¿le Icon.
Edit User Profile
1. From the PowerUp Mode screen, push the User button to select one of the User Pro¿les.
2. Push the OK button to select it.
3. The Console display shows the EDIT prompt and the current User Profile name. Push OK to start the Edit User Pro¿le
option.
To e [it the Edit User Pro¿le option, push the PAUSE/END button and the console will go back to the PowerUp Mode
screen.
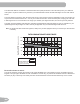
4. The Console display shows the NAME prompt and the current User Profile name.
Note: The User name will be blank if this is the first edit. The name of a User Profile is limited to 10 characters.
The currently active segment will flash. Use the Increase/Decrease buttons to move through the alphabet and blank
space (found between A and Z). To set each segment, use the Left(e) or Right(f) buttons to shift between segments.
Push the OK button to accept the displayed User name.
5. To edit the other User data (EDIT AGE, EDIT WEIGHT, EDIT HEIGHT, EDIT GENDER), use the Increase/Decrease
buttons to adjust, and push OK to set each entry.
. The Console display shows the SCAN prompt. This option controls how the workout values are displayed during a
workout. The “OFF” setting allows the user to push the Right(f) or Left(e) buttons to view the other workout value
channels when desired. The “ON” setting allows the Console to automatically display the workout value channels
every seconds.
The default is “OFF”.
Push the OK button to set how the workout values are displayed.
7. The Console display shows the WIRELESS HR prompt. If you are using the Console speakers at their higher settings
and / or using a larger sized personal electronic device, the Console may show Heart Rate interference. This option
allows the Telemetry Heart Rate Receiver to be deactivated blocking the interference.
The Upper Display shows the current value setting “ON” or “OFF”. Push the Increase(c) or Decrease(d) buttons to
change the value.
The default is “ON”.
Push the OK button to set the Telemetry Heart Rate Receiver to active.
8. The Console display shows the EDIT LOWER DISPLAY prompt. This option allows you to customize which Workout
9alues are displayed during a workout.
The Lower Display will show all of the workout values, with the active Workout 9alue flashing. The Upper Display shows
the active value setting “ON” or “OFF”. Push the Increase(c) or Decrease(d) buttons to hide the active workout
value, and push the Left(e) or Right(f
) buttons to shift the active value.
Note: To show a hidden workout value, repeat procedure and change Upper Display value to “ON” for that value
When done with customizing the Lower Display, push the OK button to set it.
Hr
9. The Console will go to the PowerUp Mode screen with the user selected.