
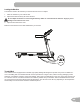
Operation Manual


30
Bluetooth
®
Connectivity with the “Nautilus Trainer™” Fitness App
ThistnessmachineisequippedwithBluetooth
®
connectivity and can wirelessly sync with the “Nautilus Trainer™”
FitnessApponsupporteddevices.TheSoftwareAppsyncswithyourtnessmachinetotracktotalcaloriesburned,time,
distance, and more. It records and stores every workout for quick reference. Plus, it automatically syncs your workout
data to Nautilus Connect™, MyFitnessPal
®
, and Under Armour
®
Connected Fitness to make hitting your daily calorie goal
easier than ever! Track your results and share with friends and family.
1. Download the free Software App, named Nautilus Trainer™. The software app is available on iTunes
®
and Google
Play™.
Note: For a complete list of supported devices, review the software app on iTunes
®
or Google Play™.
2. FollowtheinstructionsontheSoftwareApptosyncyourdevicetoyourexercisemachine.
TouploadyourworkoutletotheNautilusConnect™website,andthenMyFitnessPal
®
and Under Armour
®
Connected
Fitness:
1. Select the Options tab in the upper left corner of the Software App, and click on “Settings”.
2. Select the “Nautilus Connect” option. Sign in to your account or create a new account. To create a new account, click
on the “Create New Account” option and follow the instructions.
3. To sync your workouts, click on the “Nautilus Connect” option, and then the “OK” button.
Note: The “Nautilus Trainer™” Fitness App will automatically sync your workouts after the initial syncing.
4. To sync your workout data with MyFitnessPal
®
or Under Armour
®
Connected Fitness programs, select the “Services“
option and login with your information.
Note: The “Nautilus Trainer™” Fitness App will automatically sync your workouts after the initial syncing.
Track Your Results at www.nautilusconnect.com with a USB Flash Drive
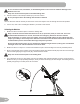
ThistnessmachineisequippedwithaUSBPortandcanexportyourWorkoutResultstoaUSBFlashDrivetobe
uploaded to the Nautilus Connect™ website, and then to MyFitnessPal
®
and Under Armour
®
Connected Fitness. With
theWorkoutsexportedfromthetnessmachine,connecttheUSBFlashDrivetoacomputeranduploadtheletoyour
Nautilus Connect™ account.
Note: USBFlashDrivesmustbe16GBorsmallerinsizeandformattedinFAT32.Donotuseamicro-USBdrive.
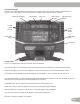
1. FromthePower-Upscreen,pushtheUserbuttontoselectthedesiredUserProle.
2. Insert the USB Flash Drive into the USB Port on the Console.
3. TheConsolewilldisplay“SAVINGTOUSB”,andthen“DONOTREMOVE”.ThecurrentUserProlewillbeginto
ash,showingtheWorkoutResultsarebeingexportedtotheUSBFlashDrive.DonotremovetheUSBFlashDrive
untiltheUserProledoesnotashandtheConsoledisplays“REMOVEUSB”.
Note:IftheWorkoutResultsontheUSBFlashDrivearecurrent,theConsolewillnotexporttheleagain.Asmore
workoutsarecompleted,theConsolewilltakelongertoexportalloftheWorkoutResults.Forlongerexports,the
Consolewilldisplayanexportstatuscount(exportedworkouts/totalnumberofworkouts).
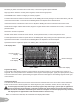
4. WhentheexportiscompletetheUserProlewillstopashing,theConsolewilldisplay“USBCOMPLETE”,followed
by the “REMOVE USB” prompt. It is now safe to remove the USB Flash Drive.
5. TheConsolewilldisplaythePower-UpModescreen.
IfaWorkoutiscompletedwithaUSBFlashDrivealreadyinserted,theConsolewillnotexportthenewWorkout
ResultsuntiltheConsoleexitstheResultsmodeanddisplaysthePower-UpModescreen.