
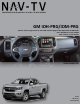
Installation Manual


BHM
08/31/16
NTV-DOC238
Agreement: End user agrees to use this product in compliance with all State and Federal laws. NAV-TV Corp. would not be held liable for misuse of its product.
If you do not agree, please discontinue use immediately and return product to place of purchase. This product is intended for off-road use and passenger
entertainment only.
4 | P a g e
GM IO-PRG Camera Installation
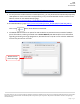
The camera in the GM MyLink systems connects at the OEM HMI Module. The location of this module varies
by vehicle.
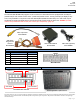
1. Disconnect the gray, 12-pin plug from the OEM
HMI circled above.
2. Cut the wires at pins 5 & 6 in half (typically
gray/yellow, white/blue), a few inches from the
connector.
3. Solder the provided Video Input RCA to the plug-
side of the cut wires as follows:
4. Reconnect the 12-pin plug back to the HMI module at the proper port.
5. Power your camera, and connect your camera signal to the provided RCA end from step 3. Place the
vehicle in reverse to verify the camera image appears clear with no distortion.
Vehicle
HMI Location
Cadillac ATS/CTS
Directly below glove box
Cadillac SRX
Below/behind glove box
Corvette
Driver’s kick panel
Camaro
Beneath glove box
Silverado/Sierra
Behind glove box (high)
Colorado/Canyon
Behind screen (low)
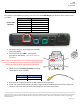
Provided RCA
Factory wires
RCA Center
PIN 5, Gray/Yellow
RCA Shield
PIN 6, White/Blue
NOTE: the wires at this location are normally populated (existing).
If not, you must pop the pin-lock tab open and populate the pin
location as shown with the supplied Video Input RCA.
Factory GM HMI (Human Machine Interface)
Known HMI
Locations:
Pin Side View