
Installation Manual

BHM
11/21/17
NTV-DOC242
Agreement: End user agrees to use this product in compliance with all State and Federal laws. NAV-TV Corp. would not be held liable for
misuse of its product. If you do not agree, please discontinue use immediately and return product to place of purchase. This product is
intended for off-road use and passenger entertainment only.
3 | P a g e
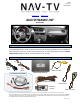
AUDI-DYN-INT Installation
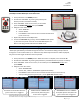
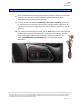
1. Remove the factory screen. This requires removing the plastic screen bezel and then
(4x) Torx T20 screws. Disconnect the 10-pin harness from the screen and set the screen
aside.
2. Remove the factory radio (CD player). Disconnect all harnesses and set the radio aside.
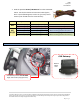
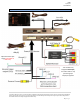
3. Connect the provided LVDS-OUT Cable to the OEM screen.
This connector is keyed and will only fit in one direction. The
other end of this cable connects to the interface at the port
labeled ‘LVDS OUT’.
4. Connect the provided LVDS-IN Cable to OEM 10-pin square connector previously
connected to the screen (removed in step 1). The other
end of this cable connects to the interface at the port
labeled ‘LVDS IN’.
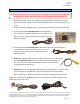
5. Optional: If adding an additional video input (front camera etc.), connect the
provided Video Input RCA to the port on the AUDI interface labeled ‘AV
IN’. Connect the video signal to this RCA, be certain the video source
is powered with an ACC source.
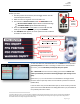
6. Optional: If this car is not equipped with OEM rear parking sensors, you may turn the
visual overlay off in the OSD menu system (see page 5 for menu information).
Note: If adjusting any OSD menu settings, temporarily connecting the provided AV
toggle switch and IR-Eye is required. Both harness connectors are located among the main
power harness (2-pin & 3-pin).
ATTENTION INSTALLER: All connections (including CAN) must be made BEFORE
connecting the power harness to this unit for proper startup operation.