
Operation Manual


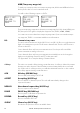

Table Of Contents
- Section 1 - General information
- Section 2 - Basic operation and key functions
- Section 3 - Radio MENU SELECT options
- 3-1 Manage your waypoints list (WAYPOINT)
- Section 4 - Radio setup menu (RADIO SETUP)
- 4-1 Channel (UIC)
- 4-2 Channel names (CH NAME)
- 4-3 Ring volume (RING VOLUME)
- 4-4 Key beep volume (KEY BEEP)
- 4-5 Select units (UNITS)
- 4-6 Internal speaker connections (INT SPEAKER)
- 4-7 Set the priority channel (WATCH MODE)
- 4-8 Weather alerts (WX ALERT)
- 4-9 NMEA protocol (COM PORT)
- 4-10 Select the GPS source (GPS SOURCE)
- 4-11 Favourite channel setup - Wx key (FAV CH SETU)
- 4-1 Channel (UIC)
- Section 5 - DSC setup menu (DSC SETUP)
- 5-1 Enter or view your USER MMSI (USER MMSI)
- 5-2 Maintain your groups
- 5-3 Enter or check your ATIS MMSI (ATIS MMSI)
- 5-4 Enable ATIS functionality (ATIS SELECT)
- 5-5 Response to individual calls (INDIV REPLY)
- 5-6 Enable DSC functionality (DSC FUNC)
- 5-7 Response type to LL polling calls (LL REPLY)
- 5-8 Automatic channel switching (AUTO SWITCH)
- 5-9 DSC Test Reply (TEST REPLY)
- 5-10 Set the inactivity timer (TIMEOUT)
- 5-1 Enter or view your USER MMSI (USER MMSI)
- Section 6 - AIS setup menu (AIS SETUP)
- Section 7 - Wireless handset setup menu (HS SETTING)
- Section 8 - Sending and receiving DSC Calls
- 8-1 What is DSC?
- 8-2 Sending DSC Calls
- 8-3 Send an individual call (INDIVIDUAL)
- 8-4 Acknowledgement of an individual incoming call (INDIV)
- 8-5 Reply to the Last Call (LAST CALL)
- 8-6 Send a group call (GROUP)
- 8-7 Send an all ships call (ALL SHIPS)
- 8-8 Send using the call log (CALL LOG)
- 8-9 Send using the distress log (DIST LOG)
- 8-10 View sent call log (SENT CALL)
- 8-11 Request the LL position of a Buddy (LL REQUEST)
- 8-12 Track your Buddy (TRACK BUDDY)
- 8-13 Make a DSC test call (DSC TEST)
- 8-14 View user MMSI and GPS information
- 8-15 Receiving DSC calls
- 8-16 Receiving an all ships call (ALL SHIPS)
- 8-17 Receiving an individual call (INDIV)
- 8-18 Receiving a group call (GROUP)
- 8-19 Receiving a geographic area call (GEOGRAPH)
- 8-20 Receiving a polled position call (POSITION)
- 8-1 What is DSC?
- Section 9 - DISTRESS calls
- Section 10 - AIS functionality
- Section 11 - General functionality
- Section 12 - Wireless Handset functionality

• your current course (128°) and speed (5.0Kt)
• your latitude (55°33.122N) and longitude (012°42.408E) and UTC time displayed in 24
hour format (14:43 - 2:43pm)
• the name of the destination waypoint (FISH), its bearing (275°), your distance in nautical
miles, mile, or kilometres (depending on your choice of units) - in this case, 800nm, and
the cross track error (XTE - 0.00) are shown.
All the symbols that may appear on the LCD are explained here:
Symbol Meaning
TX
Transmitting.
Receiver busy with an incoming signal.
SCAN
Scanning for the broadcasting channel. Press PTT to stop scanning.
When the broadcasting channel is found, scanning stops at that
channel.
DW
Dual watch mode.
TRI
Tri watch mode.
DSC
DSC function is enabled.
ATIS
ATIS is enabled for use in European inland waterways. Otherwise,
blank.
AIS
AIS function is enabled.
Incoming DSC call, or blinks to notify you of any unread call log
messages.
DISTRESS Channel name tag.
55 33.122N Your latitude.
012
4
2.408E Your longitude.
14:43 UTC Time (UTC). Local time has suffix LOC (for example; 12:30pm LOC).
16 Channel selected.
LOCAL
Local calling is selected. Otherwise, blank for distance calling.
SKIP
Channel is temporarily deleted ‘skipped’ from the SCAN operation.
A
Channel suffix, if applicable - A or B - otherwise blank.
CH1
Shows which of the 3 favorite channels, if any, are selected.
CH1, CH2, CH3 - otherwise blank.
Hi
Transmission power. High (Hi) 25 W or Low (Lo) 1 W.
INT
Selected channel bank for VHF radio operations and regulations.
INT=International; USA=USA; CAN=CANADA.
Wx
Weather channel.
Weather alert. US only.
SAME
Specific Area Message Encoding. US only.
BUSY
1-2 Customizing your Simrad VHF radio
You can customize the radio to suit your individual preferences. Some preferences can be set
directly through the keys as explained in this section.
Other preferences are set up through the built-in menus and these are explained in the other
sections.
1-3 How to display and navigate menus
1. Press MENU (or CALL) key.
2. Some line items may show an ▲ or ▼ indicator. This means there is more information
available to show. Scroll (rotate the Rotary knob, or use + / - keys on the handset mic) to
scroll up and down the menu until the cursor is positioned at the desired option. Press
ENT (press the Push To Select) to display that option.
3. Make any entries or changes as explained in the following section.
4. Press ENT to confirm changes. Otherwise, press EXIT to keep the original entry.
5. Press EXIT to backup one screen (this key is equivalent to an ESC function on a PC).
1-4 How to enter alphanumeric data
If your radio does not have the optional alphanumeric microphone, you can rotate the rotary
knob, or use +/- keys on the handset mic to enter alphanumeric data.
• Press - to count through numbers, or hold down to scroll rapidly to the desired number
• Press + to step through the alphabet, or hold down to scroll rapidly to the desired character
• If you make an error, press - until < is displayed, then press ENT to backup and correct
the entry.
1-5 LCD symbols and meanings
A typical operational display is shown here:
The bottom line is blank when a waypoint is not selected. This operational display shows:
• the channel that you are receiving (16) and Tx power is set to high (Hi)
• the International channel bank selected (INT) and DSC is enabled (DSC)
• the channel name tag (DISTRESS)
Simrad - RS35 Operation InstructionsSimrad - RS35 Operation Instructions 98