
User's Manual


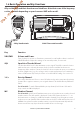
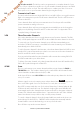
Table Of Contents
- Section 1 - General Information
- Section 2 - The Radio Menu (MENU)
- Section 3 - Radio Setup Menu (RADIO SETUP)
- Section 4 - DSC Setup Menu (DSC SETUP)
- 4-1 DSC Setup - Menu Options
- 4-2 Enter or View Your USER MMSI (USER MMSI)
- 4-3 Maintain Your Groups (GROUP SETUP)
- 4-4 Response to Individual Calls (INDIV REPLY)
- 4-5 ATIS MMSI & ATIS Functionality
- 4-6 DSC functionality options (DSC FUNC)
- 4-7 Response Type to LL Polling Calls (LL REPLY)
- 4-8 Automatic Channel switching (AUTO SWITCH)
- 4-9 DSC Test Reply (TEST REPLY)
- 4-10 Set the inactivity timer (TIMEOUT)
- 4-1 DSC Setup - Menu Options
- Section 5 - Sending and Receiving DSC Calls
- 5-1 What is DSC?
- 5-2 Sending DSC calls
- 5-2-1 Make a Routine Call (INDIVIDUAL)
- 5-2-2 Retrying a Routine Call
- 5-2-3 Acknowledgement of an Individual Incoming Call (INDIV)
- 5-2-4 Recall the Most Recent Incoming Call (LAST CALL)
- 5-2-5 Call a Group (GROUP)
- 5-2-6 Call All Ships (ALL SHIPS)
- 5-2-7 Call using the Call Log (CALL LOG)
- 5-2-8 Call using the Distress Log (DISTR LOG)
- 5-2-9 Call using the Sent Call Log (SENT CALL)
- 5-2-10 Request the LL Position of a Buddy (LL REQUEST)
- 5-2-11 Make a DSC test call (DSC TEST)
- 5-3 Receiving DSC Calls
- 5-2 Sending DSC calls
- 5-1 What is DSC?
- Section 6 - Distress Calls
- Section 7 - Installation
- Appendix A - Technical Specifications
- Appendix B - Troubleshooting
- Appendix C - US & ROW VHF Marine Channel Charts
- Appendix D - EU VHF Marine Channel Charts
- Appendix E - MMSI, FCC and License Information

Lowrance | Link-5 VHF User Guide 7
1-2 Customizing your Lowrance VHF Radio
You can customize the radio to suit your individual preferences. Some preferences can be set
directly through the keys as explained in this Section. Other preferences are set up through
the built-in menus and these are explained in the other Sections.
You can check the software version of the radio and the User MMSI each time the radio is
turned on, the screen will display the software version and the USER MMSI if one is pro-
grammed into the radio.
1-3 How to Display and Navigate Menus
1. Press MENU (or CALL). Note that only four menu items can be displayed at any one time
on the screen.
2. Some line items may show an ▲ or ▼ indicator. This means there is more information
available to show. Scroll (rotate the Rotary knob, or use + / - keys on the hand mic) to
scroll up and down the menu until the cursor is positioned at the desired option. Press
ENT (press the Push To Select) to display that option.
3. Make any entries or changes as explained in the following section.
4. Press ENT to confirm changes. Otherwise, press EXIT to keep the original entry.
5. Press EXIT to backup one screen (this key is equivalent to an ESC function on a PC)
1-4 How to Enter Alphanumeric Data
If your radio does not have the optional alphanumeric microphone, you can Rotate the
Rotary knob, or use + / - keys on the microphone key to enter alphanumeric data.
• Press - to count through numbers, or hold down to scroll rapidly to the desired number.
• Press + to step through the alphabet, or hold down to scroll rapidly to the desired
character.
• If you make an error, press - until < is displayed, then press ENT to backup and correct
the entry.
1-5 LCD Symbols and Meanings
Draft - Final approval