porsche design mobile navigation ß9611 Anwenderhandbuch User manual Manuel de l’utilisateur Gebruikershandboek Manual para el usuario Manuale utente directed by
Federal Communications Commission Requirements Warning: CHANGES OR MODIFICATIONS NOT EXPRESSLY APPROVED BY THE PARTY RESPONSIBLE FOR COMPLIANCE WITH THE FCC’ RULES ( THE FCC’ GRANTEE’ ) COULD VOID THE USER’S AUER’S AUTHORITY TO OPERATE THE EQUIPMENT. Note: This equipment has been tested and found to comply with the limits for a Class B digital devices, pursuant to part 15 of the FCC Rules. These limits are designed to provide reasonable protection against harmful interference in a residential installation.
Porsche Design® is a registered trademark Porsche Design Licensee Mobile Navigation: NAVIGON AG Schottmüllerstraße 20 A 20251 Hamburg www.navigon.com NAVIGON is a registered brand name belonging to NAVIGON AG. All trademarks used are the property of their respective owners. We are not responsible for errors and misprints. Subject to technical changes. K01000072 © 2007 NAVIGON AG und PLH | Porsche Lizenz- und Handelsgesellschaft mbH & Co. KG www.porsche-design.
[ UK ] Table of contents The crossed-through wheely bin symbol means that, within the European Union, the product must be disposed of at a recycling center. This applies both to the product itself, and to all accessories that carry this symbol. This product may not be disposed of with unsorted household waste. 52 –53 1 1.1 1.2 1.
[ UK ] Table of contents 01 Introductions 9.1 9.2 9.3 GPS status, store current location ------------------------------------------------------------------------ 83 TMC [ Traffic information ] ---------------------------------------------------------------------------------- 83 TMC Settings ----------------------------------------------------------------------------------------------- 83 10 Configuring P´ 9611 ------------------------------------------------------------------------------------ 11 11.
01 Introductions Telephone customer service Country Telephone Service times Costs Country Telephone Service times Costs Germany 01805-6284466 Monday to Saturday from 8 a.m. to 8 p.m. CET € 0.14 / min. U.S.A. +1-888-8480701 Monday to Friday from 6 a.m. to 2 p.m. EST free of charge Belgium 0900-70016 Monday to Friday from 8 a.m. to 8 p.m. CET € 0.45 / min. + € 0.05 per call Other countries +49-221-2888-999 Monday to Friday from 8 a.m. to 8 p.m.
02 Prior to commissioning 2.1 Package contents Please check that the contents of the package are complete. If this is not the case, please inform us within 14 days of purchase.
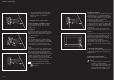
02 Prior to commissioning 2.2.5 Installing the car holder [ Fig. 3 ] [1] ! Caution ! The car holder must be affixed to the windscreen so that the view out of the windscreen is not restricted. ! Note: before installing the car holder, the windscreen should be thoroughly cleaned with a glass cleaner. The windscreen temperature should not be below 15°C. [4] [5] 1. [3] 2. [2] 3. 4.
02 Prior to commissioning 6. Touch the SETTINGS button in the START DISPLAY in order to adjust the language and brightness settings or to calibrate the touchscreen. 2.3 Turning the device on and off, Reset General information on switching on and off In order to minimize battery charge loss while reducing switch-on time, the device also has a standby mode. Fig. 4 Switching on To switch on the device, press and hold the on/off button down for 1.5 seconds.
02 Prior to commissioning – ! Do not follow the instructions of the navigation system unless the circumstances and the traffic regulations allow you to do so ! Should it be necessary to deviate from the calculated route, the navigation system will automatically calculate a new route. Note: should the spoken instructions not be clear, the map and arrow display serves as an additional aid to orientation.
04 Navigation 03 Operating the Navigation Software 3.3 Software keyboard A software keyboard appears at the bottom of the screen when text entries are necessary. All entries can be made on the software keyboard using your fingertips. Only capital letters can be entered. When entering the name of a town or street, it is not necessary to enter any special characters or umlauts. P´ 9611 replaces these characters automatically. If, for example, you are searching for “Würzburg”, then simply enter “WURZBURG”.
04 Navigation 4.2 Specifying a new destination New destinations for the P´ 9611 are all destinations that you have not yet navigated, or you have not yet stored. You can enter an address here, select a special destination, or select a destination from the quick search function. If you are entering a new destination for the first time, the COVERED COUNTRIES list opens. 5. 6. ! Tap on the country in which your destination lies. 4.2.
04 Navigation 1. Touch the 3. DESTINATION INFO button. The DESTINATION INFO window opens. It contains all information about the specified destination that is stored in the navigation system’s database. – Touch the – SHOW ON MAP button in order to show the destination on the map. Touch the button to call the destination – directly. Touch the CANCEL button to close the DESTINATION INFO window. 4.2.
05 Destination management 04 Navigation Specifying one of the points of interest as an interim destination If you wish to drive to one of the displayed points of interest, then press the INTERIM DESTINATION button to the right alongside its entry in the list. The route is recalculated. The specified point of interest is taken as the next route point. 4.7 Starting navigation The map is open in PREVIEW mode. The navigation destination is depicted by a small flag.
06 Routes with various stages It is possible to plan routes at home without GPS reception, in order to, for example, to plan a vacation route based on a defined route. 6.1 Planning routes 1. In the main window, touch the OPTIONS button. The options list opens. 2. Select ROUTE PLANNING. The ROUTE PLANNING window opens. 6.1.1 Enter the starting point The starting point of a route is the point at which you want to begin your trip. This can differ from your current location.
06 Routes with various stages 6.3.3 Starting navigation You have calculated and displayed a route. The calculation of a route is based on so-called route options. In order to view or change these settings: 1. ! Touch the ROUTE PROFILE button. Note: if you change the route profile, these changes remain valid for subsequent navigation. You can get information regarding changing individual route profiles by touching the corresponding HELP button. 2. Select START NAVIGATION or just commence your journey.
07 Options SIMULATION: Simulates navigation based on the displayed route. Simulation can only be carried out for routes of max. 100 km. GPS reception is not required for simulation. TRAFFIC: Opens the TRAFFIC INFORMATION window, in which pending reports can be listed. i For detailed information, please refer to chapter “TMC [ Traffic information ]”, page 83. STORE A VOICE COMMAND: Opens a window in which a voice command for the selected destination can be given to the device, when prompted.
08 Working with the map When you approach the junction, you will see a spot diagram instead of the distance. 1. Touch the OPTIONS button. 2. Select SETTINGS. 3. Touch BASIC SETTINGS. 4. Show or hide information. [ 4 ] A GREEN triangle shows the current position. If you display a planned or loaded route and the given starting point is not the same as your current location, then the current position may not be shown on the preview. 8.
09 Useful functions 08 Working with the map Buttons with various functions will appear. TAKE ME THERE: Begins the navigation to the selected point. Current navigation will be aborted. INTERIM DESTINATION: Sets the current destination as a way point. The navigation system will then guide you to this way point first. Afterwards, you can continue your journey to your original destination. This function is only active when you are currently navigating.
09 Useful functions 10 Configuring P´ 9611 Recalculate Route Touch RECALCULATE ROUTE to determine how new messages concerning your route should be dealt with. The SETTINGS window is the point from which you can make any modifications to match your personal preferences on the P´ 9611. The settings can be reached from the options of many windows. 1. Touch the OPTIONS button. 2. Select SETTINGS. The SETTINGS window has several buttons: CURRENT MAP, POI, BASIC SETTINGS and ROUTE PROFILE. 3.
12 Hands-free Module 11 MP3 Player The integrated MP3 player can be used to play MP3 files, even during navigation. In order to do so, MP3 files must first be copied onto the supplied memory card. Playing MP3 files Mark the directory or file in the list that you want to play. Copy MP3 files onto the device 1. Turn on navigation device. 2. Plug enclosed USB cable into the navigation device and your computer. PLAY: plays the marked file or files within the marked directory.
12 Hands-free Module If P´9611 was previously connected to your mobile phone, the connection will be established without further prompting. 12.2 Receiving a call When you receive a call, the INCOMING CALL window opens. When the relevant information is available, the name and number of the caller will be displayed. 1. Touch the PICK UP button in order to accept the call. The CALL IN PROGRESS window opens. 12.3.4 Calling a Point of Interest 1. Touch the CALL POI button in the HANDSFREE MODULE window. 2.
12 Hands-free Module 12.7.2 Speed call buttons The P´9611 hands-free module has many quick dial buttons which can be assigned individually. 1. Touch the PRESET button in the HANDS-FREE SETTINGS window. 2. Touch the speed call that is to be edited. 12.8 Configuring a connection to a mobile phone 1. Touch the OPTIONS button in the HANDSFREE MODULE window. 2. Select HANDS-FREE SETTINGS. The HANDSFREE SETTINGS window opens. Set up or edit a speed call 3. Touch the EDIT button. 4.
13 Appendix 13.1 Technical data Navigation device Processor: Intel PXA 270, 520 MHz Memory: 64 MB RAM, 64 MB ROM Expanded memory: SD memory card Power supply: 5VDC 2A [ max. ] GPS: Integrated 3rd generation GPS receiver: μ-blox Antaris 4 SuperSense TMC: Integrated TMC-antenna Display: Extra-large 4.3-inch touch-screen display [WQVGA] Speakers: Dual Audio System: in the device 0.5 watt, in the mounting, 2.
13 Appendix 7. 8. which cannot be properly controlled. Two faulty pixels are considered acceptable. These conditions apply neither to software nor to data or applications that are stored on the memory card or other storage media. This guarantee covers only the hardware components of the product. There is no express guarantee, neither written nor verbal, other than this printed limited guarantee.
14 Index 13 Appendix more than one item of hardware is not permissible. [ 2 ] The deployment of the entrusted Software within a network or any other multiple workstation computer system is not permissible, if thereby the possibility of simultaneous multiple-shift usage should be facilitated.
14 Index I Import Phone Book -------------------------------- 89 Interim destination ----------------------------- 81, 82 K Keyboard -------------------------------------------- 66 Keys Hardware -------------------------------------- 58 Keys ------------------------------------------------- 58 M Main Window --------------------------------------- 67 Make a call Call destination ------------------------------- 88 Dial a Number -------------------------------- 88 Phone book ----------------------------------