
Operating Instructions and Installation Instructions


NAVMAN 8120/8084 Installation and Operation Manual 95
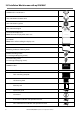
There are two mounting arrangements:
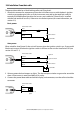
Flush Mounting the 8120/8084
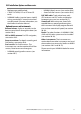
1. Attach the flush mounting template to
the selected mounting position using
adhesive tape.
2. Drill a pilot hole for each of the hole saw
cuts shown on the template before cutting
the larger hole with the hole saw.
3. Next cut all the way around the inside of
the cut-out line with a saw to remove the
waste material shown on the template.
4. Check that the unit fits correctly in the
cut out area. Adjust the fit with a file if
required.
5. Select a 2-3.5 mm 1/8” drill bit depending
on hardness of material to drill. Smaller
diameter holes will be needed for soft
woods and larger diameter pilot holes will
be required if mounting to hard materials
such as fiberglass (we recommend 3.5 mm
(1/8”) for fiberglass and Aluminum).
With the selected drill bit drill the 4 pilot
holes for the 8 gauge screws used to
attach the unit. These are indicated on the
corners of the mounting template.
6. Connect all cables to the rear of the unit
before placing the unit into the console.
7. Firmly secure the unit in place with the 4 x
8 gauge self tapping screws.
Note: the 5 x 14G self tapping screws are for
bracket mounting only.
8. To finish off the installation firmly clip the
front bezel in place.
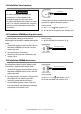
Bracket Mounting the 8120/8084
An alternative to flush mounting the
8120/8084 is to bracket mount the unit. This
method has the advantage that the display
can be easily removed when it is not in use.
The display may be tilted for best possible
viewing angle when bracket mounted.
Note: The mounting bracket does not allow
for rotation of the unit to the left and right.
1. Use the mounting bracket as a template to
mark the 5 positions of the screw holes.
2. Select a suitable drill bit (note: larger
diameter pilot holes may be required if
mounting to fiberglass) and drill 5 pilot
holes in the marked positions.
3. Secure the mounting bracket using the 5 x
14G self tapping screws.
4. Slide the 8120/8084 into the mounting
bracket and secure in place with the
bracket knobs.
5. To finish off the installation firmly clip the
front bezel in place.
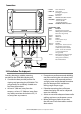
Mounting bracket
Knob
14G self tapping screws
Bezel
8 gauge screws
8120/8084
8120/8084
Dash