Pilot 3380 Fish 4432 A U T /O 4433 P I L O T F I S H F I N D E R S www.navman.
Contents 1 Introduction ..........................................................................................................................................5 1-1 Benefits of the FISH 4432/4433 . . . . . . . . . . . . . . . . . . . . . . . . . . . . . . . . . . . . . . . . . . . . . . . . . . . 5 1-2 How the FISH 4432/4433 works . . . . . . . . . . . . . . . . . . . . . . . . . . . . . . . . . . . . . . . . . . . . . . . . . . . 6 2 Basic Operation.......................................................
6-3 Mounting and removing the display unit . . . . . . . . . . . . . . . . . . . . . . . . . . . . . . . . . . . . . . . .30 6-4 Systems of several instruments (4433 0nly) . . . . . . . . . . . . . . . . . . . . . . . . . . . . . . . . . . . . . . . .31 6-5 Cleaning and maintenance . . . . . . . . . . . . . . . . . . . . . . . . . . . . . . . . . . . . . . . . . . . . . . . . . . . . . .32 Appendix A - Specifications ...........................................................................................
1 Introduction Congratulations on choosing a Navman fish-finder. For maximum benefit, please read this manual carefully before installation and use. This manual describes how to install and set up the FISH 4432/4433 and the associated dual-frequency transom transducer. (If a through hull transducer is used, refer to the Installation Instructions supplied with that transducer.) Important It is vital to the performance of the fishfinder that the transducer is installed in the best location.
1-2 How the FISH 4432/4433 works line of pixels. The most recent echo appears on the extreme right of the display, with the older echoes being scrolled towards the left, eventually disappearing off the display. The FISH 4432/4433 has two parts: - the transducer attached to the hull - the display unit.
Press ENT to confirm the selection and the startup sequence will continue. Power On / Auto Power Press to turn the fishfinder on. If the fishfinder is wired for auto power, it turns on automatically whenever the boat’s ignition is turned on. This ensures that the engine hours counter and optional fuel functions are activated. A title display appears briefly. This is followed automatically by the Installation menu the first time the fishfinder is switched on.
Simulate Mode An internal simulator allows users to learn how to operate the fishfinder off the water. In Simulate mode the word Simulate flashes on the bottom of the display. The fishfinder generates data so that all the main displays appear to be operational. Use Setup > Simulate as follows: 1. Press MENU twice to show the Setup menu. 2. Highlight Simulate. 3. Press ENT to select or de-select.
The Setup menu and options System - see section 3-1 Sonar - see section 3-2 Fuel - see section 3-3 Logs - see section 3-4 Alarms - see section 3-5 Units - see section 3-6 Comms - see section 3-7 Calibrate - see section 3-8 Simulate - see section 2 FISH 4432/4433 Installation and Operation Manual NAVMAN 10
3-1 Setup > System Press MENU once or more until the Setup menu is displayed, then select System: Auto power off Select to have the fishfinder power off automatically every time the boat’s ignition is switched off. This applies only if the display unit is wired for Auto Power. See section 6-5 Wiring Options. Snooze Mode Language Select the language for the displays. The options are: English, Italian, French, German, Spanish, Dutch, Swedish, Portuguese, Finnish Greek and Croatian.
Scroll speed Fish sensitivity Use this to set the scroll speed on the display. There is a choice of: Very Fast, Fast, Medium, Slow and Pause. The depth of the water also affects the speed of the display. Faster scroll speeds combined with a slow boat speed (typically between 2 and 6 knots) shows the most fish detail. Medium or Slow scroll speeds result in sonar information being displayed over a longer period, but with less detail. See Section 4-1 Interpreting the display, for more information.
This setting affects the Fuel flow and Fuel economy reading on the Fuel display (see section 5-6 Fuel display) but it does not affect the Fuel used reading. It is essential to do this whenever some fuel is added or removed. Otherwise, the reading on the Fuel display (see section 5-6 Fuel Display) and the Low Fuel Alarm (see section 3-5 Setup > Alarms) are meaningless.
3-5 Setup > Alarms Press MENU one or more times until the Setup menu is displayed, then select Alarms: Symbol Alarm Name Beeper Cycle Alarm condition is met when the: Too shallow 1 5 Depth is less than the alarm trigger value Too deep 1 2 / sec Depth is greater than the alarm trigger value Fish 1 short Echo matches the profile of a fish / sec beep Temp.
Fuel Temperature Select from: • Litres • USGal (US gallons) • ImpGal (Imperial Gallons) Select either: • °F (Fahrenheit) • °C (Celsius) 3-7 Setup > Comms (4433 only) Use this feature when the FISH 4432/4433 is connected to other Navman instruments through NavBus or any compatible NMEA instrument. NMEA data Use this to specify which NMEA sentences will be transmitted (see Appendix A - Specifications and section 5-7 Data display, for information about how to display NMEA data).
2. Connect the portable tank(s) to the engine through the fuel transducer(s). Temperature The factory settings should be sufficiently accurate for normal usage. To calibrate the temperature readout, first measure the water temperature with a thermometer known to be accurate. 3. Run the engine at normal cruising speed until at least 4 gallons (15 litres) of fuel has been used per engine.
4 Using the FISH 4432/4433 This section explains how to interpret the sonar displays, when and why to use the different frequencies and how fish are detected and displayed. It also describes Gain and Range and shows examples of some of the different sonar displays. Also see section 1-2 How the FISH 4432/4433 works.
Frequency and cone width The pulse generated by the FISH 4432/4433 transducer travels down through the water, spreading outwards to form a rough cone shape. However, the cone width is dependent upon the frequency of the pulse; at 83 kHz it is 20°, whereas at 200 kHz it is 14°. The chart shows how the cone width varies over depth for each frequency used. Figures are approximate.
4-2 Single and Dual frequency fishfinding When to use 200 kHz The 200 kHz frequency is best for seeing deep bottoms, showing detail and reducing noise. When to use 83 kHz The 83 kHz frequency is has a wider beam–good for locating features that can be examined in detail at 200kHz. Auto frequency This shows 200kHz detail on screen, but uses 83kHz beam for locating fish further from boat.
83 kHz display 200 kHz display Note the smaller, defined fish arches and more bottom detail.
4-3 Fish detection and display Where to find fish Fish symbols Off Underwater features like reefs, wrecks and rocky outcrops attract fish. Use the 83/200 kHz frequency display to find these features, then look for fish by passing over the feature slowly several times using the Zoom display (see section 5-2 Sonar Zoom display). If there is a current, the fish will often be found downstream of the feature.
• It is difficult to get fish arches in shallow water as the transducer sonar beam is very narrow near the surface and fish do not stay within the beam long enough to display an arch. Several fish in shallow water tend to display as randomly stacked blocks of pixels. • Wave motion may result in distorted fish arches 4-4 Gain Gain (sensitivity) controls the amount of detail displayed on the FISH 4432/4433. Understanding how to set suitable Gain settings is important for optimum performance.
4-5 Range Zoom Range and Zoom Offset Range is the vertical depth displayed on the FISH 4432/4433. On the Sonar Zoom and Sonar Bottom displays, a vertical bar is shown on the far right of the display. This is the zoom bar. The zoom bar shows the zoom range; that is, the area that is magnified. The Navman fishfinder has two range modes, Auto Range and Manual Range: In Auto Range, the fishfinder adjusts the depth range automatically so the bottom is always shown in the lower part of the display.
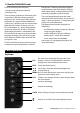
5 The Displays Press DISP to show the Display menu. Use or to select display tab, then select a particular display using the or cursor keys. The Display menu is summarized here and each display is shown in the following sections. Most displays have an Options menu so that relevant features can be changed quickly. The Display menu Note: Refer to Section 3-2 Setup > Sonar, for information about customizing features on the sonar displays.
To customize the size of the Data header, highlight Size and press ENT. There is a choice of Small and Large. 4. Highlight the required data item and press ENT. The data item is immediately displayed in that data field. To customize the data items to be displayed: 5. Press ESC when finished and the Data header resizes automatically. 1. Highlight Data setup and press ENT. The Data header increases in size to display all data fields. Some data fields may be blank. Sonar History 2.
5-3 Sonar Bottom display To show the Sonar Bottom display, press DISP and select Sonar Tab, select Sonar Bottom and press ENT. This shows a split display, with the sonar history on the right side and the zoom section on the left. The bottom signal is shown as a flat trace in the centre of the zoom section. Showing the bottom as a flat trace can make it easy to compare the echo strengths shown in the bottom signals. This can help to identify the type of bottom and objects close to the bottom.
Fish recognition The echo strengths shown on the A-scope can be useful in recognising the type of fish. Different species of fish have different sizes and shapes of swim bladders. The air in the swim bladder reflects the ultrasonic pulse, so the strength of the echo varies between fish species according to the size and shape of the swim bladder. When fishing among a school of fish and catching them, note the fish species and the strength of the echo that it returns on the A-scope.
Economy is the distance travelled per unit of fuel used. The Fishfinder calculates this using the fuel used and boat speed (water speed or GPS speed - which ever is selected as the speed source – see section 3-3 Setup > Fuel). The bigger this number, the better the fuel economy. Adjust the throttle and trim to achieve the best fuel economy.
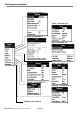
6 Installation and Maintenance Correct installation is critical to the performance of the FISH 4432/4433. There are two components to install, the display unit and the transducer. It is vital to read the entire installation section of this manual before attempting to install the components. Wiring Options The power/data cable contains 5 wires: Six wiring options are described in this section: Wire Function • Black Ground (power negative) White* NMEA out Basic wiring.
Secondary alarm wiring option (FISH 4433 only) Green Wire: Use this to connect a secondary alarm indicator such as a flashing light or external beeper with a built-in drive circuit. See the Auto power wiring diagram. If the external beeper or light requires more than 200 mA total, fit a relay. Consult your Navman dealer for more advice. Fuel kit wiring (FISH 4433 only) See the Fuel Kit Installation Guide for information about the fuel transducer cable.
6-1 What comes with this product? Standard configuration: • FISH 4432/4433 display unit • Power cable • Mounting bracket (screws included) • Warranty registration card • This manual • Sun cover for display unit • Flush mounting kit • Dual frequency transom transducer (includes cable kit and screws) • Transom Mount Transducer Installation Manual.
Flush Mounting Removing the display unit 1. Cut a hole in the bulkhead for the display unit using the flush mount template. The display unit can be removed after each use for protection against the environment or security reasons. 2. Drill four holes for the mounting studs using the flush mount template. When removing the display unit, ensure that the plugs left in the boat are not exposed to the elements. Push the attached dust covers over the exposed ends of the plugs.
DEPTH 2100 REPEAT 3100 Depth Repeater Repeater for depth, speed, water temperature and battery voltage. Accepts NavBus or NMEA data inputs from other instruments. TRACKER 5430/5380 Color GPS Chartplotter with worldwide coverage 6-5 Cleaning and maintenance To avoid damage, clean the screen only with a damp cloth and mild detergent when dirty or covered in sea salt. Avoid abrasive cleaners, petrol or other solvents. Cover or remove a transom-mounted transducer when repainting the hull.
Appendix A - Specifications Specifications FISH 4432 FISH 4433 16 Greyscales Display type: Screen Resolution 360 high x 240 wide(pixels) White LED backlighting Display size: 4.3” (110mm) diagonal Supply voltage: 10 to 16V DC Supply current at 13.
Appendix B - Dimensions Appendix C - Troubleshooting This troubleshooting guide is written with the assumption that the user has read and understood the relevant sections in this manual. The collar must be secure for watertight connection. It is possible in many cases to solve difficulties without having to send the display unit back to the manufacturer for repair. Please follow this troubleshooting section before contacting the nearest Navman dealer. There are no user serviceable parts.
from the display. This may be checked by switching off other instruments, accessories (e.g. bilge pump) and the motor until the offending device is located. To stop problems from electrical noise, try: 2. The fishfinder won’t turn off: The fishfinder may have been wired for Auto power. In this case, the fishfinder cannot be turned off while the ignition power is on. (See Auto power wiring in section 6-5 Wiring options.
and the fuel tank must be installed as per the fuel installation guide. Failure to do so will void the warranty. 7. If the fishfinder beeps when turned on but nothing is displayed: The fishfinder may be operating, but the backlight settings may have been set too low. See section 2 Basic Operation, to adjust the fishfinder backlight. Press twice to restore default backlight settings. d) Inspect the fuel cable from end to end for damage such as cuts, breaks, trapped or squashed sections.
How to contact us NORTH AMERICA BNT - Marine Electronics 30 Sudbury Rd, Acton, MA 01720. Toll Free: +1 866 628 6261 Fax: +1 978 897 8264 e-mail: sales@navmanusa.com web: www.navman.com Mexico Mercury Marine de Mexico Anastacio Bustamente #76 Interior 6 Colonia Francisco Zarabia, Zapapan, Jalisco, C.P. 45236 Mexico. Ph: +52 33 3283 1030 Fax: +52 33 3283 1034 web: www.equinautic.com.br Uruguay Alvaro Burmudez, Nautica Puerto del Buceo 11300 Montevideo, Uruguay.
Lon 174° 44.535’E Lat 36° 48.