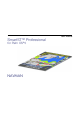
SmartS™ Professional for Palm OS® 5 NAVMAN User Manual
Navman SmartS™ Professional for Palm OS® 5 2 Welcome Congratulations on the purchase of your SmartS™ Professional for Palm OS® 5 navigation solution. Whether you travel frequently in your own country, or need to find your way around overseas, SmartS Professional will direct you to your destination without the need for map books and second-hand instructions. The Global Positioning System is available free of charge and is accurate to within 5 m (15ft).
Navman SmartS™ Professional for Palm OS® 5 Safety First It is your sole responsibility to adhere to the following safety instructions at all times. Do not operate SmartS Professional while driving. The handheld must be placed in a position where it cannot obstruct the driver’s view of the road. The handheld must not interfere with the normal operation of any airbags or other vehicle safety equipment.
Contents 1 What is GPS? ................................................................................................ 7 2 System Requirements.................................................................................. 8 2-1 Palm Powered™ Handheld Requirements ...............................................................8 2-2 Computer System Requirements..............................................................................8 2-3 Supported Screen Resolution...................................
Navman SmartS™ Professional for Palm OS® 5 8 Controls....................................................................................................... 23 8-1 Touch Screen ..........................................................................................................23 8-2 Keyboard Entry .......................................................................................................23 8-3 Zooming and Scrolling ..........................................................................
Navman SmartS™ Professional for Palm OS® 5 12-1 GPS Reception .....................................................................................................47 13 Modifying the Settings ............................................................................. 50 13-1 About Settings ......................................................................................................50 13-2 GPS Settings...............................................................................................
Navman SmartS™ Professional for Palm OS® 5 1 What is GPS? 7 The Global Positioning System (GPS) is a network of satellites launched by the US military in the 1970s. The satellites continuously transmit accurate time and position information, which is freely used by commercial and military applications worldwide. GPS receivers are designed to pick up the high frequency radio signals from these satellites, and use the information to determine your exact location.
Navman SmartS™ Professional for Palm OS® 5 2 System Requirements SmartS Professional for Palm OS® 5 is designed for a handheld running the Palm™ Operating System. A desktop computer or laptop is also required to install the SmartS Professional software and map data onto your handheld. Ensure your equipment meets the following requirements: 2-1 Palm Powered™ Handheld Requirements • Sony Users: CLIÉ™ handheld - models PEG-TG50, PEG-NX73V, PEG-NZ90. • Palm Tungsten™ T, T2 and T3 series.
Navman SmartS™ Professional for Palm OS® 5 3 The SmartST Professional CD Set On purchasing the SmartS Professional for Palm OS® 5 solution, you will have received the following material: 1 SmartS Professional software. 2 Map data for your region. 3 User Manual and Quick Start Guide in Adobe® Reader® format. 4 Adobe® Reader®. 5 Application Product Key and Map Product Key Refer to Section 14 for information about accessories.
Navman SmartS™ Professional for Palm OS® 5 4 Installing the SmartST Professional Desktop The SmartS Professional CD set contains software and map data that allows you to: • Install the SmartS Professional software onto your handheld. • Install new maps to optional memory cards. Before you can use any of these features, you need to set up the SmartS Professional Desktop software on your computer. You will then be able to download software from your computer to your handheld via a HotSync® connection.
Navman SmartS™ Professional for Palm OS® 5 5 Installing the Handheld Software and New Maps Before installing SmartS Professional onto your handheld, ensure you have completed the following steps: Tip: The main advantage of using a memory card writer is that the map download is faster. Note: Maps must be stored on a memory card. SmartS Professional will not operate without a memory card plugged into your handheld. 1 Your handheld was supplied with an installation CD.
Navman SmartS™ Professional for Palm OS® 5 5-2 Step 2: Install SmartST Professional Note: Before beginning, make sure your handheld is connected to the computer via a HotSync® connection, and that the SmartS Professional Desktop is installed on your computer. This procedure allows you to install the SmartS Professional software onto your handheld, or to upgrade existing software to a newer version. Once installed, follow the registration procedure to activate the application.
Navman SmartS™ Professional for Palm OS® 5 7 Note: You will need to have Microsoft Internet Explorer version 5.5 or above to correctly activate the software. 8 Warning: You will need the Product Keys every time you upgrade your software. Keep these in a safe place. Alternatively, if you are planning to download maps directly to a memory card plugged into your handheld: • MS Import (or Data Import) should start automatically on your handheld once the HotSync® operation is complete.
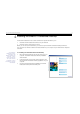
Navman SmartS™ Professional for Palm OS® 5 5-3 Install Maps Maps must be downloaded to one or more memory cards. This step allows you to manage the maps that you can use with SmartS Professional. The main options are: Note: if you copy maps onto a new memory card that has not been used with SmartST Professional before, you must first plug the card into your handheld and run SmartST Professional. • Review the maps you currently have stored in your memory card.
Navman SmartS™ Professional for Palm OS® 5 Maps available on the current CD are shaded blue. When you select a region it appears green. The areas shaded grey are not available on the current CD. Currently installed maps are displayed here. Currently selected maps are displayed here. Note: Maps are of population areas and not political areas (eg. county or state). Sometimes you will need to load multiple maps to cover the desired area. Note: You may be supplied with several map CDs.
Navman SmartS™ Professional for Palm OS® 5 16 5-4 Using a Memory Card after SmartST Professional Maps can be deleted from a memory card using the Map Downloader application. However, if you wish to start using the memory card for a different application (eg. a digital camera), you will need to reformat the card. This can be done using the CARD INFO application which is available on all standard Palm OS® 5 handhelds. Refer to the instructions supplied with your handheld for further information.
Navman SmartS™ Professional for Palm OS® 5 17 6 Configuring the GPS Receiver Note : For security purposes, and to avoid overheating, do not leave your handheld on the dash or attached to the windshield while your vehicle is unattended, especially in strong sunlight. SmartS Professional can operate with many different types of GPS receivers. Please follow the instructions relevant to your receiver, and learn how to: 1 Connect your GPS receiver to the handheld.
Navman SmartS™ Professional for Palm OS® 5 Sony Users: Restricted Function. Refer Section 6-1. Note: Restricted functions automatically become available when the handheld is removed from the Sony Car Cradle. 4 For your safety, a Restraint of Operation is automatically enforced when the handheld is connected to the Car Cradle. The Restraint of Operation means that a number of menu items and functions are made unavailable to the user to avoid driver distraction.
Navman SmartS™ Professional for Palm OS® 5 7 Getting Started 7-1 Starting SmartST Professional 1 In the Launcher screen, tap on SmartST. 2 When SmartS Professional first starts, a short tutorial is available to show you how to use SmartS Professional. Tap anywhere on the screen to move to the next screen. This tutorial can be disabled by removing the tick on the last tutorial screen. 3 The Main Menu will then be displayed.
Navman SmartS™ Professional for Palm OS® 5 Sony Car Cradle Users: Restricted Function. Refer Section 6-1. 7-3 Configuring the GPS Receiver You only need to configure your GPS receiver if you are using a Bluetooth or serial GPS receiver: The Sony Car Cradle is configured automatically. 1 Note: You only need to configure your GPS Receiver once. For Bluetooth GPS Receivers: • Switch on your Bluetooth receiver. Refer to the instructions supplied with your Bluetooth GPS Receiver for more information.
Navman SmartS™ Professional for Palm OS® 5 2 For Serial GPS Receivers: • From the MAIN MENU, select SETUP. • From the drop down list, select GPS. • From the Port options, select SERIAL. • Refer to the instructions supplied with your GPS Receiver to select the Baud Rate. 7-4 Switching On the GPS Receiver Sony Car Cradle Users: Restricted Function. Refer Section 6-1. Tip: It may take a few minutes to obtain an initial position fix, but will subsequently be much quicker.
Navman SmartS™ Professional for Palm OS® 5 7-5 Obtaining a GPS Fix Tip: In order to attain good GPS performance, signals must be picked up from three or more satellites. To check satellite reception, see Section 12 Using the GPS Status Information. Your handheld receives GPS signals through the GPS Receiver. In order for the receiver to receive signals: 1 Your handheld must be outside or in a vehicle parked outside – sunlight alone is not sufficient (e.g. through the window of a building).
Navman SmartS™ Professional for Palm OS® 5 8 Controls 8-1 Touch Screen Note: To "tap and hold", press the stylus tip against the screen until a pop-up menu is displayed. SmartS Professional is easy to use. Most of the time, you can tap on menu options and other on-screen buttons. The tap and hold function can be activated by pressing on a street map and holding to bring up a pop-up menu. 8-2 Keyboard Entry Some handhelds feature a full QWERTY keyboard. Use this to key in street address information.
Navman SmartS™ Professional for Palm OS® 5 Tip: The icon is displayed on all screens and maps - tap this icon at any time to return to the previous screen. 8-4 Address Entry Icons When entering a destination address, a number of icons are displayed along the bottom of the address entry screen. The following list describes the function of each icon. Return to the previous screen. Add the destination to the Favorites list. Show the selected destination on the map. Navigate to the selected destination.
Navman SmartS™ Professional for Palm OS® 5 9 Setting Your Destination Before you travel, you must first select a destination and allow SmartS Professional to plan your route. There are three main ways that you can program your destination: • Use a QUICK NAV that you have previously programmed for destinations used on a regular basis.
Navman SmartS™ Professional for Palm OS® 5 Sony Car Cradle Users: Restricted Function. Refer Section 6-1. Note: SmartS Professional will automatically display all countries contained in the maps currently loaded on the memory card. If there is only one country map loaded, this will be the only option provided. Tip: Step 3 is optional, but can be useful if your map area is large.
Navman SmartS™ Professional for Palm OS® 5 Tip: If any of the destination fields are not presented in capital letters, then a valid selection has not been made. 5 Once the address is selected, choose from one of the following: • . SmartS Professional will calculate the route and Tap display the current street on the Navigation Map Screen. The map will show the Waiting for GPS icon until a fix is found. • .
Navman SmartS™ Professional for Palm OS® 5 Sony Car Cradle Users: Restricted Function. Refer Section 6-1. Tip: Step 3 is optional, but can be useful if your map area is large or the street is not uniquely named. Tip: If any of the destination fields are not presented in capital letters, then a valid selection has not been made. 28 9-3 Navigating to an Intersection To enter the intersection of two streets as your destination: 1 From the MAIN MENU, select DESTINATION, then INTERSECTION.
Navman SmartS™ Professional for Palm OS® 5 5 Once the intersection is selected, choose from one of the following: • . SmartS Professional will calculate the route and Tap display the current street on the Navigation Map Screen. The map will show the Waiting for GPS icon until a fix is found. • . SmartS Professional will not calculate the route, but Tap will simply display the address on the Map Screen.
Navman SmartS™ Professional for Palm OS® 5 Sony Car Cradle Users: Restricted Function. Refer Section 6-1. Tip: Step 5 is optional, but can be useful if your map area is large. 9-4 Navigating to Points of Interest The map information that you are using also has a large number of “Points of Interest”, or POIs stored for your convenience. A Point of Interest (POI) is any named site, feature, landmark or public venue.
Navman SmartS™ Professional for Palm OS® 5 7 Select a POI from the list. Alternatively, if you know the name of the POI you are interested in, enter the first few letters of the POI to narrow down the list. 8 Choose one of the following: Example: if you wish to locate a hotel in a particular area, use this function by selecting CATEGORY : Accommodation, TYPE : Hotel or Motel. Enter the area of interest and select from the list of hotels provided.
Navman SmartS™ Professional for Palm OS® 5 9-5 Navigating to a Favorite SmartS Professional allows you to store Favorite destinations, to save you from re-entering the location again. Use Quick Navs for your 3 most regular locations, and store other commonly used locations as Favorites. 1 From the MAIN MENU, tap DESTINATION, then FavoriteS. 2 Tap the destination from the Favorites List to select your destination.
Navman SmartS™ Professional for Palm OS® 5 9-6 Navigating to a Recent Destination Destinations that you have recently used are stored inside your Handheld so that you can quickly access them. 1 From the MAIN MENU, tap DESTINATION, then RECENT. (Recent destinations can also be selected by tapping MAIN MENU, then QUICK NAVS then RECENT). 2 Use the scroll bars to scroll through the list of recent addresses, then tap on your preferred destination.
Navman SmartS™ Professional for Palm OS® 5 9-7 Using the Pop-Up Menu to Plan a Route You may prefer to program your destination directly from the Map Screen. Generally you will use this option if you know from a previous entry screen. SmartS Professional will the area in which your destination is, or if you have selected allow you to scroll around a map and pick a point on the map. SmartS Professional will automatically load the address details for you and plan a route to your selected destination.
Navman SmartS™ Professional for Palm OS® 5 9-8 Route Planning Without a GPS Fix Routes can also be planned without a GPS fix from the pop-up menu. 1 Select a departure location by tapping and holding on a street/road on the Map Screen and then selecting "Set as Departure" from the pop-up menu. 2 To select a destination location, either: 3 • Tap and hold on a street/road and select "Navigate To" from the pop-up menu. • OR select a destination as described in Section 9 Setting Your Destination.
Navman SmartS™ Professional for Palm OS® 5 36 10 Viewing Your Route Once you have selected your destination and SmartS Professional has calculated your route, there are four different icon. ways that you can view instructions for your route. Cycle through the following three views by tapping on the Each view is described below. Note: All map views are accompanied by audible announcements of your next turn. • The MAP view displays your route on a map which is always oriented North.
Navman SmartS™ Professional for Palm OS® 5 10-1 Map View The Map view is always oriented to the North, and shows your current position and surrounding street names. If you have already programmed a route, the route and all turns are highlighted. You can use the Map view to quickly set your departure point, and navigate to any destination. Note: To cancel your current route at any time, tap-and-hold on the screen, and select Cancel Route from the pop-up menu.
Navman SmartS™ Professional for Palm OS® 5 10-2 Navigation View The Navigation view is displayed when you calculate a route, except that the map is always oriented in the direction in which your vehicle is travelling. This is often an easier way to keep your bearings. Note: to view this screen, a route must be calculated. 1 To view the route, tap on the 2 Zoom in and out as required. symbol to cycle through the screens until the Navigation Screen is displayed. Direction of next turn.
Navman SmartS™ Professional for Palm OS® 5 10-3 3D Navigation Screen Note: to view this screen, a route must be calculated. You can cancel your current route at any time by starting to plan another route (e.g. by selecting DESTINATION or QUICK NAV from the MAIN MENU. Tip: When the angle option is selected, the up and down buttons can be used to reset the angle to 0º, which transforms the 3D screen view to a 2D view.
Navman SmartS™ Professional for Palm OS® 5 10-4 Next Instruction View Note: to use this view, a route must be calculated. This view shows the information that you need for the next turn, the direction of the turn and the distance to the turn. 1 symbol to cycle through the screens until the Next Instruction Screen is To view the route, tap on the displayed. Next instruction Direction of next turn.
Navman SmartS™ Professional for Palm OS® 5 10-5 Instruction List Note: to view this screen, a route must be calculated. The Instruction List displays the list of the remaining turns to your destination with the direction of the turn, the next street name and the distance to the turn. The very next turn is highlighted. 1 From the MAIN MENU, select INSTRUCTION LIST. 2 You can scroll up and down the instruction list by dragging the stylus up and down the scroll bar.
Navman SmartS™ Professional for Palm OS® 5 Tip: This function can be disabled in the SETUP Menu. 10-6 Back-On-Track™ Feature SmartS Professional is designed to re-plan your route automatically if you take a wrong turn. A ? symbol will display in place of the Direction Of Next Turn Icon. The re-routing indicator will display to show that a new route is being recalculated.
Navman SmartS™ Professional for Palm OS® 5 43 11 Editing, Deleting and using Favorites and Quick Navs Tip: Convert recent destinations to Favorites by selecting Recent - Show then tapping and holding to save as a Favorite. Tip: Favorites can be accessed through the DESTINATIONFavoriteS menu. SmartS Professional allows you to save destinations as Favorites, so you can access them quickly without re-entering address information.
Navman SmartS™ Professional for Palm OS® 5 Sony Car Cradle Users: Restricted Function. Refer Section 6-1. 11-2 Editing or Deleting a Saved Favorite Follow these instructions to delete Favorites, personalise them with a nickname, or change them to Quick Navs. 1 From the MAIN MENU, select DESTINATION, then FavoriteS. 2 Select the destination that you wish to edit/delete from the Favorite List.
Navman SmartS™ Professional for Palm OS® 5 Example: you may want to save your own address as a Quick Nav, and name it HOME. Tip: Quick Navs can be deleted after they have been ‘Saved’ as a Favorite by using . To make any of these changes, tap . • To change the name of your Favorite or Quick Nav, type it into the Name field. • To change the type of Favorite or Quick Nav, tap on the "Save as" drop-down box to save as a Favorite or one of three Quick Navs.
Navman SmartS™ Professional for Palm OS® 5 11-3 Quick Navs Three of your most frequently used destinations can be stored to save time. Once saved, your Quick Navs can be accessed quickly through the Quick Nav menu with the minimum of key presses and without having to re-enter any information. Quick Navs also give access to the return trip function and recent destination. 1 From the MAIN MENU, select QUICK NAV. 2 To go straight to one of your Quick Nav destinations, simply tap on QUICK NAV.
Navman SmartS™ Professional for Palm OS® 5 12 Using the GPS Status Information 12-1 GPS Reception The GPS Status Screen tells you how well you are receiving the GPS satellite information. SmartST Professional relies on the reception of signals transmitted by the Global Positioning System satellites orbiting the earth. This display shows a visual representation of the number of satellites that your handheld is receiving information from.
Navman SmartS™ Professional for Palm OS® 5 Tip: In practice less than 12 satellites are tracked by the GPS receiver due to satellite positioning. Tip: The number of indicated satellites depends on your GPS receiver. Latitude and longitude are displayed along with a North-pointing compass, the heading in degrees and ground speed. The 12 satellites that could be viewed from your current position are shown as segments.
Navman SmartS™ Professional for Palm OS® 5 12-2 GPS Status Messages The GPS status messages are displayed on the three navigation screens (Map screen, Navigation screen, and the Next Instruction screen). The messages listed in the table below provide you with feedback on the status of the GPS receiver connection. Status Message Meaning Suggested Action No GPS Data A GPS connection has been enabled, but no GPS data is being received.
Navman SmartS™ Professional for Palm OS® 5 13 Modifying the Settings Note: SmartS Professional is already programmed with default settings, which can be adjusted to suit your preference. Sony Car Cradle Users: Restricted Function. Refer Section 6-1. SmartS Professional has a number of Settings that you can alter: • About settings: Display the version number of the SmartS Professional software you are running. • GPS settings: Configure the communications settings for your GPS Receiver.
Navman SmartS™ Professional for Palm OS® 5 Sony Car Cradle Users: Restricted Function. Refer Section 6-1. 13-2 GPS Settings For Bluetooth and serial GPS users, use this screen to configure the GPS port. Refer to Section 7-3 Configuring the GPS Receiver. If you are experiencing difficulty with your GPS receiver, you may be asked by Technical Support Staff to switch on the GPS Logging option: Sony Car Cradle Users: Restricted Function. Refer Section 6-1. 1 From the MAIN MENU, select SETUP.
Navman SmartS™ Professional for Palm OS® 5 This feature will speed up map panning when viewing or planning a route across a large or high density map area. With normal panning mode, the map is updated repeatedly as you drag the stylus across the screen. With fast map panning, a line is drawn from when you start to drag the stylus to the end position - only then is the map redrawn. Sony Car Cradle Users: Restricted Function. Refer Section 6-1.
Navman SmartS™ Professional for Palm OS® 5 Sony Car Cradle Users: Restricted Function. Refer Section 6-1. Tip: Your Handheld will run faster with less map regions selected. To optimise performance, select only the map regions you require to plan your route. Sony Car Cradle Users: Restricted Function. Refer Section 6-1. Tip: For ease of viewing, select only the most useful POI categories. 13-5 Map Settings This screen shows all the map regions that have been installed in the memory cards.
Navman SmartS™ Professional for Palm OS® 5 Sony Car Cradle Users: Restricted Function. Refer Section 6-1. Note: The AUTO RE-ROUTING function automatically updates your route if you take a wrong turn. 13-7 Routing Settings There are a number of options that affect the way that SmartS Professional plans your route. You may be conscious of time and therefore want to get to your destination by the fastest route possible, or you may be conscious of distance and wish to take the shortest route.
Navman SmartS™ Professional for Palm OS® 5 14 Accessories 14-1 Memory Cards Maps must be stored on memory cards. Please refer to your handheld documentation for suitable memory card options and installation instructions. 14-2 Memory Card Writers The memory card writer connects to your computer via a USB port, and is used in conjunction with the SmartS Professional Desktop application to download maps to a memory card.
15 Frequently Asked Questions Where will SmartST Professional for Palm OS® 5 work? As long as the GPS receiver has a clear view of the sky, it will work accurately anywhere on earth. Note: in order for the GPS position to be displayed on a map, the relevant map will need to be installed on the memory card. How accurate is GPS? Accuracy of any GPS system will vary slightly over time. It is accurate to within 5 m (16 feet) for 95% of the time in normal usage.
Navman SmartS™ Professional for Palm OS® 5 57 16 End User License and Warranty Agreement IMPORTANT - Please read carefully NAVMAN (THE LICENSOR) IS WILLING TO LICENSE THE SMARTS™ PROFESSIONAL SOFTWARE (THE SOFTWARE) TO YOU (THE CUSTOMER) ONLY IF YOU ACCEPT ALL THE TERMS OF THIS LICENCE. PLEASE READ THE TERMS CAREFULLY, BECAUSE USING THIS SOFTWARE WILL BE DEEMED TO BE YOUR ACCEPTANCE THAT YOU ARE USING IT ON THE FOLLOWING TERMS.
Navman SmartS™ Professional for Palm OS® 5 58 Limited Warranty: IMPORTANT: The following terms and conditions may vary from country to country. Please check with Your Navman dealer from where You purchased the product. Hardware Product: Navman warrants its products to be free from defects in materials or workmanship under normal use for two years from the date of purchase (the Warranty Period) to the original owner (You).
Navman SmartS™ Professional for Palm OS® 5 16-2 FCC Statement Applicable to all Navman GPS Receivers. Note: This equipment has been tested and found to comply with the limits for a Class B digital device, pursuant to Part 15 of the FCC Rules. These limits are designed to provide reasonable protection against harmful interference in a normal installation.
Navman SmartS™ Professional for Palm OS® 5 16-4 Copyright © 2004 Navman NZ Limited. Navman is a registered trademark of Navman NZ Limited. SmartS and Back-On-Track are trademarks of Navman NZ Limited. All rights reserved. Microsoft® Windows® 98, ME, 2000 or XP, Internet Explorer are registered trademarks of Microsoft Corporation. Acrobat® Reader® is a registered trademark of Adobe Systems Incorporated. All rights reserved.