
Quick Start Guide


VHF 7110 Installation Supplement
15
NAVMAN
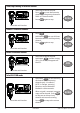
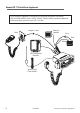
Checklist - The following extra items are
supplied in the VHF 7110 box:
1 10m connection cable
2 Rubber cushion
3 Handset wallplate
4 Two screws
5 Protective cap
6 Hexagonal nut
7 Locking nut
8 Handset cable
Also supplied, but not shown:
• Two self-tapping screws
• Two flat screws
• Two plain washers
• Two spring washers
• Two nuts
• Handset bulkhead mount
Installation
Before doing any cutting or drilling, check that:
• The intended location for the handset wallplate has reasonable access at the rear so that the
10m connection cable can be easily installed and accessed.
• The 10m connection cable comfortably reaches from the base unit to the intended location
for the handset wallplate.
• The intended route for the 10m connection cable allows it to be secured to a bulkhead (or
similar) along its length.
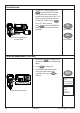
1. Install the base unit and the microphone bulkhead mount as described in the Navman VHF
RADIO INSTALLATION SHEET for 7000, 7100US, 7200US, 7100EU, 7200EU.
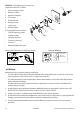
2. Drill the 25.4mm (1”)
hole through the bulkhead at your chosen location.
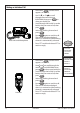
3. Install the handset wallplate components in the order shown in the picture. Finger tighten the
locking nut on the 3m handset cable to make a waterproof connection.
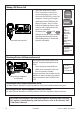
4. Install the handset bulkhead mount on the bulkhead, using the screws, nuts and washers
provided.
8
5
4
3
1
2
6
7
Drill 2 x screw
pilot holes
Drill
1 x
25.4mm (1”)
38.0
20.0 20.0
40.0
50.0
Handset WallplateHandset and Microphone Bulkhead mount