
User's Manual


Page 5 of 12
4 Installation
The KTS350-X can be mounted on a dedicated post or various other structures (e.g. walls,
roofs, gantries) by use of brackets. For correct operation of the radar, Navtech recommend
that any bracket should not move more than half degree in any direction whilst carrying the
12kg load of the radar under the required operating conditions (customer site specific). Ensure
that the radar line of sight is not obscured by any existing infrastructure.
To allow the radar to be installed in the optimum position relative to the road surface, the
KTS350-X radar should be fitted to a mounting plate which allows the tilt to be adjusted (see
below). The KTS350-X radar is fitted to the mounting plate using 4x M8 bolts in a 4” PCD
pattern (standard CCTV mounting). The procedure for adjusting the tilt to optimise the radar
performance is detailed in the section Levelling and optimising the radar position.
The mounting plate provides a simple method to fine tune the incline of the radar. For each of
the mounting holes, the bolt is fed from underneath and locked onto the mounting plate with a
nut. Two more nuts are used below the radar base plate and another is used above so that
the sensor can be positioned anywhere up or down the bolt thread, as necessary. An extra
nut should then be added once the radar is levelled to lock off the position.
4.1 User Safety
The equipment should be mounted in a fixed location maintaining minimum separation
distance from personnel when in general operation, of 60cm.
4.2 Essential Equipment
• Laptop computer with Ethernet port, Web Browser (IE v10 or higher, Chrome),
RadarView Lite v1.59.3 or higher with correct configuration file.
• Qty 2 – 25m2 Radar targets. RadarView Lite and targets are available by contacting
Navtech Radar customer support.
• Qty 2 – Tripods (for mounting radar targets)
• Qty 2 – Adjustable spanners to suit mounting bracket used (see Mounting plate
section)
• 4mm and 6mm Allen keys
• Digital inclinometer (accurate to 0.1°)
• Pair of 2-way radios Measuring wheel
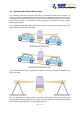
4.3 Connecting the Radar
Navtech radar sensor requires a power and a network connection.
The power and network connections run from the sensor to a local junction box (e.g. at the
base of the post) where the power supply is situated. Remember to ensure that the maximum
cable lengths remain within the capability of the selected cabling and infrastructure.