Content Installation steps........................................................................... 2 General information about remote control...................................... 6 1. Removing insulating sheet......................................................... 6 2. Replacing the lithium cell........................................................... 6 3. Note about using the remote control........................................... 6 4. Warning about lithium cells of remote control................
INSTALLATION STEPS 1. Remove 2 screws for protecting deck; 1) Remove chassis from the Slide Bracket Housing as follows: KEY PLATE PLASTIC TRIM OUT KEY PLATE If you want to remove the chassis from the Slide Bracket Housing , first remove the Plastic trim from both sides, then insert 2 Key Plates into the left and the right side of the chassis as illustrated. 2) Remove 2 screws protecting the deck as illustrated on the right; 2.
3) Connect all wires as follows: REAR AUDIO OUT RCA JACK R (red) FRONT AUDIO OUT RCA JACK R (red) RADIO ANTENNA JACK REAR AUDIO OUT RCA JACK L (white) FRONT AUDIO OUT RCA JACK L (white) Fixed ISO Female Connector The Description of the Fixed ISO Female Connector FUSE CONNECTOR A 1. 2. 3. 4. Memory +12V 5. Auto Antenna 6. 7. 12V (To Ignition Key) 8. GROUND CONNECTOR B 1. Rear Right Speaker (+) 2. Rear Right Speaker (-) 3. Front Right Speaker (+) 4. Front Right Speaker (-) 5.
4) Attaching the control panel onto the chassis. A. Align and thrush the bulge of the control panel into the hollow of the chassis. Hollow Bulge B. Push the right end of the control panel to the chassis till a click sound is heard. Panel Connector * How to clean panel connector Frequent detachment will cause the panel connectors to deteriorate. To minimize deterioration, periodically wipe the panel connector with a clean/soft/dry cloth . 5) Test to make sure that it works properly. 3.
Installation diagram DASH BOARD HEX NUT METAL MOUNTING STRAP SPRING WASHER PLAIN WASHER TAPPING SCREW CONSOLE SLIDE BRACKET HOUSING HEX BOLT -5-
General information about the remote control 1. Removing insulating sheet The remote control comes with an insulating sheet attached to the underside of the remote control as illustrated on the right . The remote control is disabled and will not work until the insulating sheet is removed. 2. Replacing the lithium cell If the electric energy of the lithium cell is weak, replace it as illustrated on the right . 1.
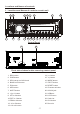
Locations and Names of controls 1. Locations and Names of controls on main unit 2 16 7 4 15 19 5 14 22 6 24 3 17 25 8 21 9 10 11 12 13 20 1 Control Panel 23 18 Front side of chassis after removing control panel 1. REL button 14. |<< button 2. PWR button 15. >>| button 3. SEL button and VOL knob 16. MODE button 4. BAND or ID3 button 17. EJECT button 5. EQ button 18. RESET button 6. APS button 19. IR sensor window 7. MUTE button 20. AUX IN jack 8. >|| or 1 button 21. USB port 9.
2. Locations and Names of controls on remote control 11 1 PWR 12 13 MUTE SEL 2 3 VOL+ 14 ENTER LOUD VOL - ST 15 MO 4 LOC 5 6 DX ID3 BAND 7 8 9 MOD APS SEARCH SCAN INT RPT 1 2 3 RDM -10 +10 4 5 6 /TOP 16 17 18 DISP 19 20 10 1. PWR button 21 11. VOL+ button 2. < button 12. MUTE button 3. LOUD button 13. SEL or ENTER button 4. VOL- button 14. > button 5. LOC/DX button 15. ST/MO button 6. ID3 or BAND button 16. DISP button 7. APS or SEARCH button 17.
General Operation 1. PWR button To power main unit on or off. 2. VOL knob or VOL+ & VOL- button To increase or decrease volume level. 3. MUTE button To cancel or resume sound. 4. SEL button To switch between BAS(bass), TRE(treble), BAL(balance), FAD(fader), EQ, BEEP, LOUD, MONO/STEREO(in radio mode), LOC/DX(in radio mode) and VOL(volume), press the SEL button repeatedly. After selecting a desired mode, rotate the VOL knob or press the VOL+ or VOL- button to set it. 5.
Radio Operation 1. BAND button To switch between F1(FM1),F2(FM2),F3(FM3),A1(AM1) and A2(AM2). 2. |<< & >>| or < & > buttons In standby mode or after no manually searching operation for a while, briefly press one of them to automatically search down or up for an available station and listen to it. To manually search down or up for a desired station and listen to it, long press one of them to enter MANUAL mode, then briefly press one of them step by step. 3.
Disc/USB/card operation 1. Loading or unloading a disc, USB or card 1.1 Loading a disc, USB or card To play files on a disc, insert a disc with label surface up into the disc slot, then it will play automatically. Label surface up * DISCS PRECAUTIONS 1) Handle a disc by its edges, do not touch the surface of play side. 2) Before inserting a disc, wipe the disc outwards from the disc centre with a clean, soft, dry, lint-free cloth. Do not use solvents/thinners such as petrol/benzine or cleaners.
To unload the USB storage, use STOP button to stop playback, then remove the USB storage. To unload the card in the card slot, use STOP button to stop playback. Press REL button to detach the control panel, push the card to release it and then pull it out of the card slot. 2. Function of buttons on main unit or remote control 1. >|| button During playback, use it to pause playback; in pause mode, use it to resume playback. 2.
2) DIR SEARCH: a. Press APS or SEARCH button twice to enter dir search mode and display NAVIGAT on LCD. b. Press the SEL button to display FOLD 00 1 , The 1 is the digit of the folder SN. in units order. after a while, it will display the name of the No. 1 folder. Then rotate the VOL knob or press the VOL+ or VOL- button to select the digit in units order of the folder SN. After selecting the desired digit in units order, press the SEL button to confirm. c. To select all digits of the desired folder SN.
AUX IN Operation 1. Use an audio cable to connect the car audio system and the external audio system through the AUX IN jack on the control panel of the car audio system and the Audio Out jack of the external audio system. Ground Right Left 2. Play the external audio system, and use the MODE button to enter AUX IN mode for the car audio system. * In AUX IN mode, the external audio system uses the car audio system as an amplifier. 3.
Troubleshooting During playback, if your player has a problem, use this guide to try and resolve the problem .If you are unable to solve the problem,consult an authorised dealer or service centre. Symptom Cause Solution Car ignition is not on.
SPECIFICATIONS GENERAL Power Supply Requirement.............................................DC 12V Current consumption....................................................10A MAX. Maximum Power Output..............4 x 25W(measured at DC 14.4 V) RADIO FM Frequency range.........................................87.5MHz -107.9MHz Usable sensitivity.............................................................15dBu I.F Frequency...............................................................10.