
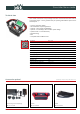
Users Manual


11
SMJ Technology – Surface Mounted Joystick
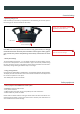
> Surface Mounted Joystick
– Switch off the transmitter and remove the battery.
– Loosen all 4 screws of the Surface Mounted Joystick with a Torx 10 screwdriver and
remove the screws.
– Remove the Surface Mounted Joystick from the top. Insert the new Surface Mounted
Joystick and make sure that the plugs and sockets are above each other when mounting.
Screw down the Surface Mounted Joystick with the 4 screws previously removed and
re-inset the batteries.
Start teach mode after changing the Surface Mounted Joystick (see below).
> Teach mode activation
To activate teach mode, the transmitter must be switched off.
1. Press and hold the “Frequency switching” key.
2. Switch the transmitter on.
3. Version 7-segment functional display (LED): The letters “JT” appear in the display
after 2 seconds.
Version LCD display: “Joy Teach” and graphical display appear after 2 seconds.
4. Release the “Frequency switching” key.
5. Move the joystick in one direction completely and return to the 0-position. Repeat
this for all directions. Repeat point 5 for all other joysticks (also applies to 3-axis
joysticks). It is not necessary to activate the teach mode again.
6. To exit the teach mode press the “On/Horn” key once. All joystick activations are
available to its full extent.
7. Attention! The transmitter is now in working mode!
The Teach mode for setting and saving the max. and min. values of the valves with pro-
portional control is activated by a separate key combination. Please note the instruction
„Teach mode“ which is described separately in the technical documentation.
If “JT” does not appear in the display,
please switch off the transmitter
and start teach mode activation from
the beginning!
3
5
41
2
Frequency change
On/Horn
6