User’s guide for OfficeStationTM -PCI (L150 Series) © Copyright by Ncomputing Co. Ltd. 2004 . - Illegal copying of this software, hardware and this documentation is prohibited by law. All other brand- and product names are trademarks of registered trademarks of the respective owners.
Safety Instructions The following instructions pertain to the risk of fire, electric shock or bodily injury. Please read all of these instructions carefully. Warning - Do not use this system on an unstable cart, stand or table. The product may fall, causing serious damage to the product. - Slots and openings in the cabinet and the back have been provided for ventilation. To ensure reliable operation of your computer, and to protect it from overheating, do not block or cover these openings.
FCC Information to Use Note : This equipment has been tested and found to comply with the limit for a Class B digital device, pursuant 15 of the FCC Rules. These limits are designed to provide reasonable protection against harmful interference in a residential installation. This equipment generates, uses, and can radiate radio frequency energy and, if not installed and used in accordance with the instructions. May cause harmful interference to radio communications.
Introductions What is OfficeStationTM ? OfficeStationTM is an unique networking device using WoIPTM (Windows over IP) based on networking standards. You can share the resources of the host PC system by connecting OfficeStationTM terminal(s) to it, thus giving you the benefit of having several networked PCs. You can connect one or more OfficeStationTM terminals to one Host PC directly using a LAN adapter and cable or via network using a hub/router.
OS (Operating System) - Windows XP Home Edition - Windows XP Professional Edition - Windows 2000 Professional Edition 5
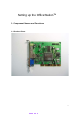
Setting up the OfficeStationTM 1.
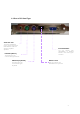
1-2 Port of PCI Card Type Audio out Jack The Stereo headphone jack is used to connect the OfficeStation’s audio out signal to amplified speakers External Monitor Let you connect your OfficeStation to External Monitor that RGB types monitors PS/2 Port (Mouse) The PS/2 port is for connect PS/2 types Mouse PS/2 Port (Keyboard) Ethernet Jack The PS/2 port is for connect PS/2 types keyboard Lets you connect your OfficeStation to a your PC 7
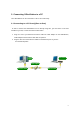
2. Connecting OfficeStation to a PC Your OfficeStation can be connected to a PC in one of two ways 2-1 Connecting to a PC Directly(Peer-to-Peer) In order to connect the OfficeStation to a PC directly using wire, you must have a LAN card installed in your PC, or must have that function built in. 1. Plug one end of your Ethernet Crossover cable into cable adapter on the OfficeStation, Cable Adapter and Crossover cable that are optional. 2.
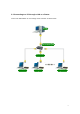
2.2 Connecting to a PC through a Hub or a Router Connect the OfficeStation to a PC through a Hub or Router as shown below. Host PC Ethernet Router /Hub Ethernet Cable OfficeStation 1 OfficeStation 2 OfficeStation..
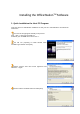
Installing the OfficeStationTM Software 1. Quick Installation the Host PC Program Insert the driver for OfficeStation installation CD into your PC’s CD-ROM driver and follow the instructions. You need to setup program manually in the present. Start -> Run -> Open type X:/install.exe Substitute your CD-ROM drive letter for the “x”. You will see preparing to install window when installation gets started.
Select installation folder windows appears Click [Next] button if you want to install NCT-2000-XP in the default folder Click [Disable password protection] button if you want to not to use password. If you want to specify password, type the password, and confirm it. Click [Installation Network Administrator Console], If you want to using the Administrator Console, and click [Next] Enter the serial number and activation key these are bottom side the OfficeStation. And type the user’s information.
Click [Next] Copies files needed for installation. When the ‘installation complete’ window appears, click [Restart] button after select “Yes, I want to restart my computer now.
2.
Click Internet Protocol (TCP/IP) Click Properties -> Select “Use an IP following IP address” Type in the IP address, subnet mask and Default gateway of the your PC And Click OK e.g) IP Address: 192.168.1.1 Subnet mask: 255.255.255.0 Default gateway: 192.168.10.
Click Network Tap -> Click Use Static IP Address-> Type in the IP Address and Gateway address of your a OfficeStation. e.g) IP Address: 192.168.1.2 Default gateway: 192.168.10.0 Click TS Option Tap -> Type the Host PC’s IP address in the Terminal Server Network address. And Click Save e.g) Terminal Server Network address: 192.168.1.
Connecting to a PC through a Hub or a Router To connect to the PC make sure the network in your computer is configured properly. Here’s how to configure the network properties to connect PC with the OfficeStation. Connect to PC with a Hub You can set up the network environment in your PC, Go to Start -> right Click on My Network Places -> Double Click on the Network Connection associated with the Ethernet adapter.
Click Network Tap -> Click Use Static IP Address-> Type in the IP Address and Gateway address of your a OfficeStation. e.g) IP Address: 192.168.1.2 Default gateway: 192.168.10.0 Click TS Option Tap -> Type the Host PC’s IP address in the Terminal Server Network address. And Click Save e.g) Terminal Server Network address: 192.168.1.
Connect to PC with a Router For additional settings or information about your Router, refer to its Manual. You can set up the network environment in your PC, Go to Start -> right Click on My Network Places -> Double Click on the Network Connection associated with the Ethernet adapter.
Click Network Tap -> Click Get Dynamic IP address -> Click TS Option Tap -> Type the Host PC’s IP address in the Terminal Server Network address from received the Router.