
- NDC Communications Network Card User Manual
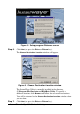


InstantWave
11-Mbps USB Wireless LAN Adapter
5
Adapter Installation
Installing the adapter consists of connecting it to the computer and installing the
driver and the utility program. Software installation will begin automatically the
first time you connect the adapter to the computer. Follow these instructions
carefully to ensure successful installation.
Connecting the Adapter for the First Time
Step 1.
If the computer does not have a built-in 3.5-inch floppy-disk drive,
connect its external drive.
Step 2.
If the computer has not yet been set up for networking, make sure you
have the Microsoft
®
Windows CD-ROM on hand. You may be
prompted to insert it during installation of the adapter software.
Step 3.
Turn the computer on and wait for the Microsoft
®
Windows desktop
display to appear.
Step 4.
Locate a free USB jack (also known as a USB “port”) on the computer.
It may be behind a small door in the computer’s housing, and it will be
marked with a tree-like symbol. Many desktop computers have two or
more USB jacks; a laptop computer may have only one.
Step 5.
Plug the matching end of the supplied USB cable or the optional USB
coupler into the computer’s USB jack.
Step 6.
Plug the other end of the cable into the matching jack on the adapter, or
fit the adapter onto the free end of the optional USB coupler.
A driver installation program, sometimes called a “wizard,” will
automatically start up.
Step 7.
Insert the USB Adapter Driver disk in the floppy-disk drive.
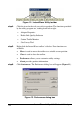
Installing the Driver
Each version of Microsoft
®
Windows has a different procedure for installing a
driver. Before carrying out the procedure for your version of Microsoft
®
Windows,
note the following tips, which apply to all supported versions:
• Make sure the driver disk is inserted at the start.
• The installation program can find the driver only if you specify the driver’s
location. Do not let the installation program carry out an “automatic” search
for a driver, and do not let it display a list of drivers.