LED TV User’s Guide 26LEDF3200B 32LEDF3200B 40LEDF3200B Need Assistance? Please visit our website at www.NFM.com or call 1-888-731-6789.
Important Information CAUTION This symbol indicates that this product incorporates double insulation between hazardous main voltage and user accessible parts. When servicing, use only identical replacement parts. RISK OF ELECTRIC SHOCK. DO NOT OPEN. Caution: To reduce the risk of electric shock, do not remove cover (or back). No user serviceable parts inside. Refer servicing to qualified service personnel.
Important Safety Instructions 1. 2. 3. 4. 5. Read and follow all instructions. Keep these instructions. Heed all warnings. Do not block any ventilation openings. Install in accordance with the manufacturer’s instructions. Do not install near any heat sources such as radiators, heat registers, stoves, or other apparatus (including amplifiers) that produce heat. 6. Do not negate the safety purpose of the polarized or grounding-type plug. A polarized plug has two blades with one wider than the other.
Table of Contents Important Information...............................2 Important Safety Instructions....................3 Chapter 1 - Connections and Setup Before Initial Setup ..................................5 Protect Against Power Surges..............5 Safety Information ...............................5 Avoid Audio Interference .....................5 Avoid Direct Light.................................5 Check Supplied Parts...........................5 Attaching Your TV to the Table Stand..........
Chapter 1 - Connections and Setup Before Initial Setup Protect Against Power Surges • Connect all components before you plug any power cords into the wall outlet or power strip. • NEVER plug your TV into an outlet that is controlled by a wall switch. • Turn off the TV before you connect or disconnect any cables. • Make sure all antennas and cables are properly grounded. Refer to the Important Safety Instructions. Safety Information • Protect components from overheating.
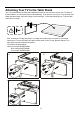
Attaching Your TV to the Table Stand Your TV comes without the table stand attached so that you can choose to mount your TV either to its table stand or to a wall (wall mount sold separately). If you want to mount your TV to the wall, don’t attach the table stand, remove the hinge cover and hinge. Follow the Mounting Your TV to the Wall instructions on page 7. First, remove the TV bag and place it on a large, flat surface such as a table or countertop.
Mounting Your TV to the Wall If you are mounting your TV to the wall, don’t attach the table stand, remove the hinge cover and hinge. To mount your TV to the wall, purchase a VESA wall mount. Model 26LEDF3200B Purchase a VESA 100 x 100, M4 screw Model 32LEDF3200B Purchase a VESA 200 x 100, M4 screw Model 40LEDF3200B Purchase a VESA 200 x 200, M6 screw The VESA number is the horizontal and vertical measurement of the mounting holes.
SPDIF OUT - DIGITAL AUDIO OUT (coaxial) Use a digital coaxial cable to connect your TV to a compatible audio receiver. HDMI IN 3 Lets you connect a component, such as a digital cable box, with an HDMI output for the best picture quality. HDMI/DVI IN 1 (High-Definition Multimedia Interface/Digital Visual Interface) Provides an uncompressed digital connection that carries both video and audio data by way of an integrated mini-plug cable.
• CMPT Y Pb Pr (Component Video) Provides good picture quality because the Rear Panel video is separated into three signals. Use three video-grade or component (right) video cables for the connection. • CMPT L AUDIO Provides left audio connection when using the CMPT VIDEO inputs. The left audio connector is usually white. For mono audio sources, be sure to use the left AUDIO input. • CMPT R AUDIO Provides right AUDIO connection when using the CMPT VIDEO inputs. The right audio connector is usually red.
Obtain the Signal The first step in connecting your TV is obtaining the signal. The back panel of your TV allows you to receive analog and/or digital channels by using the ANTENNA/CABLE INPUT. Before you connect your TV, you have to determine whether you will be using an antenna or a cable service to obtain the signal. What You Need Antenna (Rabbit Ears) Or Outdoor Antenna with Coaxial Cable Plug the antenna or coaxial cable from the wall outlet into the ANT/CABLE/SAT IN on the back of the TV.
Choose Your Connections There are several ways to connect components, such as DVD players and set-top boxes, to your TV. Please use the following chart to determine which connections are best for you. Proceed to the appropriate pages to connect your components. Note: No cables are supplied with this unit. Please purchase the necessary cables. A high-speed HDMI cable is recommended for better compatibility. Jacks Used Cable Needed Go to...
Composite Video Connection (Good) To connect a component with a video output jack, such as a DVD player, follow these steps: Example: DVD Player 1. Connect your cable and/or off-air antenna as described on page 10. 2. Connect the yellow video cable to the (AV2) VIDEO jack on the side of the TV and to the video output jack on the DVD player. 3. Connect the red and white audio cables to the (AV2) right and left audio jacks on the side of the TV and to the audio output jacks on the DVD player. 4.
HDMI Connection (Best) High-Definition Multimedia Interface (HDMI) technology is an uncompressed digital connection that carries both video and audio data by way of an integrated mini-plug cable. Example: Component with HDMI jack. 1. Connect an HDMI cable to the HDMI IN 2 jack on the back of the TV (or the HDMI/DVI IN 1 jack or HDMI IN 3 ) and to the HDMI output jack on the component. 2. Turn on your TV; then turn on the component. 3. Press the INPUT button on the remote control to open the Input list.
PC Connection To connect a personal computer and use your TV as a monitor, follow these steps: 1. Connect one end of a 15-pin monitor cable (VGA cable) to the PC IN VGA jack on the TV and the other end to the PC’s video output jack. 2. Connect an audio cable to the PC AUDIO IN jack on the back of the TV and the other end to the audio output jack on the PC. 3. Turn on your TV; then turn on the PC. 4. Press the INPUT button on the remote control to open the Input list.
Complete the Initial Setup The menu system in your TV allows all of the TV’s features to work properly. The first time you turn on your TV, the Initial Setup Wizard opens, which guides you through the setup process, including Language, TV Location, Time Zone, Tuner and Channel Scan. Set the Menu Language The first step of the setup requires you to select your preferred language for the menu system. If English is your preferred language, press the OK button on the remote control.
Auto Channel Scan Initial Setup 1. On the Tuner screen, select either Antenna or Cable/ Sat. Press the OK button or right arrow ( ) to continue to the next screen. Tuner Please select your tuner mode: Antenna Cable/Sat Note: If you are using a satellite or cable set-top box, you do not have to complete the Channel Search. 2. The Channel Scan screen is now displayed. The default choice is to scan.
Chapter 2 - Understanding the Basics Turning the TV On and Off 1. Plug the power cord from the TV into an AC power outlet. 2. Press to turn on the TV. 3. Press to turn off the TV. When you turn the TV off, it automatically goes into Standby Mode. Note: When your TV is in Standby Mode, it is still receiving some power. To completely disconnect the power, unplug the power cord. Selecting the Video Input Source 1. Turn on the TV; then, press INPUT on the remote control. The INPUT list appears. 2.
Screen Formats Screen format refers to the way the picture is displayed on your TV. Press the ZOOM -/+ button on your remote to see if a different format is available for the video you are viewing. The format changes as you press the ZOOM -/+ button, and the format type is displayed at the bottom left of the screen. Analog video is sent in a 4/3 format, which your TV displays in a 16/9 format.
Chapter 3 - Using the Remote Control Remote Control Buttons 1. INPUT – Press the INPUT button to open the Input list; then press the INPUT button repeatedly to select the video input, or press the up and down arrows ( ) to highlight options, and press OK to select the desired option. 2. Alphanumeric Buttons – Using these buttons, enter channel numbers. To enter a channel, press the number buttons and press OK (or let the entry timeout).
Chapter 4 - Using the TV Menu Using the Menu System This section explores the menus of your TV. Each menu is outlined and detailed to help you get the most from your TV. To access the menu system, follow these steps: 1. Press the MENU button to open the main menu. 2. Use the up and down arrows ( ) to highlight an option and press the OK button or the right arrow ( ) to enter its sub-menu. 3.
Color - Adjusts the richness of the color. Tint - This option adjusts the balance between the red and green levels. Color Temperature - Adjusts the color temperature from cool to warm. Note: Color and Tint are not available in PC mode.
Sound Menu The Sound Menu lets you adjust audio output. To access the Sound Menu, press MENU on the remote, and then use the up and down arrows ( ) to highlight Sound from the Main Menu. Press the OK button or right arrow key ( ) to select. The following options will be displayed: Equalizer – The five-band equalizer allows you to adjust the audio frequency settings. You can select one of the five preset options or create a custom preset.