
User's Manual Part 1

16
Auto Channel Scan
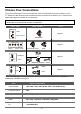
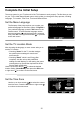
1. On the Tuner screen, select either Antenna or Cable/
Sat. Press the OK button or right arrow ( ) to continue
to the next screen.
Note: If you are using a satellite or cable set-top box,
you do not have to complete the Channel Search.
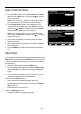
2. The Channel Scan screen is now displayed. The
default choice is to scan. Press the OK button or the
right arrow ( ) to begin the channel scan for available
channels to be stored in the TV’s memory.
Note: If you do not want to scan for channels at this
time, press the OK button or right arrow ( ) to stop the
scanning process.
3. The screen will change to show the progress of the
scanning process.
4. When the scanning is nished, the unit has completed
the Initial Setup.
5. Press CLEAR to exit the Wizard and begin watching
TV.
Skip Scan
If you select to skip the Auto Scanning process by choosing
Skip Scan or by pressing the CLEAR button, you will need
to follow this process the next time you decide to complete
this procedure.
1. Select the TV as input (using the INPUT key).
2. Go through the menu options to select the Signal Type,
which will display the option of scanning the channels
again.
3. If you are using a satellite or cable set-top box, you do
not have to complete the Channel Search.
Note: See the Setup Menu to:
• Scan channels automatically again (page 23).
• Add desired channels not memorized by the Channel
Skip (page 24).
• Reset the time zone (page 27).
See the Language Menu to:
• Change to another language (page 32).
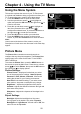
Initial Setup
Tuner
Please select your tuner mode:
Cable/Sat
Antenna
Back NextSelect
Exit
CLEAR
OK
Initial Setup
Channel Scan
First, please connect Cable/Sat or
Antenna. Start Channel Scan
now?
If you skip this step, the
Channel Scan could be performed
in Setup menu later.
Skip Scan
Scan
0%
Back NextSelect
Exit
CLEAR
OK