Getting Started with Your Phone RECENT CALLS 1. Missed 2. Received 3. Dialed* 4. Blocked 5. All 6. View Timers SETTINGS & TOOLS 1. My Verizon 2. Tools 1. Voice Commands 2. Calculator 3. Calendar 4. Alarm Clock 5. Stop Watch 6. Countdown Timer 7. World Clock 8. Notepad 3. Bluetooth Menu 1. Add New Devices 4. Sounds Settings 1. Call Sounds 1.1. Call Ringtone 1.2. Call Vibrate 2. Alert Sounds 2.1. TXT Message 2.2. Multimedia Message 2.3. Voicemail 2.4. Emergency Tone 3. Keypad Volume 4. Service Alerts 4.1.
3. Card Memory 9. Phone Info 1. My Number 2. SW/HW Version 3. Icon Glossary 4. Software Update Getting Started with Your Phone 8. Clock Format 8.1. Main Clock 8.2. Front Clock 9. Slide Show 6. Phone Settings 1. Airplane Mode 2. Set Shortcuts 2.1. Set My Shortcuts 2.2. Set Directional Keys 3. Voice Commands 4. Language 5. Location 6. Security 6.1. Edit Codes 6.2. Restrictions 6.3. Phone Lock Setting 6.4. Lock Phone Now 6.5. Restore Phone 7. System Select 8. NAM Selection 7. Call Settings 1.
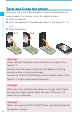
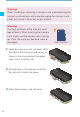
Getting Started with Your Phone Twist and Close the phone When you Twist and Close the phone, you can take pictures or record videos in a manner similar to a digital camera. 1. Open the display. 2. Twist 180 degrees in the direction shown in the figure (2.-1 to 2.-2). 3. Close the display. 2.-1 2.-2 Warning! When rotating the display, rotate clockwise as shown in the figure 2.-1. Do not rotate the display more than 180 degrees. Exerting excessive force can cause damage.
k Function Select Menu When you Twist and Close the phone with the home screen displayed, the Function Select Menu displays automatically. From the Function Select Menu, you can turn on the camera and take pictures and videos, display pictures saved in My Picture, or start a Slide Show. Getting Started with Your Phone NOTE This procedure described in this manual assumes the phone is opened with the display facing in unless noted otherwise. 1. Twist and Close the phone with the home screen displayed. 2.
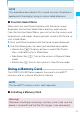
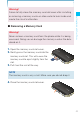
Getting Started with Your Phone Warning! When installing or removing a memory card, avoid touching the memory card contacts and avoid damaging the memory card. Either can cause malfunction or loss of data. Warning! The front and back of the memory card look different. When inserting the memory card, make sure the correct side is facing up. If not, the card may become stuck or damaged. 1. Open the memory card slot cover.
k Removing a Memory Card Warning! Never remove a memory card from the phone while it is being accessed. Doing so can damage the memory card or the data stored on it. Getting Started with Your Phone Warning! Failure to fully close the memory card slot cover after installing or removing a memory card can allow water to leak inside and create the risk of malfunction. 1. Open the memory card slot cover. 2. Gently press the memory card into the memory card slot.
Quick Access to Convenient Features Quick Access to Convenient Features Camera The CASIO EXILIM Phone is equipped with a 5.09 mega pixel camera featuring optical 3x zoom. In Take Picture mode, you can take pictures at up to 2560 × 1920 resolution. You can also adjust the focus automatically using Auto Focus or use Best Shot to take pictures with the appropriate setting just by selecting the scene to shoot. In Record Video mode you can record video with sound at resolution up to 320 × 240.
NOTE You cannot display copyright protected files on your TV. You can use the Headset Adapter/2.5mm Splitter included in the box to attach a standard 2.5mm headset to the phone. It also allows simultaneous connection of the AC Charger. AC Charger Accessory Connector Port Headset Headset Adapter/2.5mm Splitter Quick Access to Convenient Features Using the Headset Adapter/ 2.5mm Splitter Vibrate Mode Vibrate Mode mutes key tones and activates an alert for an incoming call or message.
Quick Access to Convenient Features NOTE For information about how to lock and unlock the phone, see page 164. Mute Function If you press Mute during a call, the person you are speaking with cannot hear you or any sounds from your side of the conversation. However, you can still hear them. To activate Mute: 1. During a call, press the Left Soft Key L [Mute]. 2. To unmute, press the Left Soft Key L [Unmute].
Caller ID Voice Commands Voice Commands allow you perform certain functions by simply saying a command (make calls, confirm Voicemail, etc.). Press the Voice Command Key C and follow the prompts to set up your voice command(s). For detailed instructions on how to use Voice Commands, see page 133. Quick Access to Convenient Features Caller ID displays the number of the person calling when your phone rings. If the caller’s identity is stored in Contacts, the name appears on the screen.
Entering and Editing Information Text Input Entering and Editing Information You can input and edit your Banner, Schedule, Contacts, and Messages. k Key Functions L * 0 # C Left Soft Key: Press to select one of the following text input modes: T9 Word/Abc/ABC/123/Symbols/Add Quick Text Shift: Press to change case. T9 text: T9 Word → T9 WORD → T9 word Abc text: Abc → ABC → abc Next: In T9 mode, press to display other matching words.
2. Press 8 8, wait one second, then press 8. “UT” is displayed. k Using T9 Mode Text Input Entering and Editing Information T9 mode incorporates a built-in-dictionary to determine a word based on the entered characters. A word can be entered more quickly by pressing each key once per character. To type the message “Call the office.” follow these steps: 1. Press the Left Soft Key L, select T9 Word, then press the Center Select Key c [OK]. 2. Press 2 2 5 5. 3. Press # to complete the word and add a space.
2. Press 5 5 6 6 6 7. “Kop” is displayed. 3. Press the Left Soft Key L, select T9 Word, then press the Entering and Editing Information Center Select Key c [OK]. 4. Press and hold the Clear Key C to erase the existing word. 5. Press 5 6 7. “Kop” is displayed. k Using 123 (Numbers) Text Input To type numbers using one keystroke per number: 1. Press the Left Soft Key L, select 123, then press the Center Select Key c [OK]. 2. Press 5 5 5 1 2 1 2. “5551212” is displayed.
Contacts in Your Phone’s Memory k Contacts Entries This provides easy access to your most frequently dialed phone numbers. You may store up to 500 entries with up to 4 phone numbers each. Each entry may be up to 48 characters. 1. From the home screen, enter the phone number you want to save. 2. Press the Right Soft Key R [Options], then press 1 Save. NOTE The following options are displayed: Save Save the phone number into your Contacts. 2-Sec Pause Insert a 2-sec Pause in the number.
5. Enter a name for the contact (up to 32 characters), then press the Center Select Key c [SAVE]. 6. CONTACT SAVED appears on the display. The phone number Contacts in Your Phone’s Memory reappears on screen. Press the End/Power Key E to exit, or press the Send Key D to call the number. NOTE Use Update Existing to add another phone number to a contact already stored in memory, see page 42.
2. Press the Left Soft Key L [Edit]. 3. Press the Directional Key j up or down to highlight Group then press the Left Soft Key L [Set]. 4. Press the Directional Key j up or down to select the Group, NOTE You can change the name of the group, add groups, and delete groups, see page 121. k Changing the Call Ringtone To identify who is calling by setting different ringtones for different phone numbers in your Contacts: 1.
Contacts in Your Phone’s Memory k Adding or Changing the Pictures ID To select a picture or graphic to assign to a Caller ID: 1. From the home screen, press the Right Soft Key R [Contacts], then press the Directional Key j up or down to highlight an entry. 2. Press the Left Soft Key L [Edit]. 3. Press the Directional Key j up or down to highlight Picture, then press the Left Soft Key L [Set]. 4.
3. Press the Directional Key j up or down to highlight the phone Contacts in Your Phone’s Memory number you want to add to Speed Dial, then press the Right Soft Key R [Options]. 4. Select Set Speed Dial, then press the Center Select Key c [OK]. 5. Use the keypad to enter a Speed Dial digit. Press the Center Select Key c [SET], or press the Directional Key j up or down to highlight the Speed Dial digit, then press the Center Select Key c [SET]. 6.
Contacts in Your Phone’s Memory display. Press the Directional Key j up or down to select Yes to overwrite, then press the Center Select Key c [OK]. 7. Press the Center Select Key c [SAVE] to save. A confirmation message appears. k Adding a Phone Number from the Contact List Screen 1. From the home screen, press the Right Soft Key R [Contacts]. Your Contacts display alphabetically. 2.
k Changing the Default Number 1. From the home screen, press the Right Soft Key R [Contacts]. Your Contacts display alphabetically. 2. Press the Directional Key j up or down to highlight the Contacts in Your Phone’s Memory Contact entry you want to edit, then press the Left Soft Key L [Edit]. 3. Press the Directional Key j up or down to highlight the phone number you want to assign as the Default Number, then press the Right Soft Key R [Options]. 4.
2. Press the Directional Key j up or down to highlight the Contacts in Your Phone’s Memory Contact entry you want to edit, then press the Left Soft Key L [Edit]. 3. Edit the name as necessary, then press the Center Select Key c [SAVE]. Deleting k Deleting a Phone Number from a Contact 1. From the home screen, press the Right Soft Key R [Contacts]. 2. Press the Directional Key j up or down to highlight the Contact entry, then press the Left Soft Key L [Edit]. 3.
k Deleting a Speed Dial 1. From the home screen, press the Center Select Key c [MENU]. 2. Press the Directional Key j up or down to highlight Speed Dials, then press the Center Select Key c [OK]. 3. Press the Directional Key j up or down to highlight the Speed A confirmation message appears. Phone Numbers with Pauses Pauses are used for automated systems (i.e. voicemail or calling cards). Insert a pause after a phone number then enter another group of numbers.
Contacts in Your Phone’s Memory 3. Press the Directional Key j up or down to select pause type, then press the Center Select Key c [OK]. 2-Sec Pause/Wait 4. Enter additional number(s) (pin number or credit card number). 5. Press the Right Soft Key R [Options], then press 1 Save. 6. Press the Directional Key j up or down to select Add New Contact, then press the Center Select Key c [OK]. 7. Press the Directional Key j up or down to select the phone number type, then press the Center Select Key c [OK]. 8.
Searching Your Phone’s Memory k Scrolling Through Your Contacts 1. From the home screen, press the Right Soft Key R [Contacts]. Your CONTACT LIST is displayed alphabetically. 2. Press the Directional Key j up or down to scroll through the list. Contacts in Your Phone’s Memory The CASIO EXILIM Phone is able to perform a dynamic search of the contents in your phone’s memory. A dynamic search compares entered letters or numbers against the entries in your Contacts.
k From Contacts 1. From the home screen, press the Right Soft Key R [Contacts]. 2. Press the Directional Key j up or down to select the Contact entry then press the Center Select Key c [VIEW]. Contacts in Your Phone’s Memory 3. Press the Directional Key j up or down to select the phone number. 4. Press the Send Key D to place the call.
NOTE Blocked appears only when Contacts Only or Block All is selected for Calls under Restrictions on the SETTINGS & TOOLS menu. For information about how to configure this setting, see page 131. NOTE You will need to activate One-Touch Dialing to use Speed Dialing, see page 168. Contacts in Your Phone’s Memory k Speed Dialing Speed Dialing is a convenient feature that allows you to make phone calls quickly and easily (Speed Dial 1 is reserved for Voicemail).
k For Speed Dials from 100 to 999 Contacts in Your Phone’s Memory NOTE When the three digits you input are not stored in Speed Dial, it calls the number you input. 52 1. Press the first and second Speed Dial digits, then press and hold the key of the last Speed Dial digit. 2. Your phone recalls the phone number from your Contacts, displays it briefly, and then dials it.
Camera The CASIO EXILIM Phone is equipped with a 5.09 mega pixel camera. You can shoot close-up pictures and video in macro mode. You can attach the picture and video you shot and send them as picture or video message. Camera Warning! The body of the phone may become warm when the monitor screen is displayed for a long time while taking photos or the camera is repeatedly zoomed in/out when taking movies.
Camera The image is more likely to blur if you shoot with your arms loose from your sides. • If the Shutter Sound setting is set to Shutter, do not move the CASIO EXILIM Phone until the shutter sounds. • If the Shutter Sound setting is set to Silent, do not move the CASIO EXILIM Phone until the image taken is displayed on the screen. • By using the self-timer, you can avoid blurred image due to camera movement because you do not press the shutter when shooting.
Take Picture In Take Picture mode, you can take pictures with resolution up to 2560 × 1920. You can also adjust the focus automatically using Auto Focus. The Best Shot feature lets you take pictures with the best setting just by selecting the desired scene and the Image Stabilizer reduces image blurring due to camera movement. Camera Shortcut Press and hold the Shutter Key S while displaying the home screen to directly access the Take Picture mode. k Options (Flip Open) You can change the camera options.
Flash Self Timer Camera Macro Brightness White Balance Display Setting Shutter Sound Memory Video Auto Flash/Off/On/Only This Shot To activate the camera’s timer function. (Off / 3 sec / 5 sec / 10 sec) Off/On To increase or decrease the brightness. (–5 to +5) Auto/Shade/Sunny/Fluorescent/Tungsten To select the icon display method. (Timeout/ Always) Shutter/Silent To select the picture storage location. (Phone/Card) To change to Record Video mode.
Camera NOTE Best Shot provides you with a collection of scenes that show a variety of different types of shooting conditions. When you need to change the setup of the camera, simply select the scene that matches what you are trying to achieve, and the camera sets up for it automatically. • When you set the Best Shot setting to Night View, Twilight, or Sports, the Auto Focus setting is turned off.
Camera NOTE The flash of the CASIO EXILIM Phone is provided only as an aid when shooting in a dark area and is not as bright as normal camera flash. NOTE When using the Flash, take the Picture within about 6˝ to 20˝ of the subject. When the Flash setting is set to Only This Shot, it will return to Auto Flash after you take a picture. NOTE When you turn off the camera, the Best Shot, Self Timer, and Macro settings all return to Off. When you turn off the camera, the Flash setting returns to Auto Flash.
NOTE For “Options (Flip Open)” see page 54. k Normal Shot (Flip Open) 1. From the home screen, press the Camera/Video Key V. 2. Use the following keys to change the Take Picture mode Camera settings: • Directional Key j up or down: Zoom Up/Zoom Out • Directional Key s left or right: Brightness Down/Up • Speaker/Flashlight Key F: AF Lock (When Auto Focus is set to Single Point AF or 9 Point AF) • Send Key D: Changes the Shot Mode. (Normal Shot/Multi Shot) • 1: Changes the Resolution setting.
Camera • 0: Displays the Key Guide. • Right Soft Key R [Options]: Displays the Options menu • Left Soft Key L [My Pics]: Displays My Pictures 3. To take the picture, press the Center Select Key c [TAKE]. 4. Select from the following options: • Press the Left Soft Key L [Save]. The picture is stored in My Pictures. • Press the Center Select Key c [SEND]. The picture is stored in My Pictures, and then you can send a Picture Message.
NOTE When the Auto Focus setting is set to 9 Point AF, nine focus rings appear. When the focus is locked, 1 to 3 focus rings change from white to green and the lock clicks. If the focus cannot be locked, the focus ring turns red. Camera NOTE The LED next to the lens turns red when you activate the shutter. NOTE If you press the Center Select Key c [SEND] after taking the picture with size of more than 1175KB, it is reduced to 1175KB or less and attached to a mail.
Camera • Press the Shutter Key S [Save]. The picture is stored in My Pictures. • Press the Side Select Key . [SEND]. The picture is stored in My Pictures, and then you can send a Picture Message. • Press the BACK Key , [Erase] to shoot again without saving the picture. • Press the Volume Key > [ ] to perform Perspective Adjustment.
NOTE Up to 16 blue frames and one red frame appear on the picture. The blue frames are the selectable outlines of the subject and the red frame is the currently selected outline. If there is no selectable outline around the subject, Perspective Adjustment cannot be performed. Camera NOTE After shooting with the phone Flip Opened, you can also perform Perspective Adjustment by twisting and closing the phone and then pressing the Volume Key > [Pers. ad].
NOTE When you set the Shot Mode to Multi Shot, Image Stabilizer is fixed to Off. When set to Best Shot, Night View, Twilight, and Party cannot be selected. Camera k Multi Shot View (Flip Open) Pictures taken in Multi Shot mode can be displayed full screen. 1. Perform steps 1 through 4 under “Multi Shot (Flip Open),” and select the picture you want to view. 2. Press the Center Select Key c [Options]. 3. Press the Directional Key j up or down to select View, then press the Center Select Key c [OK]. 4.
6. To take the picture, press the Shutter Key S [TAKE]. 7. Press the Volume Keys <> [ / ] to select a picture. You Camera can select from the following options: • Press the Side Select Key . [Options] to access the following options: View Displays the selected picture in full screen mode. Save All Saves all pictures in My Pictures. Erase Erases the selected picture. • Press the BACK Key , [Erase] to erase the selected picture. k Multi Shot View (Twist and Close) 1.
Take Picture mode Best Shot Person Scenery Night View Camera Person & Scenery Twilight Food Character Sports Party Monotone Sepia Reverse High Sharpness High Contrast Vivid Multi Shot Mode Image Stabilizer On Resolution 2560×1920 2048×1536 1600×1200 1280×960 66
Resolution 640×480 320×240 160×120 Quality Normal Fine Auto Flash Off Camera Flash On Only This Shot Macro On Brightness (Value) White Balance Shade Sunny Fluorescent Tungsten Shutter Sound is set to silent.
Record Video In Record Video mode you can record video with sound at resolution up to 320 × 240. An Image Stabilizer function is provided to reduce image blurring. Camera k Options (Flip Open) 1. From the home screen, press and hold the Camera/Video Key V. 2.
Camera To change to Take Picture mode. NOTE From Record Video mode, you can change to Take Picture mode by pressing the Camera/Video Key V. Camera NOTE The recording light of the CASIO EXILIM Phone is provided only as an aid when shooting in dark area and is not as bright as a normal photographing light. NOTE When you turn off the camera, the Recording Light setting returns to Auto. When you turn off the camera, the Self Timer and Macro settings return to Off.
3. Select the Option you want to change while pressing the Camera Volume Keys <> [ / ] and then press the Side Select Key . [OK]. 4. Select the setting while pressing the Volume Keys <> [ / ] and then press the Side Select Key . [OK]. NOTE For “Options (Flip Open)” see page 54. k Record Video (Flip Open) 1. From the home screen, press and hold the Camera/Video Key V. 2.
• Left Soft Key L [My Videos]: Displays My Videos 3. To begin recording, press the Center Select Key c [REC]. Camera The following keys are available while recording: • Directional Key j up or down: Zoom Up/Zoom Out • #: Changes the Recording Light setting. (Auto/Off/On/Only This Shot) • Right Soft Key R [Cancel]: Cancels recording • Left Soft Key L [Pause]: Pauses recording 4. To stop recording, press the Center Select Key c [STOP]. 5.
Camera 3. Press the Volume Keys <> [Zoom-/Zoom+] to zoom. 4. To begin recording, press the Shutter Key S [REC]. The following keys are available while recording: • Volume Keys <> [Zoom-/Zoom+]: Zoom Up/Zoom Out • BACK Key , [Cancel]: Cancels recording • Side Select Key . [Pause]: Pauses recording 5. To stop recording, press the Shutter Key S [Stop]. 6. Select from the following options: • Press the Shutter Key S [Save]. The video is stored in My Videos. • Press the Side Select Key . [SEND].
Recording Light On Only This Shot Color Effects Black & White Effect Negative Effect Sepia Effect Call Interruption is set to Block. Camera Macro On Brightness (Value) White Balance Shade Sunny Fluorescent Tungsten Start Sound is set to silent.
MEDIA CENTER MEDIA CENTER MEDIA CENTER allows you to do more than just talk on your phone. MEDIA CENTER is a technology and service that allows you to download and use applications on your phone. With MEDIA CENTER, it is quick and easy to personalize your phone to your lifestyle and tastes. Just download the applications that appeal to you.
Music & Tones MEDIA CENTER 3. Games Turn your phone into a handheld arcade with exciting and challenging games. 4. Mobile Web Get the latest news, stock quotes, and movie listings on the Internet. To start, just launch your phone’s Web browser. 5. Browse & Download Everything you need to know while you are on the go. Look for a great restaurant, the nearest ATM, etc. 6. Extras Access additional applications. You can personalize your phone’s ringtones and download music.
MEDIA CENTER V CAST Music with Rhapsody® V CAST Music with Rhapsody ® is a digital music service that lets you listen to millions of songs from thousands of artists. Discover new and old favorites in an extensive music catalog. Download V CAST Music with Rhapsody ® to sync tracks, albums, and playlists to your new compatible phone, while managing your existing PC music library all in one place. With V CAST Music, you can download music to your phone’s memory or a memory card.
NOTE You may be charged for each track you download. You must be within the Coverage Area to use V CAST. V CAST may not be available in all areas. Get New Ringtones MEDIA CENTER To connect to MEDIA CENTER and download various ringtones: 1. From the home screen, press the Center Select Key c [MENU], then press the Directional Key l left twice for MEDIA CENTER, 1 Music & Tones, 2 Get New Ringtones, 1 Get New Applications. 2.
MEDIA CENTER ringtone to, then press the Center Select Key c [OK]. Alert Sounds Press the corresponding number key to set the ringtone for one of the following: All Messages/TXT Message/Multimedia Message/Voicemail. • Press the Right Soft Key R [Options] to access the following options: Erase* Erase the current ringtone from your phone. Rename* To edit the ringtone’s title. Lock/Unlock* Lock or unlock the current ringtone in your phone. Erase All* To erase all the ringtones in your phone.
My Sounds To select a desired sound or record a new sound: 1. From the home screen, press the Center Select Key c [MENU], then press the Directional Key l left twice for MEDIA CENTER, 1 Music & Tones, 5 My Sounds. 2. Press the Directional Key j up or down to highlight a sound, then press the Center Select Key c [PLAY] to hear the sound. Press the Center Select Key c [STOP] to stop playing the sound. 3.
MEDIA CENTER Erase To erase the selected sound. Erase All To erase all the sounds in your phone. File Info Displays information on the selected sound. For PRELOADED SOUNDS: Send To send a sound. To Online Album To upload selected sound to picture server. File Info Displays information on the selected sound. k Recording New Sounds To record a new sound: 1. From the home screen, press the Center Select Key c [MENU], then press the Directional Key l left twice for MEDIA CENTER, 1 Music & Tones, 5 My Sounds.
k Erase Sound MEDIA CENTER To erase a sound: 1. From the home screen, press the Center Select Key c [MENU], then press the Directional Key l left twice for MEDIA CENTER, 1 Music & Tones, 5 My Sounds. 2. Press the Directional Key j up or down to select the sound you want to erase, and then press the Left Soft Key R[Options]. 3. Press the Directional Key j up or down to select Erase, then press the Center Select Key c [OK]. “Erase Sound?” will appear on your display. 4.
4. From the home screen on your phone, the SYNC MUSIC V MEDIA CENTER CAST MOBILE PHONE display appears. Your phone should display the message: Connected. 5. Drag and drop the song(s) you want to sync from My Library, to your V CAST Music with Rhapsody ® mobile phone, listed under the Sources tab. Once synchronization is complete, press the End/Power Key E and disconnect the USB cable.
6. Record Video 7. Online Album NOTE For more information on “Take Picture” see page 53. For more information on “Record Video” see page 66. V CAST Videos MEDIA CENTER V CAST Videos is a high-quality video content delivery service. With V CAST Videos you can enjoy full motion video clips, and the latest news, sports results, games, weather reports, and entertainment right on your phone. NOTE Application fees may apply. You must be within the Coverage Area to use V CAST.
6. To agree to the charge, press the Directional Key j up or MEDIA CENTER down to select Yes and then press the Center Select Key c [OK] to start transferring the video clip. (This confirmation screen does not appear for every video clip.) 7. The video clip is played back in streaming video.
NOTE There is no guarantee you will be able to download any particular video clip to your phone. k Deleting Video Clips 1. From the home screen, press the Center Select Key c MEDIA CENTER [MENU], then press the Directional Key l left twice for MEDIA CENTER, 2 Picture & Video, 4 My Videos. 2. Press the Directional Key a up, down, left or right to select the video you want to delete, and then press the Left Soft Key L [Erase]. 3. Press the Center Select Key c [OK] to select Yes.
MEDIA CENTER Get New Pictures To connect to MEDIA CENTER and download a variety of Pictures (images): 1. From the home screen, press the Center Select Key c [MENU], then press the Directional Key l left twice for MEDIA CENTER, 2 Picture & Video, 2 Get New Pictures. 2. Press 1 Get New Applications. Media Center will launch and take you to the download menu. 3. Press the Directional Key j up or down to select a provider’s browser, and then press the Center Select Key c [OK]. 4.
2. Press the Directional Key a up, down, left or right to select MEDIA CENTER your desired pictures, then press the Right Soft Key R [Options]. 3. Select one of the following options: Send Send a picture message. (New Picture Message/Bluetooth) Set As Assign the selected picture to display for specific tasks. (Wallpaper/Picture ID) To Online Album Access the Online Album. Take Picture Take a new picture. Get New Pictures Download various pictures. Slide Show Start a slide show.
MEDIA CENTER NOTE You can display on your TV the picture you are viewing by connecting the phone to a TV with an TV/Video Outlet Cable (sold separately).* When you connect the cable, the word “TV-OUT” and a key operation guide appear on your phone screen. For more information on “TV OUT” see page 31 for the connection method. *You cannot display copyright protected files on your TV. k Browse My Pictures (Twist and Close) You can display pictures saved in My Pictures with the phone twisted and closed. 1.
2. Press the Directional Key a up, down, left or right to select your desired picture, then press the Center Select Key c [VIEW]. 3. Press the Right Soft Key R [Options], then press 4 Rotate. 4. Press the Right Soft Key R [Rotate(R)] or the Left Soft Key L [Rotate(L)], then press the Center Select Key c [SAVE]. The rotated picture is stored in My Pictures. MEDIA CENTER NOTE The rotated picture is saved in My Pictures as a file separate from the original file.
MEDIA CENTER k Resize You can resize pictures saved in My Pictures. 1. From the home screen, press the Center Select Key c [MENU], then press the Directional Key l left twice for MEDIA CENTER, 2 Picture & Video, 3 My Pictures. 2. Press the Directional Key a up, down, left or right to select your desired picture, then press the Center Select Key c [VIEW]. 3. Press the Right Soft Key R [Options], then press 6 Resize. 4.
3. Press the Right Soft Key R [Options], then press 7 Crop. 4. Press the Directional Key j up or down to select one of the MEDIA CENTER following sizes, then press the Center Select Key c [OK]. 160 × 120 / 120 × 160 / 320 × 240 / 240 × 320 / 640 × 480 / 480 × 640 / 1280 × 960 / 960 × 1280 / 1600 × 1200 / 1200 × 1600 / 2048 × 1536 / 1536 × 2048* * The selectable size depends on the size of the image you are editing. 5.
3. Press the Right Soft Key R [Options], then press 8 Pers.Adj. 4. Select the outline of the subject with the Directional Key j up or down and press the Center Select Key c [OK]. 5. Press the Center Select Key c [SAVE]. The adjusted picture MEDIA CENTER is stored in My Pictures. NOTE Up to 16 blue frames and one red frame appear on the picture. The blue frames are the selectable outlines of the subject and the red frame is the currently selected outline.
• Directional Key s left or right: Displays the previous/next picture • Center Select Key c [STOP]: Stops the Slide Show • Left Soft Key L [Pause]: Pauses the Slide Show NOTE Slide show are set in SETTINGS & TOOLS. For more information on “Slide Show” see page 156. MEDIA CENTER NOTE The slide show continues even when the phone is twisted and closed while playing a slide show. The slide show ends if you close the phone while playing a slide show.
• BACK Key , [STOP]: Stops the Slide Show • Side Select Key . [Pause]: Pauses the Slide Show MEDIA CENTER k Erase Picture 1. From the home screen, press the Center Select Key c [MENU], then press the Directional Key l left twice for MEDIA CENTER, 2 Picture & Video, 3 My Pictures. 2. Press the Directional Key a up, down, left or right to select the picture you want to erase, and then press the Left Soft Key L [Erase]. “Erase Picture from My Pictures and Settings?” will appear on your display. 3.
1. From the home screen, press the Center Select Key c MEDIA CENTER [MENU], then press the Directional Key l left twice for MEDIA CENTER, 2 Picture & Video, 4 My Videos. 2. Press the Directional Key a up, down, left or right to select your desired videos, then press the Center Select Key c [PLAY] to play.
MEDIA CENTER NOTE When you press the Right Soft Key R [Options] after selecting a video in My Videos, you can select the following options: Send Send a Video message. Record Video Record a new video. To Online Album Access the Online Album. V CAST Videos Upload selected video and access V CAST Videos. Set As Wallpaper Set the selected video as wallpaper. Rename Rename the selected video. Move Move the selected video to the other save location.
[Erase]. “Erase Video from My Videos?” will appear on your display. 3. Press the Center Select Key c [OK] to select Yes. A confirmation message appears. k Erase All Videos 1. From the home screen, press the Center Select Key c MEDIA CENTER [MENU], then press the Directional Key l left twice for MEDIA CENTER, 2 Picture & Video, 4 My Videos. 2. Press the Right Soft Key R [Options]. 3. Press the Directional Key j up or down to select Erase All, then press the Center Select Key c [OK].
1. From the home screen, press the Center Select Key c MEDIA CENTER [MENU], then press the Directional Key l left twice for MEDIA CENTER, 3 Games. 2. Press the Center Select Key c [OK] to Get New Applications. 3. Choose the software you want from the list displayed on the screen. k Playing Downloaded Games 1. From the home screen, press the Center Select Key c [MENU], then press the Directional Key l left twice for MEDIA CENTER, 3 Games. 2.
k Starting the Mobile Web 1. From the home screen, press the Center Select Key c[MENU], then press the Directional Key l left twice for MEDIA CENTER, 4 Mobile Web. The browser launches. k Ending a Browser Session MEDIA CENTER NOTE This feature is currently unavailable outside of the United States. It is only available within the Verizon Wireless Enhanced Services Area. End a Browser session by pressing the End/Power Key E.
8: Scroll Down by Page 9: Go to next page 0: Display Bookmark List *: Display URL Info #: Refresh the page MEDIA CENTER k Action Menu Move the pointer with the Directional Key a up, down, left or right and then press the Center Select Key c [Action] to display options corresponding to your selection or the displayed page.
1. Press the Center Select Key c [Action] while browsing. 2. Press the Directional Key j up or down to select Change Display Mode, then press the Center Select Key c [OK]. 3. Press the Directional Key j up or down to select one of the following settings, then press the Center Select Key c [OK].
MEDIA CENTER Image Display Display/Do Not Display PagePilot Display Whether to automatically display the entire page when scrolling. (Display On/Display Off) Virtual Pointer Setting Virtual Pointer/Pointer Move Distance/Acceleration Speed Script Setting Whether to enable JavaScript.
Info To view App. Memory, Phone Memory, View Log, and Help information: 1. From the home screen, press the Center Select Key c [MENU]. 2. Press the Directional Key l left twice for MEDIA CENTER. 3. Press the Right Soft Key R [Info]. 4. Press the Directional Key j up or down to select one of the MEDIA CENTER following settings, and then press the Center Select Key c [OK]. App.
MESSAGING k Access and Options 1. From the home screen, press the Center Select Key c [MENU]. MESSAGING 2. Press the Directional Key l left to select MESSAGING. 3. Select a submenu. 104 1. New Message Sends a TXT Message/Picture Message/Video Message/Voice Message. 2. Inbox Displays the list of received messages. 3. Sent Displays the list of sent messages. 4. Drafts Displays the list of draft messages. 5. Voicemail Displays the number of messages in the voicemail box. 6.
Shortcut • From the home screen, the Left Soft Key L is a hot key to the Message menu. • You can make a call to the callback number by pressing the Send Key D during a message check. k New Message Alert MESSAGING There are two ways your phone alerts you to new messages: 1. The phone displays a message on the screen. 2. The message icon ( / ) appears on the display screen. In the case of an urgent message, the icon will flash and NEW Message appears.
Search for a phone number which is stored in the contact list. Recent Calls Search the phone number which is stored in the recent calls list. Groups Search the groups stored in the contact list. To Online Album To send pictures by using online Address. (This option only appears for a Picture/ Video/Voice Message) To Contacts To store the phone number in contacts. 4. Press the Center Select Key c [OK]. 5. Type your message. 6. Press the Center Select Key c [SEND]. A sending screen appears.
6. Press the Directional Key d down to highlight Picture, then press the Left Soft Key L [My Pics]. 7. Press the Directional Key a up, down, left or right to select MESSAGING the picture you want to include in your message, then press the Center Select Key c [OK]. 8. Press the Directional Key d down to highlight Sound, then press the Left Soft Key L [Sounds]. 9. Press the Directional Key j up or down to select the sound you would like to attach to your message, then press the Center Select Key c [OK].
4. Press the Center Select Key c [OK]. 5. Type your message (text or e-mail). 6. Press the Directional Key d down to highlight Video and Press the Left Soft Key L [My Videos]. 7. Press the Directional Key a up, down, left or right to select MESSAGING the video you would like to add to your message, then press the Center Select Key c [OK]. 8. Perform steps 10 through 13 under “Sending a Picture Message” on page 105. k Sending a Voice Message 1.
k Customizing the Message Using Options You can customize a new Text Message, Picture Message, Video Message or Voice Message, by pressing the Right Soft Key R [Options] to access the following features. NOTE These options vary depending on the type of message you are sending. Add Preview Save Quick Text Format Text Save As Draft Add Quick Text Add Slide Priority Level Inserts Quick Text into a message.
Inserts a pre-programmed callback number in your message. Yes/No/Edit (Text Message option) Cancel Message Cancels message editing and returns to the Message menu. Complete and then send or save the message. Callback # MESSAGING k Using Contacts to Send a Message To select an entry saved in your Contacts as the recipient instead of manually entering the address: 1. From the home screen, press the Left Soft Key L [Message], 1 New Message. 2.
Inbox k Out of Memory Warning If memory is full, no more messages can be received until enough memory space becomes available. If memory is over 80% full, one of the following warning messages will appear.
Replies to the Text or Picture/Video/Voice message. Reply w. Copy Replies to the Text or Picture/Video/Voice message with the original message attached. Forward Forwards a received message to other destination address(es). Lock Locks or unlocks the selected message. Locked messages cannot be deleted by the Erase Inbox and Erase All functions. Add To Contacts Stores the callback number, e-mail address, and numbers from the address of the received message into your Contacts.
Priority Locked Messages Sent MESSAGING The phone can store approximately 100 messages in Sent View lists. However, message storage space may be affected due to the combined size and content of all messages. 1. From the home screen, press the Left Soft Key L [Message], 3 Sent. 2. Press the Left Soft Key L [Erase] to erase a selected message. Or, press the Right Soft Key R [Options] to access the following: Forward Forwards a sent message to other destination address(es).
k Message Icon Reference The following icons are displayed in the Sent message list: Sent Messages Delivered Messages Sent failed Messages Incomplete delivery Messages Pending Messages MESSAGING Priority 114 Locked Messages Drafts To display draft messages: 1. From the home screen, press the Left Soft Key L [Message], 4 Drafts. 2. Press the Left Soft Key L [Erase] to erase a selected message. Or, press the Right Soft Key R [Options] to access the following: Send Allows you to send the selected message.
k Message Icon Reference The following icons are displayed in the Drafts message list: Draft Text Draft Pictures/Videos/Voices Priority Locked Messages Voicemail k Checking Your Voicemail Box 1. From the home screen, press the Left Soft Key L [Message], MESSAGING Your phone will alert you when you have a new voice message. To view new voice messages recorded in the Voicemail box: 5 Voicemail. 2. Options include: • Press the Left Soft Key L [Clear] to select Clear the Voicemail Counter.
MESSAGING Mobile IM To send and receive an Instant Message: 1. From the home screen, press the Left Soft Key L [Message], 7 Mobile IM. Mobile IM launches. 2. Press the Directional Key s left or right to select your instant message community, and then press the Center Select Key c [OK]. 3. To send and receive an instant message, follow the on-screen prompts and functions. Email To send an e-mail: 1. From the home screen, press the Left Soft Key L [Message], 8 Email. The browser launches. 2.
Message Settings To configure received message settings: 1. From the home screen, press the Left Soft Key L [Message], then press the Left Soft Key L again for [Settings]. 2. Press the Directional Key j up or down to highlight one of the settings, then press the Center Select Key c [OK] to select it.
MESSAGING k Message Settings Submenu Descriptions 118 1. Entry Mode Allows you to select the default input method including T9 Word, Abc, ABC, 123. 2. Auto Save Sent When activated, sent text messages are automatically saved in the Sent folder. 3. Auto Erase Inbox When activated, read/unlocked messages are automatically deleted when you exceed the storage limit. 4. TXT Auto View Allows you to directly display the content when receiving a message in the home screen. 5.
10. Messaging Font Size Selects the font size for the message. Message Erase MESSAGING To erase all messages stored in your Inbox, Drafts or Sent folders: 1. From the home screen, press the Left Soft Key L [Message], then Right Soft Key R [Options]. • Press 1 Erase Inbox to erase all messages stored in the Inbox. Then press the Directional Key j up or down to select All (read and unread) Messages or Only Read Messages, then press the Center Select Key c [OK].
CONTACTS The Contacts menu allows you to store names, phone numbers and other information in your phone’s memory. k Access and Options 1. From the home screen, press the Center Select Key c [MENU] to access the Contacts Menu. CONTACTS 2. Select a submenu: 1. New Contact 2. Contact List 3. Backup Assistant 4. Groups 5. Speed Dials 6. In Case of Emergency 7. My Name Card Shortcut In idle mode, pressing the Right Soft Key R [Contacts] is a hot key to Contact List.
2. Enter the name, then press the Directional Key d down. To change the input mode, press the Left Soft Key L [Abc]. 3. Press the Directional Key d down to enter information in other fields for the contact. Fields include: Mobile 1/Home/Work/ Email 1/Group/Picture/Ringtone/Mobile 2/Email 2 If entering information in a phone number field, press the Right Soft Key R [Options] to select one of the following options: Set Speed Dial/Set As Default/Add Pause 4.
• Press the Left Soft Key L [Edit] to edit the entry. • Press the Center Select Key c [VIEW] to view the contact information. CONTACTS Backup Assistant Backup Assistant is a wireless service that saves a copy of your phone's contacts to a secure web site. If your phone is lost, stolen or damaged, Backup Assistant restores your saved contacts to a new phone wirelessly. To set up Backup Assistant on your phone: 1. From the home screen, press the Center Select Key c[MENU], 3 Backup Assistant.
New TXT Message/New Picture Message/New Video Message/New Voice Message/Rename/Erase/Add • Press the Center Select Key c [VIEW] to view the Groups information. k Add a New Group 1. From the home screen, press the Center Select Key c [MENU], 4 Groups. 2. Press the Left Soft Key L [New]. 3. Enter a new group name, then press the Center Select Key c k Add Contacts to Group 1. From the home screen, press the Center Select Key c CONTACTS [SAVE]. [MENU], 4 Groups. 2.
3. Press 5 Rename. 4. Enter the new group name, then press the Center Select Key c [SAVE]. k Erase Group 1. From the home screen, press the Center Select Key c [MENU], 4 Groups. CONTACTS 2. Press the Directional Key j up or down to select the existing group name that you want to erase, and then press the Right Soft Key R [Options]. 3. Press 6 Erase. “Erase Group?” will appear on the screen. 4. Press the Center Select Key c [OK] to select Yes. A confirmation message appears.
In Case of Emergency (ICE) Follow the procedures below to register a Contact to be contacted in case of emergency, or to register a medical record number or other personal info. NOTE Even when the phone is locked, the Contact or personal info registered as ICE can be viewed without unlocking the phone by pressing the Left Soft Key L [ICE]. CONTACTS k Adding a Contact to ICE To register up to three different Contacts to ICE: 1.
CONTACTS k Entering Personal Info To store a Medical Record Number or other information that may be used in case of an emergency: 1. From the home screen, press the Center Select Key c [MENU] and then 6 In Case of Emergency. 2. Press the Directional Key j up or down to select Personal Info and then press the Center Select Key c [VIEW]. 3. Press the Directional Key j up or down to select Note 1, Note 2, or Note 3, and then press the Center Select Key c [ADD]. 4.
RECENT CALLS The Recent Calls menu is a list of the last phone numbers or Contact entries for calls you placed, accepted, missed, or blocked. It is continually updated as new numbers are added to the beginning of the list and the oldest entries are removed from the bottom of the list. The following icons are displayed in the Recent Calls lists (Missed, Received, Dialed, and All): indicates a dialed call. indicates a received call. k Access and Options 1.
RECENT CALLS Missed To view a list of the 90 most recently missed calls: 1. From the home screen, press the Center Select Key c [MENU], then press the Directional Key r right once for RECENT CALLS, 1 Missed. 2. Press the Directional Key j up or down to highlight an entry, then: • Press the Center Select Key c [OPEN] to view the entry. • Press the Send Key D to place a call to the number. • Press the Right Soft Key R [Options] to select: Save to Contacts To store the phone number in your Contacts.
Save to Contacts/Erase/Lock (Unlock)/Erase All/View Timers • Press the Left Soft Key L [Message] to select: New TXT Message/New Picture Message/New Video Message/New Voice Message Dialed RECENT CALLS To view a list of the 90 most recent outgoing calls: 1. From the home screen, press the Center Select Key c [MENU], then press the Directional Key r right once for RECENT CALLS, 3 Dialed. 2.
1. From the home screen, press the Center Select Key c RECENT CALLS [MENU], then press the Directional Key r right once for RECENT CALLS, 4 Blocked. 2. Enter the four-digit lock code, then press the Center Select Key c [OK]. 3. Press the Directional Key j up or down to highlight an entry, and then: • Press the Center Select Key c [OPEN] to view the entry. • Press the Send Key D to place a call to the number.
• Press the Left Soft Key L [Message] to select: New TXT Message/New Picture Message/New Video Message/New Voice Message Shortcut To view a quick list of all your recent calls, press the Send Key D from the home screen. View Timers RECENT CALLS To view the duration of selected calls: 1. From the home screen, press the Center Select Key c [MENU], then press the Directional Key r right once for RECENT CALLS. 2.
SETTINGS & TOOLS The Settings & Tools menu has options to customize your phone. k Access and Options 1. From the home screen, press the Center Select Key c [MENU]. 2. Press the Directional Key r right twice for SETTINGS & TOOLS. SETTINGS & TOOLS 3. Select a submenu: 1. My Verizon 2. Tools 3. Bluetooth Menu 4. Sounds Settings 5. Display Settings 6. Phone Settings 7. Call Settings 8. Memory 9. Phone Info My Verizon Allows you to access your account information. 1.
Shortcut From the home screen, you can directly access the My Verizon feature by pressing the Directional Key l left. NOTE Airtime is free when accessing My Verizon. Once connected, the VZW My Verizon page will be displayed. To exit the browser at any time and return to the home screen, press the End/Power Key E. Tools [MENU]. 2. Press the Directional Key r right twice for SETTINGS & TOOLS. 3. Press 2 Tools. 4. Select a submenu: SETTINGS & TOOLS k Access and Options 1.
Voice Commands The Voice Commands tool allows you to make phone calls quickly and easily by verbal command. Your phone recalls the number from your Contacts, displays it briefly, and then dials it. 1. From the home screen, press the Center Select Key c [MENU], then press the Directional Key r right twice for SETTINGS & TOOLS, 2 Tools, 1 Voice Commands. 2. Follow the prompts to set up your voice command(s).
message to Bob”) and the message will automatically start. If the name has more than one number, the system will prompt you for the number type. k Go To The “Go To” command allows you to access a menu within the phone (for example, “Go to Contact”).If no menu option is stated, a list of options will be provided. k Check - k Contact The “Contact” command allows you to access information for a contact.
k Help Help displays general information about how to use Voice Commands. SETTINGS & TOOLS k Voice Commands Settings 1. From the home screen, press the Center Select Key c [MENU], then press the Directional Key r right twice for SETTINGS & TOOLS, 2 Tools, 1 Voice Commands. 2. Press the Right Soft Key R [Settings]. 3.
1. From the home screen, press the Center Select Key c [MENU], then press the Directional Key r right twice for SETTINGS & TOOLS, 2 Tools, 2 Calculator. NOTE You can input arithmetic operators using the following keys. • Directional Key u up: + • Directional Key r right: × • Directional Key l left: ÷ • Directional Key d down: − • Center Select Key c : = SETTINGS & TOOLS NOTE To insert a decimal, press *. To insert ±, press #. For example: 1.
Shortcut You can directly access the Calendar feature by pressing the Directional Key d down. 2. Press the Directional Key a up, down, left or right to highlight the scheduled day. SETTINGS & TOOLS 3. Press the Left Soft Key L [Add]. 4. Enter the Appointment Name. 5. Press the Directional Key j up or down to highlight the information field (Start Date & Time, End Date & Time, Time Zones, Recurrence, or Alert), then press the Left Soft Key L [Set] to view your choices. 6.
• Frequency • Ringer 4. Press the Directional Key j up or down to highlight the information you want to set, then press the Left Soft Key L [Set] to view your choices. 5. Set information and press the Center Select Key c [OK]. 6. Press the Center Select Key c [SAVE] after setting all of the applicable Alarm Fields. Stop Watch 1. From the home screen, press the Center Select Key c SETTINGS & TOOLS [MENU], then press the Directional Key r right twice for SETTINGS & TOOLS, 2 Tools, 5 Stop Watch. 2.
• Press the Left Soft Key L [Reset] to reset the countdown timer. World Clock SETTINGS & TOOLS To determine the current time in another time zone or country: 1. From the home screen, press the Center Select Key c [MENU], then press the Directional Key r right twice for SETTINGS & TOOLS, 2 Tools, 7 World Clock. 2. Press the Directional Key s left or right to view the time in different cities. To view a list of the cities, press the Right Soft Key R [Cities].
Visual Distribution (AVDTP), Audio/Visual Control Transport (AVCTP) and Object Exchange (OBEX) Protocols. In addition, the phone supports the following OBEX profiles: Object Push (OPP: image and vCard transfer only) and Phone Book Access (PBAP) Profiles.* You can create and store 20 pairings within the CASIO EXILIM Phone and connect to only one device at a time. The approximate communication range for Bluetooth® wireless technology is up to 25 feet.
Add New Devices SETTINGS & TOOLS “Pairing” is the process that allows the handset to locate, establish, and register a 1-to-1 connection with the target device. To pair the phone with a new Bluetooth® device: 1. Follow the Bluetooth® accessory instructions to set the device to pairing mode. 2. From the home screen, press the Center Select Key c [MENU], then press the Directional Key r right twice for SETTINGS & TOOLS, 3 Bluetooth Menu. Press the Center Select Key c [OK] or 1 to select Add New Devices.
NOTE You do not need to input the passkey for pairing when the passkey of the Bluetooth® Headset or hands-free kit is 0000. 6. The handset will prompt you with the following message on SETTINGS & TOOLS the LCD screen: Before Connecting To [Device Name]. If you would like to always confirm before connecting to the Bluetooth® device, select Always Ask, then press the Center Select Key c [OK]. Then the handset will prompt you with the message Connect to [Device Name].
k Icon References When Searching for a Bluetooth ® Wireless Connection (neither connected nor paired) When your CASIO EXILIM Phone is searching for an audio device When your CASIO EXILIM Phone is searching for a PC When your CASIO EXILIM Phone is searching for a PDA When your CASIO EXILIM Phone is searching for another phone SETTINGS & TOOLS k Icon References When Successfully Connected When a headset is connected with your CASIO EXILIM Phone NOTE • In the Bluetooth Menu, you can disconnect the connected
2. Press the Directional Key j up or down to select the paired device. 3. Press the Right Soft Key R [Options]. 4. Press the Directional Key j up or down to select one of the k My Phone Name To edit the Bluetooth® name of your phone: 1. From the home screen, press the Center Select Key c [MENU], then press the Directional Key r right twice for SETTINGS & TOOLS, 3 Bluetooth Menu. 2. Press the Right Soft Key R [Options]. 3. Press 1 My Phone Name. 4. Use the numeric keypad to enter a new custom name. 5.
1. From the home screen, press the Center Select Key c [MENU], then press the Directional Key r right twice for SETTINGS & TOOLS, 3 Bluetooth Menu. 2. Press the Right Soft Key R [Options]. 3. Press 2 Discovery Mode. 4. Press the Directional Key j up or down to select On or Off, then press the Center Select Key c [OK]. SETTINGS & TOOLS k Supported Profiles To view brief descriptions of the profiles supported by the phone: 1.
2. Select the Contact and then press the Right Soft Key R [Options]. 3. Press the Directional Key j up or down to select Send Name Card, then press the Center Select Key c [OK]. 4. Your contact entries will be displayed in alphabetical order. Select the contact you want to send, then press the Center Select Key c [MARK]. 5. Press the Left Soft Key L [Done]. 6. Press the Directional Key j up or down to select the receiving device and then press the Center Select Key c [OK].
k Receiving a Name Card To save a Name Card received via Bluetooth® to your Contact List: 1. The message “Receive Name Card?” will appear on your phone’s display when another Bluetooth® device sends your phone a name card. 2. Press the Directional Key j up or down to select Yes, then press the Center Select Key c [OK]. Sending and Receiving Images To send and receive an image via Bluetooth®: SETTINGS & TOOLS k Sending an Image To use Bluetooth® to send an image you have saved on your phone: 1.
2. Press the Directional Key j up or down to select Yes, then press the Center Select Key c [OK]. Sounds Settings Provides options to customize the phone’s sounds. k Access and Options 1. From the home screen, press the Center Select Key c [MENU]. 2. Press the Directional Key r right twice to select SETTINGS & TOOLS. 3. Press 4 Sounds Settings. 4. Select a submenu: Call Sounds To set ringtones for types of incoming calls: 1.
k Call Vibrate 1. From the home screen, press the Center Select Key c [MENU], then press the Directional Key r right twice for SETTINGS & TOOLS, 4 Sounds Settings, 1 Call Sounds, 2 Call Vibrate. 2. Press the Directional Key j up or down to select On or Off, then press the Center Select Key c [OK]. SETTINGS & TOOLS Alert Sounds 150 To select the alert type for a new message: 1.
NOTE Emergency Tone has the following settings: Alert/Vibrate/Off. Keypad Volume To set the keypad volume: 1. From the home screen, press the Center Select Key c [MENU], then press the Directional Key r right twice for SETTINGS & TOOLS, 4 Sounds Settings, 3 Keypad Volume. 2. Adjust the volume by pressing the Directional Key j up or down, then press the Center Select Key c [OK] to save the setting. SETTINGS & TOOLS Service Alerts To set any of the three Alert options to either On or Off: 1.
Power On/Off To set the phone to sound a tone when the phone is powered on/off: 1. From the home screen, press the Center Select Key c [MENU], then press the Directional Key r right twice for SETTINGS & TOOLS, 4 Sounds Settings, 5 Power On/Off. 2. Press 1 Power On or 2 Power Off. 3. Press the Directional Key j up or down to select On/Off, then press the Center Select Key c [OK]. Display Settings SETTINGS & TOOLS Provides options to customize the phone’s display screen. k Access and Options 1.
1. From the home screen, press the Center Select Key c [MENU], then press the Directional Key r right twice for SETTINGS & TOOLS, 5 Display Settings, 1 Banner, 1 Personal Banner. 2. Enter your banner text (up to 18 characters) then press the Center Select Key c [OK]. k ERI Banner Backlight To set the duration for backlight illumination for the Main Screen and Keypad: 1.
NOTE If Always On is selected for the Backlight setting, the battery life may be shorter than the normal battery life. Contrast To set the front LCD Contrast: 1. From the home screen, press the Center Select Key c [MENU], then press the Directional Key r right twice for SETTINGS & TOOLS, 5 Display Settings, 3 Contrast. 2. Press the Directional Key s left or right to select 0% ~ 100%, then press the Center Select Key c [OK].
Display Themes To choose the color of the background screen: 1. From the home screen, press the Center Select Key c [MENU], then press the Directional Key r right twice for SETTINGS & TOOLS, 5 Display Settings, 5 Display Themes. 2. Press the Directional Key j up or down to select one of the following settings, then press the Center Select Key c [SET]. Classic/Optical Black/Positive Red/Composite Silver Main Menu Settings SETTINGS & TOOLS To change Main Menu layout and type: 1.
Dial Fonts To set the font size: 1. From the home screen, press the Center Select Key c [MENU], then press the Directional Key r right twice for SETTINGS & TOOLS, 5 Display Settings, 7 Dial Fonts. 2. Press the Directional Key j up or down to select one of the following settings, then press the Center Select Key c [OK]. Normal/Large Only SETTINGS & TOOLS Clock Format To choose the kind of clock to be displayed on the LCD screen: 1.
k Auto Start On/Off Setting whether to automatically start a slide show when CASIO EXILIM Phone is inserted into the Desk Top Cradle.: 1. From the home screen, press the Center Select Key c [MENU], then press the Directional Key r right twice for SETTINGS & TOOLS, 5 Display Settings, 9 Slide Show, 1 Auto Start On/Off. 2. Press the Directional Key j up or down to select On/Off, then press the Center Select Key c [OK]. NOTE It takes longer to fully charge the phone if slide show is displayed while charging.
k Repeat Setting whether to repeat a slide show: 1. From the home screen, press the Center Select Key c [MENU], then press the Directional Key r right twice for SETTINGS & TOOLS, 5 Display Settings, 9 Slide Show, 3 Repeat. 2. Press the Directional Key j up or down to select On/Off, then press the Center Select Key c [OK]. Phone Settings SETTINGS & TOOLS The Phone Settings menu allows you to set your phone’s system. k Access and Options 1. From the home screen, press the Center Select Key c [MENU]. 2.
SETTINGS & TOOLS, 6 Phone Settings, 1 Airplane Mode. 2. Press the Directional Key j up or down to select On/Off, then press the Center Select Key c [OK]. Set Shortcuts k Set My Shortcuts SETTINGS & TOOLS Your phone offers you the option of assigning four shortcuts for favorite or often-used functions. 1. From the home screen, press the Center Select Key c [MENU], then press the Directional Key r right twice for SETTINGS & TOOLS, 6 Phone Settings, 2 Set Shortcuts, 1 Set My Shortcuts. 2.
k Resetting My Shortcuts To return My Shortcuts to their original defaults: 1. From the home screen, press the Center Select Key c [MENU], then press the Directional Key r right twice for SETTINGS & TOOLS, 6 Phone Settings, 2 Set Shortcuts, 1 Set My Shortcuts. 2. Press the Directional Key j up or down to select Shortcut SETTINGS & TOOLS 1, Shortcut 2, Shortcut 3, or Shortcut 4, and then press the Right Soft Key R [Options]. 3. Press 1 Reset Shortcut ([1], [2], [3], or [4]), or 2 Reset My Shortcuts. 4.
1. From the home screen, press the Center Select Key c [MENU], then press the Directional Key r right twice for SETTINGS & TOOLS, 6 Phone Settings, 2 Set Shortcuts, 2 Set Directional Keys. 2. Press the Directional Key j up or down to select UP Directional Key, LEFT Directional Key, or DOWN Directional Key, and then press the Right Soft Key R [Options]. 3. Press 1 Reset ([UP], [LEFT] or [DOWN]) Key, or 2 Reset Directional Keys. 4.
Location 1. From the home screen, press the Center Select Key c [MENU], then press the Directional Key r right twice for SETTINGS & TOOLS, 6 Phone Settings, 5 Location. 2. Press the Directional Key j up or down to select one of the following settings, then press the Center Select Key c [OK]. Location On Your location is now available to the network. E911 Only Your location will be hidden from the network and applications, except for 911.
4. Press the Directional Key j up or down to select one of the following settings, then press the Center Select Key c [OK]. Phone Only Allows you to edit the Lock Code for the handset only. Calls & Services Allows you to edit the Lock Code for all Calls & Services. 5. Enter the new four-digit code in the Enter New Code field. If you selected Calls & Services in step 4, you also will need to enter the current code before entering the new code. 6.
Calls Messages SETTINGS & TOOLS Dial-Up Modem Incoming Calls/Outgoing Calls For Incoming Calls, set Allow All/Contacts Only/Block All. For Outgoing Calls, set Allow All/Contacts Only/Block All. Incoming Messages/Outgoing Messages For Incoming Messages, set Allow All/ Block All. For Outgoing Messages, set Allow All/ Block All. Allow/Block k Phone Lock Setting This setting specifies whether the phone should be locked whenever it is turned on. Lock Mode prevents the unauthorized use of your phone.
On Power Up Phone will lock when it is turned on. k Lock Phone Now 1. From the home screen, press the Center Select Key c [MENU], then press the Directional Key r right twice for SETTINGS & TOOLS, 6 Phone Settings, 6 Security. 2. Enter the four-digit Lock Code, then press the Center Select Key c [OK]. The default Lock Code is the last 4 digits of your mobile telephone number. 3. Press 4 Lock Phone Now.
System Select You can set your phone to search or roam for another network when you are not in your home area. Leave this setting as default unless you want to alter the system selection as instructed by your service provider. 1. From the home screen, press the Center Select Key c [MENU], then press the Directional Key r right twice for SETTINGS & TOOLS, 6 Phone Settings, 7 System Select. SETTINGS & TOOLS 2.
2. Press the Directional Key j up or down to select one of the following settings, then press the Center Select Key c [OK]. NAM 1/NAM 2 Call Settings The Call Setup menu allows you to designate how the phone handles both incoming and outgoing calls. k Access and Options 1. From the home screen, press the Center Select Key c [MENU]. 2. Press the Directional Key r right twice to select SETTINGS & TOOLS.
NOTE When the phone is closed, the Auto w/Handsfree Mode will not function, except when connected to a headset. When the phone is open, the Auto w/Handsfree Mode will only function when the Speakerphone is on. The Auto w/Handsfree will function after about five seconds. NOTE Flip Open is the default setting. SETTINGS & TOOLS Auto Retry To set the length of time the phone waits before automatically redialing a number when the attempted call fails: 1.
2. A warning message “Enabling TTY will disable headset audio.” appears on the display. Then press the Center Select Key c [OK]. 3. Press the Directional Key j up or down to select one of the following settings, then press the Center Select Key c [OK]. TTY Full/TTY+Talk/TTY+Hear/TTY Off One Touch Dial NOTE If One Touch Dial is disabled, Speed Dial numbers designated in your Contacts will not function. SETTINGS & TOOLS To initiate a speed dial call by holding down the speed dial digit: 1.
Data Settings Allows you to use wireless data communication services, which use subscriber terminals for access to the internet with personal computers or laptops from at least 19.2 Kbps to a maximum of 230.4 Kbps. The connection speed depends on your carrier’s network and other variables. Contact communication information specifications must match the network. SETTINGS & TOOLS 1.
Save Options To select whether to save to Phone Memory or to Card Memory when saving a file: 1. From the home screen, press the Center Select Key c [MENU], then press the Directional Key r right twice for SETTINGS & TOOLS, 8 Memory, 1 Save Options. 2. Press the Directional Key j up or down to select one of the Phone Memory Select this option to display Phone Memory information, and to delete or move files saved in Phone Memory.
k Deleting and Moving Files To delete files stored in Phone Memory, and to move files from Phone Memory to Card Memory: 1. From the home screen, press the Center Select Key c [MENU], then press the Directional Key r right twice for SETTINGS & TOOLS, 8 Memory, 2 Phone Memory. SETTINGS & TOOLS 2. Press the Directional Key j up or down to select one of the following settings, and then press the Center Select Key c [OK]. My Pictures/My Video/My Ringtones/My Music/My Sounds 3.
1. From the home screen, press the Center Select Key c [MENU], then press the Directional Key r right twice for SETTINGS & TOOLS, 8 Memory, 3 Card Memory. 2. Press 1 Card Memory Usage. k Deleting and Moving Files SETTINGS & TOOLS To delete files stored in Card Memory, and to move files from Card Memory to Phone Memory: 1. From the home screen, press the Center Select Key c [MENU], then press the Directional Key r right twice for SETTINGS & TOOLS, 8 Memory, 3 Card Memory. 2.
Phone Info To display information about your phone: 1. From the home screen, press the Center Select Key c [MENU], then press the Directional Key r right twice for SETTINGS & TOOLS, 9 Phone Info. 2. Select a submenu: My Number/SW/HW Version/Icon Glossary/Software Update SETTINGS & TOOLS My Number To view your phone’s Mobile Device Number (MDN), Mobile Identifications Number (MIN), and other device information: 1.
k Icon Glossary Digital EVDO 1x Airplane Mode Battery Strength In Call State Data Session Location On E911 Only No Service Roaming SSL TTY SETTINGS & TOOLS Voice Privacy BT On BT Connected BT Discovery Mode Alarm Only Vibrate Only Sound Off Alarm On Calendar Missed Calls New Message 175
Voicemail Speakerphone Software Update k Status To check the status of a Software Update: 1. From the home screen, press the Center Select Key c [MENU], then press the Directional Key r right twice for SETTINGS & TOOLS, 9 Phone Info, 4 Software Update. 2. Press 1 Status. SETTINGS & TOOLS k Check new To check for and execute a Software Update: 1. From the home screen, press the Center Select Key c [MENU], then press the Directional Key r right twice for SETTINGS & TOOLS, 9 Phone Info, 4 Software Update.
NOTE After the software download is complete, you can press the Right Soft Key R [Options] and then 1 Defer to set a time when Software Update should start. NOTE After the software download is complete, you can press the Right Soft Key R [Options] and then 2 Reject to reject the Software Update. k Install Deferred S/W SETTINGS & TOOLS When there is a Software Update that has been deferred, the “Check New” item changes to “Install Deferred S/W.” Executing this option executes the deferred Software Update.
Included Items This package includes all items listed below. Contact the retailer where you purchased the phone if any items are missing. • CASIO EXILIM Phone • Standard Lithium Ion Battery Included Items • AC Charger • Desk Top Cradle Easy to use while traveling on Use with the AC Charger to business or pleasure. charge your phone. • Headset Adapter/2.
Safety TIA Safety Information The following is the complete TIA Safety Information for wireless handheld phones. k Tips on Efficient Operation Do not touch the antenna unnecessarily when the phone is in use. Contact with the antenna affects call quality and may cause the phone to consume more power than otherwise needed. k Driving Safety Talking on the phone while driving is extremely dangerous and is illegal in some states. Remember, safety comes first.
k Electronic Devices Your wireless handheld portable telephone is a low power radio transmitter and receiver. When it is ON, it receives and also sends out radio frequency (RF) signals. Most modern electronic equipment is shielded from RF energy. However, certain electronic equipment may not be shielded against the RF signals from your wireless phone. Therefore, use of your phone must be restricted in certain situations.
Hearing Aids Some digital wireless phones may interfere with some hearing aids. In the event of such interference, you may want to consult your service provider (or call the customer service line to discuss alternatives). Other Medical Devices If you use any other personal medical device, consult the manufacturer of your device to determine if they are adequately shielded from external RF energy. Your physician may be able to assist you in obtaining this information.
Always request and obtain prior consent and approval of an authorized airline representative before using your phone aboard an aircraft. Always follow the instructions of the airline representative whenever using your phone aboard an aircraft, to prevent any possible interference with airborne electronic equipment. k Blasting Areas To avoid interfering with blasting operations, turn your phone OFF when in a “blasting area” or in areas posted “Turn off two-way radio”. Obey all signs and instructions.
In August 1996 the Federal Communications Commission (FCC) of the United States with its action in Report and Order FCC 96-326 adopted an updated safety standard for human exposure to radio frequency electromagnetic energy emitted by FCC regulated transmitters. Those guidelines are consistent with the safety standard previously set by both U.S. and international standards bodies. The design of this phone complies with the FCC guidelines and these international standards.
Safety 184 guidelines are based on standards that were developed by independent scientific organizations through periodic and thorough evaluation of scientific studies. The standards include a substantial safety margin designed to assure the safety of all persons, regardless of age and health. The exposure standard for wireless mobile phones employs a unit of measurement known as the Specific Absorption Rate, or SAR. The SAR limit set by the FCC is 1.6 W/kg.
The FCC has granted an Equipment Authorization for this model phone with all reported SAR levels evaluated as in compliance with the FCC RF exposure guidelines. SAR information on this model phone is on file with the FCC and can be found under the Display Grant section of http://www.fcc.gov/oet/fccid after searching on TYKNX9250. Additional information on Specific Absorption Rates (SAR) can be found on the Cellular Telecommunications & Internet Association (CTIA) web-site at http://www.phonefacts.net.
• Connect the equipment into an outlet on a circuit different from that to which the receiver is connected • Consult the dealer or an experienced radio/TV technician for help. FDA Information U.S. Food and Drug Administration Cell Phone Facts Consumer Information on Wireless Phones Safety k What kinds of phones are the subject of this update? 186 The term “wireless phone” refers here to hand-held wireless phones with built-in antennas, often called “cell,”“mobile,” or “PCS” phones.
k Do wireless phones pose a health hazard? The available scientific evidence does not show that any health problems are associated with using wireless phones. There is no proof, however, that wireless phones are absolutely safe. Wireless phones emit low levels of radiofrequency energy (RF) in the microwave range while being used. They also emit very low levels of RF when in the stand-by mode.
Safety • Support needed research into possible biological effects of RF of the type emitted by wireless phones; • Design wireless phones in a way that minimizes any RF exposure to the user that is not necessary for device function; and • Cooperate in providing users of wireless phones with the best possible information on possible effects of wireless phone use on human health 188 FDA belongs to an interagency working group of the federal agencies that have responsibility for different aspects of RF safet
Base stations are thus not the primary subject of the safety questions discussed in this document. k What are the results of the research done already? Safety The research done thus far has produced conflicting results, and many studies have suffered from flaws in their research methods. Animal experiments investigating the effects of radiofrequency energy (RF) exposures characteristic of wireless phones have yielded conflicting results that often cannot be repeated in other laboratories.
Safety k What research is needed to decide whether RF exposure from wireless phones poses a health risk? A combination of laboratory studies and epidemiological studies of people actually using wireless phones would provide some of the data that are needed. Lifetime animal exposure studies could be completed in a few years. However, very large numbers of animals would be needed to provide reliable proof of a cancer promoting effect if one exists.
been the development of a detailed agenda of research needs that has driven the establishment of new research programs around the world. The Project has also helped develop a series of public information documents on EMF issues. FDA and the Cellular Telecommunications & Internet Association (CTIA) have a formal Cooperative Research and Development Agreement (CRADA) to do research on wireless phone safety.
use a wireless phone connected to a remote antenna. Again, the scientific data do not demonstrate that wireless phones are harmful. But if you are concerned about the RF exposure from these products, you can use measures like those described above to reduce your RF exposure from wireless phone use. Safety k What about children using wireless phones? The scientific evidence does not show a danger to users of wireless phones, including children and teenagers.
absorption of RF energy in the head because the phone, which is the source of the RF emissions, will not be placed against the head. On the other hand, if the phone is mounted against the waist or other part of the body during use, then that part of the body will absorb more RF energy. Wireless phones marketed in the U.S. are required to meet safety requirements regardless of whether they are used against the head or against the body. Either configuration should result in compliance with the safety limit.
Safety k What about wireless phone interference with medical equipment? 194 Radiofrequency energy (RF) from wireless phones can interact with some electronic devices. For this reason, FDA helped develop a detailed test method to measure electromagnetic interference (EMI) of implanted cardiac pacemakers and defibrillators from wireless telephones. This test method is now part of a standard sponsored by the Association for the Advancement of Medical Instrumentation (AAMI).
Emergency Calls Never rely solely upon your wireless phone for essential communications (e.g., medical emergencies), if it can be avoided, since a wireless phone requires a complex combination of radio signals, relay stations and landline networks for its operation. Consequently, emergency calls may not always be possible under all conditions on all wireless phone systems. Your wireless phone, however, may sometimes be the only available means of communication at the scene of an accident.
dependent on: (a) the use of digital technology by the wireless network; (b) GPS satellite signals being able to reach the handset (such transmissions do not always work indoors, for example); and (c) handset signals reaching wireless “base stations” (atmospheric and environmental conditions may cause variations in handset receiving signal strength).
• Never use obscene, indecent, or profane language. • Never use your Cellular Phone to send false distress calls. • Never wiretap or otherwise intercept a phone call, unless you have first obtained the consent of the parties participating in the call. • Never make any anonymous calls to annoy, harass, or molest other people. • Never charge another account without authorization, to avoid payment for service. • Never willfully or maliciously interfere with any other radio communications.
Safety 198 DO NOT use unauthorized accessories. DO NOT disassemble the phone or its accessories. If service or repair is required, return unit to an authorized UTStarcom cellular service center. If unit is disassembled, the risk of electric shock or fire may result. DO NOT place this equipment inside the microwave or pressurized container. It may cause the explosion, product failure and fire. DO NOT throw device into the fire or heat. It may cause the explosion or fire. DO NOT short the terminal.
Safety the specified timeframe, stop recharging. It may cause leakage, heat generation, explosion or fire. If device is damaged by dropping and the internal parts are exposed, do not touch the exposed parts. You might get electric shock or injured from damaged parts. Call the customer service for assistance. Do not place device on unstable area, such as wobbly stool or slanted places. Device may drop and cause injury. Also watch for shocks, particularly during vibrator mode.
To avoid injury, do not use device as the earpiece magnet picks up metal objects such as pins. Never bring device near a floppy disk, magnetic card, magnetic tape, MOs, MDs, prepaid card, or other similar objects. It may destroy or corrupt these data. Never press or poke display with your finger or other object. It may cause damage to display. Never twist device. It may cause product failure. DO NOT put stickers on LCD screen or keypad. these stickers may touch and press keys when the Flip Top is closed.
Safety • Use only the AC charger provided with the phone. Using any charger other than the one included with the phone may damage your phone or battery. • Only use the battery and charger approved by the manufacturer. • Only use the battery for its original purpose. • Try to keep batteries in a temperature between 41°F (5°C) and 95°F (35°C). • If the battery is stored in temperatures above or below the recommended range, give it time to warm up or cool down before using.
Safety • Don’t leave the battery in hot or cold temps. Otherwise, it could significantly reduce the capacity and lifetime of the battery. • Don’t dispose of the battery into a fire. • Don’t short the positive electrode and negative electrode on battery pack. • Don’t nail, hit with hammer, or step on battery pack. It may cause fire or damage. • Don’t use the battery pack with damage or leak. Lithium ion batteries are recyclable.
Safety UTStarcom authorized service center, if repair or replacement is required. Never alter the AC cord or plug on your travel charger or desktop charger. If the plug will not fit into the available outlet, have a proper outlet installed by a qualified electrician. Never allow any liquids or water to spill on the travel charger or desktop charger when it is connected to an AC power source.
Do not touch the electric plug when starts lightning. It may cause the electric shock from thunderbolt. Do not overload a power outlet with too many devices. Games k Seizures/Blackouts Safety Warning A very small percentage of individuals may experience epileptic seizures when exposed to certain light patterns or flashing lights. Exposure to certain patterns or backgrounds on a computer screen, or while playing video games, may induce an epileptic seizure in these individuals.
• If your hands, wrists, or arms become tired or sore while playing, stop and rest for several hours before playing again. • If you continue to have sore hands, wrists, or arms during or after play, stop playing and see a doctor. Camera Safety Do not aim your camera at the sun. The sunlight passing through the camera lens may cause damage to the camera. Do not use your camera’s flash close to a person’s eyes. This may cause the person to lose eyesight temporarily and result in an accident.
Safety 206 more immune than others to this interference noise, and phones also vary in the amount of interference they generate. The wireless telephone industry has developed a rating system for wireless phones to assist hearing device users find phones that may be compatible with their hearing devices. Not all phones have been rated. Phones that are rated have the rating on their box or a label located on the box. The ratings are not guarantees.
The M mark is intended to be synonymous with the U mark. The T mark is intended to be synonymous with the UT mark. The M and T marks are recommended by the Alliance for Telecommunications Industries Solutions (ATIS). The U and UT marks are referenced in Section 20.19 of the FCC Rules. The HAC rating and measurement procedure are described in the American National Standards Institute (ANSI) C63.19 standard.
Safety 208 headsets, earbuds and Bluetooth or other wireless devices). Exposure to very loud sound has also been associated in some studies with tinnitus (a ringing in the ear), hypersensitivity to sound and distorted hearing. Individual susceptibility to noiseinduced hearing loss and other potential hearing problems varies. The amount of sound produced by a portable audio device varies depending on the nature of the sound, the device, the device settings and the headphones.
k You can obtain additional information on this subject from the following sources: American Academy of Audiology 11730 Plaza American Drive, Suite 300 Reston, VA 20190 Voice: (800) 222-2336 Email: info@audiology.org Internet: www.audiology.org Safety National Institute on Deafness and Other Communication Disorders National Institutes of Health 31 Center Drive, MSC 2320 Bethesda, MD USA 20892-2320 Voice: (301) 496-7243 Email: nidcdinfo@nih.gov Internet: http://www.nidcd.nih.
Safety industry’s recycling website www.recyclewirelessphones.com. To mail in your old wireless device to UTStarcom Personal Communications for recycling purposes, simply package your old wireless device and any accessories (including discharged batteries) in appropriate shipping materials and mail to: For Recycling UTStarcom Personal Communications LLC 555 Wireless Blvd. Hauppauge, NY 11788 Wireless phones also can be donated to the Wireless Foundation’s DONATE A PHONE® CALL TO PROTECT® 210 campaign.
12 MONTH LIMITED WARRANTY Personal Communications Devices, LLC.
(e) Defects in appearance, cosmetic, decorative or structural items such as framing and non-operative parts; (f) Product damaged from external causes such as fire, flooding, dirt, sand, weather conditions, battery leakage, blown fuse, theft or improper usage of any electrical source. The Company disclaims liability for removal or reinstallation of the product, for geographic coverage, for inadequate signal reception by the antenna or for communications range or operation of the cellular system as a whole.
12 MONTH LIMITED WARRANTY phone number and/or fax number and complete description of the problem, transportation prepaid, to the Company at the address shown below or to the place of purchase for repair or replacement processing. In addition, for reference to an authorized Warranty station in your area, you may telephone in the United States (800) 229-1235, and in Canada (800) 465-9672 (in Ontario call 416-695-3060).
Some states or provinces do not allow limitations on how long an implied warranty lasts or the exclusion or limitation of incidental or consequential damage so the above limitation or exclusions may not apply to you. This Warranty gives you specific legal rights, and you may also have other rights, which vary from state to state or province to province. IN USA: Personal Communications Devices, LLC. 555 Wireless Blvd.
Index 12 MONTH LIMITED WARRANTY ................ 209 A Add New Devices.........141 Airplane Mode ............. 158 Alarm Clock ................. 137 Alert Sounds ................ 149 All................................. 129 Answer Options ........... 167 Auto Retry .................... 167 Auto Start On/Off ......... 156 Index B Backlight...................... 152 Backup Assistant......... 121 Banner ......................... 152 Basics of Storing Contacts Entries............................ 38 Battery .
E Edit Codes ................... 162 Editing Contacts Entries ....................................... 42 Email .............................115 Emergency Calls ......... 192 Emergency Tone ......... 150 ERI ............................... 150 ERI Banner .................. 152 F FCC Regulations ......... 194 FDA Information........... 184 Front Clock .................. 156 G H Headset Adapter/2.5mm Splitter ........................... 32 I Icon Glossary ...............174 In Case of Emergency (ICE) .....
Music & Tones ............... 74 Mute Function ................ 33 My Music ....................... 77 My Name Card ............ 125 My Number.................. 173 My Pictures .................... 85 My Ringtones ................ 76 My Sounds .................... 78 My Verizon ................... 131 My Video ....................... 93 Personal Banner .......... 152 Phone Info ................... 173 Phone Lock Setting ..... 163 Phone Memory ............ 170 Phone Number with Pauses ......................
T Take Picture ................... 53 Text Input ....................... 35 Text Iput Modes ............. 35 TIA Safety Information ..................................... 178 Tools ............................ 132 TTY Mode .................... 168 Turning the Phone On and Off .......................... 19 TV-OUT ......................... 31 Twist and Close the Phone ............................ 27 TXT Message .............. 149 U Using a Memory Card ... 28 Using the Headset Adapter/ 2.5mm Splitte .........
THIS PRODUCT IS LICENSED UNDER THE MPEG-4 VISUAL PATENT PORTFOLIO LICENSE FOR THE PERSONAL AND NON-COMMERCIAL USE OF A CONSUMER FOR (i) ENCODING VIDEO IN COMPLIANCE WITH THE MPEG-4 VISUAL STANDARD (“MPEG4-VIDEO”) AND/OR (ii) DECODING MPEG4 VIDEO THAT WAS ENCODED BY A CONSUMER ENGAGED IN A PERSONAL AND NON-COMMERCIAL ACTIVITY AND/ OR WAS OBTAINED FROM A VIDEO PROVIDER LICENSED BY MPEG LA TO PROVIDE MPEG-4 VIDEO. NO LICENSE IS GRANTED OR SHALL BE IMPLIED FOR ANY OTHER USE.
T9 Text Input is covered by U.S. Pat. 5,818,437, U.S. Pat. 5,953,541, U.S. Pat. 6,011,554, 6,307,548, U.S. Pat. 6,286,064, U.S. Pat. 6,307,549 and other patents pending. This Product incorporates technology from Nuance Communications, Inc. microSD is a registered trademark of the SD Card Association. ACCESS and NetFront are trademarks or registered trademarks of ACCESS CO., LTD. in Japan and other countries. Copyright © 1996 - 2006 ACCESS CO., LTD.