PlasmaSync Plasma Monitor User’s Manual NEC Technologies
Important Information Precautions Warnings and Safety Precaution Please read this manual carefully before using your NEC PlasmaSync - 42inch Plasma Monitor PX-42M4A and keep the manual handy for future reference. The NEC PlasmaSync 4205W is designed and manufactured to provide long, trouble-free service. No maintenance other than cleaning is required. Use a soft dry cloth to clean the panel. Never use solvents such as alcohol or thinner to clean the panel surface.
To avoid damage and prolong operating life: 1. Use only with 120V 50/60Hz AC power supply. Continued operation at line voltages greater than 120 Volts AC will shorten the life of the unit, and might even cause a fire hazard. 2. Handle the unit carefully when installing it and do not drop. 3. Locate set away from heat, excessive dust, and direct sunlight. 4. Protect the inside of the unit from liquids and small metal objects.
Précautions Veuillez lire ce manuel avec attention avant d'utiliser votre PlasmaSync NEC - Moniteur Plasma 42 pouces PX-42M4A et conserver ce manuel à portée de la main pour une consultation ultérieure. ATTENTION RISQUE D’ELECTROCUTION NE PAS OUVRIR MISE EN GARDE: AFIN DE REDUIRE LES RISQUES D’ELECTROCUTION, NE PAS DEPOSER LE COUVERCLE, IL N’Y A AUCUNE PIECE UTILISABLE A L’INTERIEUR DE CET APPAREIL. NE CONFIER LES TRAVAUX D’ENTRETIEN QU’A UN PERSONNEL QUALIFIE.
Pour éviter des dommages et prolonger la durée de service de l’appareil: 1. N’utiliser qu’une source d’alimentation de 120 V 50/ 60 Hz CA. Le fait d’utiliser l’appareil en continu à des tensions de ligne supérieures à 120 Volts CA réduit sa durée de vie et risque de provoquer un incendie. 2. Manipuler l’appareil avec soin pendant son déplacement et ne pas le faire tomber. 3. Eloigner l’appareil des endroits chauds, très poussiéreux et exposés en plein soleil. 4.
Limited Warranty NEC Technologies, Inc. (hereinafter NECTECH) warrants this product to be free from defects in material and workmanship under the following terms and, subject to the conditions set forth below, agrees to repair or replace (at NECTECH's sole option) any part of the enclosed unit which proves defective. Replacement parts or products may be new or refurbished and will meet specifications of the original parts or product.
Contents How to Attach Options to the Plasma Monitor ......... 1 Introduction ..................................................... 2 Introduction to the PlasmaSync 42–inch Plasma Monitor ....................................................... 2 The features you'll enjoy include: .............................. 2 Contents of the Package ........................................... 2 Part Names and Function ................................. 3 Front View ........................................................
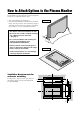
How to Attach Options to the Plasma Monitor You can attach your optional mounts or stand to the plasma monitor in one of the following two ways: Drawing A * As it is made upright. (See Drawing A) * As it is laid down with the screen face down (See Drawing B). Lay the protective sheet, which was wrapped around the monitor when it was packaged, beneath the screen surface so as not to scratch the screen face. • This device cannot be installed on its own. Be sure to use a stand or original mounting unit.
Introduction Introduction to the PlasmaSync 42–inch Plasma Monitor Contents of the Package M PlasmaSync 4205W plasma monitor NEC's PlasmaSync™ is a seamless blend of cutting-edge visual technology and sophisticated design. At 42-inches, with a 16:9 aspect ratio, the PlasmaSync™ certainly makes a big impression. However, at a mere 3.6 inches/ 91mm thin, the monitor's sleek techno-art lines blend in well with your environment.
Part Names and Function Front View POWER/STANDBY INPUT SELECT VOLUME POWER/STANDBY INPUT SELECT 1 2 VOLUME 3 4 5 1 Power Turns the monitor's power on and off. 4 Remote sensor window Receives the signals from the remote control unit. 2 INPUT SELECT Switches the input, in the following order: 5 VOLUME and Adjust the volume. → VIDEO → DVD/HD → RGB 3 POWER/STANDBY indicator When the power is on............................. Lights green. When the power is in the standby mode ... Lights red.
Rear View/ Terminal Board AC IN EXT SPEAKER R + EXT SPEAKER L G – AUDIO – + VIDEO H A B C D E L MONO R L R L R DVD/HD Y/Y CB/PB MONO A S-VIDEO IN DVD/HD IN R L VIDEO IN VIDEO IN RGB IN B CR/PR RGB AUDIO OUT (VARIABLE) REMOTE CONTROL RGB IN C EXTERNAL CONTROL F F EXTERNAL CONTROL This terminal is used when power ON/OFF, input selection and AUDIO MUTE are operated externally (by external control). See also page 38 for external control.
Remote Controller I 1 POWER Turns the monitor's power on and off. J 2 RGB/PC Press this button to select RGB/PC as the source. 1 3 2 4 RGB/PC can also be selected using the INPUT SELECT button on the monitor. The input switches as follows each time the button is pressed: POWER RGB/PC VIDEO DVD/HD → VIDEO → DVD/HD → RGB/PC POSITION / CONTROL MENU H 3 VIDEO Press this button to select VIDEO as the source. 5 VIDEO can also be selected using the INPUT SELECT button on the monitor.
C VOLUME (▲ / ▼) Adjust the volume. Battery Installation and Replacement Insert the 2 "AA" batteries, making sure to set them in with the proper polarity. D MUTE Mutes the sound. 1.Press and pull. E WIDE The type of broadcast is detected automatically, and the recommended wide screen mode is set. F DISPLAY Displays the source settings on the screen. G OFF TIMER Activates the off timer for the unit. 2.Load the batteries in the direction indicated by the "+" and "–" marks in the case.
Operating Range * Use the remote controller within a distance of about 7 m / 23ft. from the front of the monitor's remote control sensor and at a horizontal angle of within 30°. * The remote control operation may not function if the monitor's remote control sensor is exposed to direct sunlight or strong artificial light, or if there is an obstacle between the sensor and the remote control unit.
Installation AC IN To video, S-video inputs on the PlasmaSync 4205W AUDIO VIDEO Document Camera VIDEO IN L (MONO) VIDEO IN R S-VIDEO IN DVD/HD IN L VCR or Laser Disc Player DVD/HD Y/Y R RGB IN L MONO CB/PB DVD Player CR/PR R Signal cable (supplied) To Mini D-Sub 15 pin connector on the PlasmaSync 4205W AUDIO OUT L R (VARIABLE) RGB RGB IN IBM VGA or Compatibles REMOTE CONTROL EXTERNAL CONTROL Macintosh or Compatibles (Desk top type) Monitor adapter for Macintosh (supplied) External Co
Connecting Your PC Or Macintosh Computer Connecting Your VCR Or Laser Disc Player Use common RCA cables (not provided) to connect your VCR or laser disc player to your PlasmaSync 4205W. To make these connections, simply: Connecting your PC or Macintosh computer to your PlasmaSync 4205W will enable you to display your computer's screen image for an impressive presentation. The PlasmaSync 4205W supports the signals described on page 44.
External Speaker Connections EXT SPEAKER R + EXT SPEAKER L – – AUDIO – + L MONO R L L R L R VIDEO IN VIDEO IN – + S-VIDEO IN DVD/HD Y/Y DVD/HD IN R + VIDEO CB/PB MONO RGB IN CR/PR RGB AUDIO OUT RGB IN (VARIABLE) EXTERNAL CONTROL REMOTE CONTROL External speakers may be connected to the PlasmaSync 4205W to reproduce sound from VIDEO, DVD or RGB signal sources. To connect external speakers directly to the PlasmaSync 4205W: 1. Strip the ends of the speaker wires. 2.
AUDIO AC IN AUDIO OUT L R (VARIABLE) LINE OR AUX INPUT L LINE OR AUX INPUT R STEREO AMP To connect the PlasmaSync 4205W to stereo system speakers: 1. Connect AUDIO OUT L to the stereo amplifier AUX INPUT L. 2. Connect AUDIO OUT R to the stereo amplifier AUX INPUT R.
Mini D-Sub 15 Pin RGB Signal Composition Pin Assignments and Signal Levels for 15 pin RGB (Analog) 5 4 3 2 1 10 9 8 7 6 15 14 13 12 11 Pin No. Signal to be connected 1 RED 2 GREEN or Sync. on Green 3 BLUE 4 No Connection 5 GND 6 RED (GND) 7 GREEN (GND) 8 BLUE (GND) 9 No Connection 10 SYNC (GND) 11 No Connection 12 SDA 13 H. sync 14 V.
Basic Operations POWER VISUAL CONTROL To turn the unit ON and OFF: 1. Plug the power cord into an active AC power outlet. TO adjust the picture's contrast: 1, Press and hold the CONTRAST ▲ button for higher contrast. 2. Press the POWER button (on the remote controller) to turn on. 2, Press and hold the CONTRAST ▼ button for lower contrast. The monitor’s POWER/STANDBY indicator will light up(green) when the unit is on.
OFF TIMER To set the off timer: The off timer can be set to turn the power off after 30, 60, 90 or 120 minutes. 1. Press the OFF TIMER button to start the timer at 30 minutes. 2. Press the OFF TIMER button to the desired time. 3. The timer starts when the menu turns off. → 30 → 60 → 90 → 120 → 0 OFF TIMER30 To check the remaining time: 1. Once the off timer has been set, press the OFF TIMER button once. 2. The remaining time is displayed, then turns off after a few seconds. 3.
WIDE Operations Watching with a wide screen STADIUM size screen (manual) With this function, you can select one of four screen sizes. When watching videos or digital video discs 1. Press the "WIDE/AUTO WIDE" button on the remote controller. 2. Within 3 seconds ... The picture is expanded in the horizontal and vertical directions at different ratios. * Use this for watching normal video programs (4:3) with a wide screen. Press the "WIDE/AUTO WIDE" button again.
Watching computer images with a wide screen Information m Supported resolution • When 800 dot2600 line signals are input, they are converted to 640 dot2480 line or 853 dot2480 line signals. • When 1024 dot2768 line signals are input, they are converted to 614 dot2460 line or 853 dot2460 line signals. • When 1280 dot21024 line signals are input, they are converted to 640 dot2478 line. See page 44 for details on the display output of the various vesa signal standards supported by the monitor.
OSM(On Screen Menu) Controls Menu Operations 5. The change is stored until you adjust it again. The OSM window is displayed with respect the to screen as shown on the diagram. 6. Repeat steps 2 – 5 to adjust an additional item, or press the MENU button on the remote controller to exit the menu display. * Depending on the screen's mode, the OSM may be displayed slightly differently. In the explanation, the OSM section is shown close up. MAIN MENU PICTURE SOUND SCREEN FUNCTION INFORMATION SEL.
Main menu Sub menu PICTURE PICTURE MODE Functions Sets the picture mode according to the VIDEO environment and image software. CONTRAST Adjust the contrast. BRIGHTNESS Adjust the brightness. SHARPNESS Adjust the sharpness. COLOR Adjust the color. TINT Adjust the tint. COLOR TEMP Adjust the color temperature and white balance. NR Reduces noise visible in image. Main menu Sub menu Functions SOUND BASS Sets the bass. TREBLE Sets the treble. BALANCE Sets the left/right balance.
Picture Settings Menu 4. Press the “OK” button. The picture mode is set to “THEATER”. Setting the picture mode according to the brightness of the room There are four picture modes that can be used effectively according to the environment in which you are viewing the display. PICTURE PICTURE MODE : THEATER CONTRAST : BRIGHTNESS : SHARPNESS : COLOR : TINT : COLOR TEMP : 2 SEL. N R : NR–2 ADJ.
Adjusting the picture The contrast, brightness, sharpness, color and tint can be adjusted as desired. 4. Press the “OK” button. The contrast adjustment is completed. PICTURE PICTURE MODE : MEMORY CONTRAST : BRIGHTNESS : SHARPNESS : COLOR : TINT : COLOR TEMP : 2 SEL. N R : NR–2 ADJ. RETURN MENU EXIT Example: Adjusting the contrast Press the MENU button on the remote controller to display the MAIN MENU on the screen, then... 1. Use the ▲ and ▼ buttons to select “PICTURE”, then press the “OK” button.
Setting the color temperature Use this procedure to set color tone produced by the plasma display. Information m Setting the color temperature 1 ......................... High (bluer) 2 ......................... Middle (Standard) 3 ......................... Low (redder) Example: Setting "1" Press the MENU button on the remote controller to display the MAIN MENU on the screen, then... m Restoring the factory default settings Select “RESET” under the function menu.
6. Adjusts the white balance using the § and © buttons. Adjusting the color to the desired quality Use this procedure to adjust the white balance for bright pictures and dark pictures to achieve the desired color quality. Example: Adjusting the "WHITE BALANCE" Press the MENU button on the remote controller to display the MAIN MENU on the screen, then... R-GAIN 1. Use the ▲ and ▼ buttons to select “PICTURE”, then press the “OK” button. The “PICTURE” screen appears.
Reducing noise in the picture Use these settings if the picture has noise due to poor reception or when playing video tapes on which the picture quality is poor. 4. Press the “OK” button. The noise reduction mode is set to “NR-2”. PICTURE PICTURE MODE : MEMORY CONTRAST : BRIGHTNESS : SHARPNESS : COLOR : TINT : COLOR TEMP : 2 SEL. N R : NR–3 ADJ. RETURN MENU EXIT Example: Setting “NR-3” Press the MENU button on the remote controller to display the MAIN MENU on the screen, then... 1.
Sound Settings Menu To continue adjusting the sound ... Repeat from step 2. Adjusting the treble, bass and left/right balance The treble, bass and left/right balance can be adjusted to suit your tastes. 4. Press the “OK” button. The bass has now been adjusted. SOUND Example: Adjusting the bass BASS TREBLE BALANCE RETURN Press the MENU button on the remote controller to display the MAIN MENU on the screen, then... 1. Use the ▲ and ▼ buttons to select “SOUND”, then press the “OK” button.
Screen Settings Menu * If neither the § or © button is pressed within 5 sec- Adjusting the position and size of the wide screen The position and size of the wide screen can be fine-adjusted. Example: Adjusting the vertical position in the zoom mode Press the MENU button on the remote controller to display the MAIN MENU on the screen, then... V–POSITION 1. Use the ▲ and ▼ buttons to select “SCREEN”, then press the “OK” button. The “SCREEN” screen appears.
Adjusting the Position, Fine Picture, Picture Adj and Auto Picture of a computer image When a computer image is displayed, the position of the image can be adjusted and flickering of the image can be corrected. 4. To adjust the vertical position ... Use the ▲ and ▼ buttons to select “V-POSITION”. RGB ADJ. : N OR MA L MODE V–POSITION : H–POSITION : FINE PICTURE : PICTURE ADJ. : SEL. AUTO PICTURE : ON ADJ.
Information m Screen modes FULL* ................. The image is displayed over the entire screen. Set this mode for wide images. (16 : 9) NORMAL* .......... Set this mode for the same size as video pictures with a 4 : 3 aspect ratio. An 8002600 input signal is converted to a 6402480 resolution iage. An 10242768 input signal is converted to a 6142460 resolution iage. An 8002600 input signal is converted to a 6402478 resolution iage. * For compatibility set Table for Signals Supported on page 44.
4. Adjust using the § and © buttons. Adjusting the position of the menu display Use these operations to adjust the position of the menus that appear on screen. OSM ADJ. V–POSITION H–POSITION RETURN Example: Adjusting the vertical position of the menu display Press the MENU button on the remote controller to display the MAIN MENU on the screen, then... : : SEL. ADJ. MENU EXIT 1. Use the ▲ and ▼ buttons to select “SCREEN”, then press the “OK” button. The “SCREEN” menu appears. 2.
Function Settings Menu Information m Power management function * The power management function automatically reduces the monitor’s power consumption if the computer’s keyboard or mouse is not operated for a certain amount of time. This function can be used when using the monitor with a computer conforming to the VESA DPMS format. * If the computer’s power is not turned on or if the computer and selector tuner are not properly connected, the system is set to the off state.
POWER/STANDBY indicator Power management mode POWER/STANDBY indicator Power management operating status Description On Green Not activated. Horizontal and vertical synchronizing signals are present from the computer. Picture already on. Standby Yellow Activated. No horizontal synchronizing signals are sent from the computer. Operate the keyboard or mouse. The picture reappears immediately. Suspend Red Activated. No vertical synchronizing signals are sent from the computer.
Setting a computer image to the correct RGB select screen On the computer image select the RGB mode, moving image (video) mode, wide mode or digital broadcast. Information m RGB SELECT modes These 4 mode are not displayed in correct image automatically. Example: Setting the RGB SELECT mode to “VIDEO” RGB .........VESA 6402480@60Hz (Use this mode for normal computer images.) VIDEO ......To display the video signal that is converted to the RGB signal, set this mode. WIDE ........
Setting high definition images to the suitable screen size Use this procedure to set whether the number of vertical lines of the input high definition image is 1035 or 1080. Example: Setting the "1080I" mode to "1035I" Press the MENU button on the remote controller to display the MAIN MENU on the screen, then... 1. Use the ▲ and ▼ buttons to select “FUNCTION”, then press the “OK” button. The “FUNCTION” screen appears. 2. Use the ▲ and ▼ buttons to select “HD SELECT”.
Setting the on-screen display When using the monitor for presentations, etc., the monitor can be set so that the input source, screen mode, etc., do not appear. Setting the gray level for the sides of the screen Use this procedure to set the gray level for the parts on the sides of the screen on which nothing is displayed when the screen is set to the 4:3 size.
Resetting to the default values Use these operations to restore all the picture adjustments, audio settings, wide adjustments, RGB adjustments, OSM adjustments, etc., to the factory default values. Press the MENU button on the remote controller to display the MAIN MENU on the screen, then... 1. Use the ▲ and ▼ buttons to select “FUNCTION”, then press the “OK” button. The “FUNCTION” screen appears. 2. Use the ▲ and ▼ buttons to select “RESET”, then press the “OK” button.
Information Menu Checking the frequencies and polarities of input signals Use this function to check the frequencies and polarities of the signals currently being inputted from a computer, etc. Press the MENU button on the remote controller to display the MAIN MENU on the screen, then... 1. Use the ▲ and ▼ buttons to select “INFORMATION”, then press the “OK” button. The “INFORMATION” screen appears. 2. Use the ▲ and ▼ buttons to select “FREQUENCY”, then press the “OK” button.
Setting the language for the menus The menu display can be set to one of seven languages: Japanese, English, German, French, Swedish, Italian or Spanish. 5. Press the “OK” button. The display language is switched to Deutsch. 6. Once the setting is completed ... Press the “MENU” button. The menu disappears. Example: Setting the menu display to “DEUTSCH” Information Press the MENU button on the remote controller to display the MAIN MENU on the screen, then... m Language settings ENGLISH .............
Setting the video signal format Use these operations to set the video signal format (PAL, SECAM, 4.43 NTSC or 3.58 NTSC). 4. To select “3.58 NTSC” ... Use the § and © buttons to select “3.58 NTSC”. The mode switches as follows when the § and © buttons are pressed: → AUTO ↔ PAL ↔ SECAM ← → 3.58NTSC ↔ 4.43NTSC ←−− Example: Setting the video signal format to “3.58 NTSC” COLOR SYSTEM Press the MENU button on the remote controller to display the MAIN MENU on the screen, then... C OLOR S Y S TE M : 3.
External Control Application These specifications cover the communications control of the PlasmaSync 4205W by external equipment. Connections Connections are made as described below. External equipment e.g., Personal computer PlasmaSync 4205W POWER/STANDBY INPUT SELECT VOLUME 1) Connector on the PlasmaSync 4205W side: EXTERNAL CONTROL connector. Type of connector: D-Sub 9-pin male No.
Communication Format 8 bit 8 bit 8 bit 8 bit 8 bit 8 bit ○ ○ ○ 8 bit 8 bit Command 1 Unit ID 1 Unit ID 2 Command 2 Data length Data Check sum Command 1 Command 1, along with command 2, is a number used to distinguish each command. In the case of ACK, when the lower order 4 bits is FH (as in 3FH and 7FH), this indicates that the commands and data of the supported equipment have been received.
Communications Flow External equipment e.g., Personal computer PlasmaSync 4205W POWER/STANDBY INPUT SELECT VOLUME Running Sense Running Sense Running Sense The PlasmaSync 4205W regularly transmits a Running Sense command at an interval of approximately 1 second. (Running Sense command: 1FH 60H E0H 88H 00H E7H) This command is used to recognize optional equipment. The return of an ACK is not required when external equipment such as a personal computer has been connected.
Command Reference List CMD1 CMD2 LEN 01. Power ON 9FH 4EH 00H 02. Power OFF 9FH 4FH 00H 03. Input Switch Change DFH 47H 01H 04. VOLUME Gain Data DFH 7FH 03H 05. SCREEN MODE Select DFH 51H 01H 06. AUDIO Mute On 9FH 3EH 00H 07. AUDIO Mute Off 9FH 3FH 00H 08. OSD Select DFH 58H 01H 01. Power ON Function The external control equipment switches on the power of the PlasmaSync 4205W.
04. VOLUME Gain Data Function The external control equipment changes the VOLUME gain data of the PlasmaSync 4205W. Transmission Data DFH 80H 60H 7FH 03H DATA00 DATA00: USER SOUND Gain Flag DATA01: VOLUME Gain Flag DATA02: VOLUME Gain DATA01 DATA02 CKS 05H 01H 00H: Step 0 0AH: Step 10 (Default) 2AH: Step 43 ACK 7FH 60H 80H 7FH 02H DATA00 DATA00: USER SOUND Gain Flag DATA01: VOLUME Gain Flag DATA01 CKS 05H 01H 05.
08. OSD Select Function The external control equipment switches on or off the on-screen display (OSD) of the PlasmaSync 4205W. Transmission Data DFH 80H 60H DATA00 ACK 7FH 01H DATA00 CKS 01H : Screen display On 02H : Screen display Off 60H DATA00 58H 80H 58H 01H DATA00 CKS 01H : Screen display On 02H : Screen display Off * Screen display On/Off is equivalent to the screen display On/Off function of the convenient function settings. Operation is as described in the table below.
Table for Signals Supported Supported resolution • When 800 dot2600 line signals are input, they are converted to 640 dot2480 line or 853 dot2480 line signals. • When 1024 dot2768 line signals are input, they are converted to 614 dot2460 line or 853 dot2460 line signals. • When 1280 dot21024 line signals are input, they are converted to 640 dot2478 line. Screen mode Horizontal Computer input onlines this systemVertical Model signals supported Dots 2 frequency (Hz) frequency (kHz) NORMAL FULL 70.1 YES 31.
Troubleshooting If the picture quality is poor or there is some other problem, check the adjustments, operations, etc., before requesting service. Symptom Checks Remedy Picture is disturbed. Sound is noisy. Remote control unit operates erroneously. • Is a connected component set directly in front or at the side of the display? • Leave some space between the display and the connected components. The remote controller does not work.
Specifications Color Reproduction Signals Synchronization Range Horizontal : 15.5 to 64.0 kHz (automatic : step scan) Vertical : 46.0 to 85.
NEC Technologies, Inc. 1250 N.