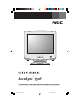
MENU SELECT AccuSync 750F TM AS750FCovercontents 1 10/16/03, 9:38 AM
Index Warning .................................................................................................................... 1 Contents ................................................................................................................. 2 Quick Start ............................................................................................................. 3 Controls ..................................................................................................................
WARNING TO PREVENT FIRE OR SHOCK HAZARDS, DO NOT EXPOSE THIS UNIT TO RAIN OR MOISTURE. ALSO, DO NOT USE THIS UNIT'S POLARIZED PLUG WITH AN EXTENSION CORD RECEPTACLE OR OTHER OUTLETS UNLESS THE PRONGS CAN BE FULLY INSERTED. REFRAIN FROM OPENING THE CABINET AS THERE ARE HIGH VOLTAGE COMPONENTS INSIDE. REFER SERVICING TO QUALIFIED SERVICE PERSONNEL. CAUTION RISK OF ELECTRIC SHOCK • DO NOT OPEN CAUTION: TO REDUCE THE RISK OF ELECTRIC SHOCK, DO NOT REMOVE COVER (OR BACK). NO USER SERVICEABLE PARTS INSIDE.
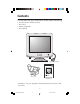
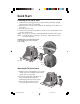
Contents Your new NEC AccuSync™ monitor box* should contain the following: • AccuSync Monitor with tilt/swivel base • Power Cord • Captive Signal Cable • User’s Manual MENU SELECT Captive Signal Cable MENU SELECT AccuSync 750F TM Power Cord User’s Manual * Remember to save your original box and packing material to transport or ship the monitor. 2 AS750Fmanualfinal.
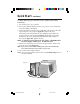
Quick Start Connecting the Tilt/Swivel stand 1. With the monitor unplugged from your system and the wall outlet, carefully turn the monitor down on a firm table 2. Align the hooks on the tilt/swivel stand with the matching slots in the base of the monitor. 3. Insert the hooks into slots. 4. Slide the tilt/swivel stand toward the front of the monitor until the latches click into the locked position. NOTE: For correct use of monitor, completely attach tilt/swivel base to the monitor.
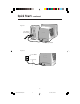
Quick Start –continued To attach the AccuSync™ monitor to your system, follow these instructions: 1. Turn off the power to your computer. 2. If necessary, install the display card into your system. For more information, refer to the display card manual. 3. For the PC: Plug the end of the video signal cable of the monitor in the video signal connector of the computer. (Figure A.1). Tighten all screws.
Quick Start –continued Figure B.1 Mac Adapter (Not Included) 15-pin mini D-SUB Captive Signal Cable Figure C.1 Power Outlet Power Cord 5 AS750Fmanualfinal.
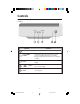
Controls OSD (On Screen Display) control buttons on the front of the monitor function as follows: Control Function Power Button Use this button to turn the monitor on or off. Power (DPMS) Indicator This Indicator lights up green when the monitor operates normally. If the monitor is in DPMS (Energy Saving) mode, this indicator color changes to amber. MENU (or OSD) Button Use this button to enter or exit the on screen display.
Controls –continued Screen Adjustment Making adjustments to the image size, position and operating parameters of the monitor is quick and easy with the On Screen Display Control system. A short example is quick and easy given below to familiarize you with the use of the controls. The following section is an outline of the available adjustments and selections you can make using the OSD. NOTE: Allow the monitor to stabilize for at least 30 minutes before making image adjustments.
Controls –continued Contrast To adjust the contrast of the screen. Brightness To adjust the brightness of the screen. Horizontal Position To move image left and right. Horizontal Size To adjust image width. Vertical Position To move image up and down. Vertical Size To adjust image height. Tilt To correct image rotation. Pincushion To correct a concave or convex bowing of the image. Pincushion Balance OSD Adjust Description To correct the balance of both sides bowing.
Controls –continued COLOR • 6500: Slightly reddish white. • 9300: Slightly bluish white. • K: Select the screen temperature which you prefer among reddish or bluish or any color in between. • RGB: Set your own color levels.
Recommended Use Safety Precautions and Maintenance FOR OPTIMUM PERFORMANCE, PLEASE NOTE THE FOLLOWING WHEN SETTING UP AND USING THE ACCUSYNC™ COLOR MONITOR: • DO NOT OPEN THE MONITOR. There are no user serviceable parts inside and opening or removing covers may expose you to dangerous shock hazards or other risks. Refer all servicing to qualified service personnel. • Do not spill any liquids into the cabinet or use your monitor near water.
Recommended Use –continued CORRECT PLACEMENT AND ADJUSTMENT OF THE MONITOR CAN REDUCE EYE, SHOULDER AND NECK FATIGUE. CHECK THE FOLLOWING WHEN YOU POSITION THE MONITOR: • Adjust the monitor height so that the top of the screen is at or slightly below eye level. Your eyes should look slightly downward when viewing the middle of the screen. • Position your monitor no closer than 12 inches and no further away than 28 inches from your eyes. The optimal distance is 18 inches.
Specifications Picture Tube Sync Input Video Input Plug & Play Power Consumption Resolutions 17 inches (16.0 inches viewable) 90 degree deflection 0.25mm dot pitch AGARAS (Anti-Glare Anti-Reflective Anti-Static) coating Horizontal Freq. 30 - 71kHz (Automatic) Vertical Freq. 55 - 120Hz (Automatic) Input Form Separate TTL, Positive/Negative Signal Input 15 pin D-Sub Connector Input Form Separate, RGB Analog, 0.
Features ClearFlat™ Shadow Mask CRT: Delivers an outstanding viewing experience with a virtually flat image, eliminating distortion and reducing glare so that what you see on-screen is as realistic and lifelike as what you see on your printed output. The patented ClearFlat CRT also offers a high contrast screen with a fine grille pitch, delivering crisp, clean text and graphics.
Troubleshooting No • • • picture Display card should be completely seated in its slot. Power Button and computer power switch should be in the ON position. Signal cable should be completely connected to display card/computer and monitor. • Check connector for bent or pushed-in pins. Image is scrolling or unstable • Signal cable should be completely attached to the computer and monitor.
References NEC-Mitsubishi Monitor Customer Service & Support Customer Service and Technical Support: (800) 632-4662 Fax: (800) 695-3044 Parts and Accessories/Macintosh Cable Adapter: (888) NEC-MITS [888-632-6487] Customer Service Policies & Processes: http://www.necmitsubishi.com/ css/ServicePolicies/ServicePolicies.htm Online Technical Support Knowledge Base: http://www.necmitsubishi.com/ css/knowledgebase.cfm Customer Service & Technical Support Email: http://www.necmitsubishi.com/ css/techform.
Limited Warranty NEC-Mitsubishi Electronics Display of America, Inc. (hereinafter “NMD-A”) warrants this Product to be free from defects in material and workmanship and, subject to the conditions set forth below, agrees to repair or replace (at NMD-A’s sole option) any part of the enclosed unit which proves defective for a period of three (3) years from the date of first consumer purchase. Spare parts are warranted for ninety (90) days.
Declaration of the Manufacturer We hereby certify that the color monitor AccuSync 750F (AS750F) is in compliance with Council Directive 73/23/EEC: – EN 60950 Council Directive 89/336/EEC: – EN 55022 – EN 61000-3-2 – EN 61000-3-3 – EN 55024 and marked with NEC-Mitsubishi Electric Visual Systems Corporation 4-13-23, Shibaura, Minato-Ku Tokyo 108-0023, Japan 17 AS750Fmanualfinal.
AVERTISSEMENT AFIN D’ÉVITER TOUT RISQUE D’INCENDIE OU D’ÉLECTROCUTION, NE PAS EXPOSER CET APPAREIL À LA PLUIE OU À L’HUMIDITÉ. NE PAS UTILISER LA FICHE D’ALIMENTATION POLARISÉE AVEC UNE PRISE DE CORDON DE RALLONGE OU AUTRE QUE SI LES BROCHES PEUVENT ÊTRE ENTIÈREMENT INTRODUITES. NE PAS OUVRIR LE BOÎTIER, LEQUEL CONTIENT DES COMPOSANTS À HAUTE TENSION. CONFIER TOUS TRAVAUX À DU PERSONNEL TECHNIQUE QUALIFIÉ.
Contenu La boîte de votre nouveau moniteur NEC AccuSyncMC contient : • Moniteur AccuSync avec socle inclinable/rotatif • Cordon d'alimentation • Câble d’interface captif • Manuel de l’utilisateur MENU SELECT Câble d’interface captif MENU SELECT TM AccuSync 750F Cordon d'alimentation Manuel de l’utilisateur * Ne pas oublier de conserver la boîte et le matériel d'emballage d'origine pour transporter ou expédier le moniteur. 19 AS750Fmanualfinal.
Mise en marche rapide Raccorder Socle Inclinable/Rotatif 1. Le moniteur étant débranché du système et de la prise de courant, renverser soigneusement le moniteur sur une table solide. 2. Alignez les crochets du socle inclinable et pivotant par rapport aux logements correspondants dans la base du moniteur. 3. Insérez les crochets dans les logements. 4. Faites glisser le socle vers l'avant du moniteur jusqu'à ce que vous entendiez le clic de verrouillage des clenches.
Mise en marche rapide –suite Pour raccorder le moniteur AccuSyncMC au système, suivre les directives ci-après : 1. Mettre l'ordinateur hors tension. 2. Si nécessaire, installer la carte vidéo dans le système. Pour plus d'informations, se reporter au mode d'emploi de la carte vidéo. 3. Pour le PC : Branchez l’extrémité du câble de signal vidéo au moniteur dans le connecteur de signal vidéo de l’ordinateur. (Figure A.1). Serrer toutes les vis.
Mise en marche rapide –suite Figure B.1 Adaptateur Mac (non fourni) Mini-fiche D-SUB à 15 broches Câble d’interface captif Figure C.1 Prise de courant Cordon d’alimentation 22 AS750Fmanualfinal.
Commandes Les boutons de réglage OSD situés sur l’avant du moniteur fournissent les fonctions suivantes : Commande Fonction Bouton d'alimentation Ce bouton permet d'allumer et éteindre le moniteur. Témoin d'alimentation (DPMS) Cette diode luminescente est verte lorsque le moniteur est en mode de fonctionnement normal. S'il passe en mode DPMS (économie d'énergie), la diode prend la couleur orange. Bouton MENU (ou OSD) Ce bouton permet de faire apparaître et disparaître l'affichage du menu à l'écran.
Commandes –suite Réglage de l'affichage Le réglage de la taille et de la position de l'image ainsi que des paramètres de fonctionnement du moniteur se fait facilement et rapidement à l'aide du système de commande OSD (menu sur écran). Le bref exemple ci-dessous vous permettra de vous familiariser avec ces commandes. La section qui suit définit dans ses lignes générales le fonctionnement des réglages et des sélections que vous pouvez effectuer avec l'OSD.
Commandes –suite Contraste Réglage du contraste de l'écran. Luminosité Réglage de la luminosité de l'écran. Position H Positionnement de l'image en largeur. Taille H Réglage de la largeur de l'image. Position V Positionnement de l'image en hauteur. Taille V Réglage de la hauteur de l'image. Inclinaison Correction de l'inclinaison de l'image. Coussin Correction des images concaves ou convexes. OSD Adjust Description Coussin Balance OSD Adjust Description Correction de l'équilibre des lignes incurvées.
Commandes –suite COULEUR • 6500: blanc tirant sur le rouge. • 9300: blanc tirant sur le bleu. • K: Sélectionnez la température d'écran que vous préférez parmi les couleurs allant du rouge au bleu. • RGB: Paramétrez les niveaux de couleur voulus.
Usage recommandé Consignes de sécurité et de maintenance POUR UN FONCTIONNEMENT OPTIMAL, PRIÈRE DE NOTER CE QUI SUIT POUR LE RÉGLAGE ET L'UTILISATION DU MONITEUR COULEUR AccuSyncMC : • NE PAS OUVRIR LE MONITEUR. Aucune pièce intérieure ne nécessite l'intervention de l'utilisateur, et l'ouverture ou la dépose des couvercles peut entraîner des risques de décharges électriques dangereuses ou d'autres risques. Confier tous travaux à du personnel technique qualifié.
Usage recommandé –suite LA MODIFICATION DE LA POSITION ET DU RÉGLAGE DU MONITEUR PEUT RÉDUIRE LA FATIGUE DES YEUX, DES ÉPAULES ET DE LA NUQUE. OBSERVER LES DIRECTIVES CI-APRÈS LORS DU POSITIONNEMENT DU MONITEUR : • Régler la hauteur du moniteur de sorte que le dessus de l'écran soit au niveau ou légèrement en-dessous du niveau des yeux. Les yeux doivent regarder légèrement vers le bas lorsque l'on regarde le milieu de l'écran.
Fiche techniques Tube cathodique Entrée sync Entrée vidéo Plug&Play Consommation 17 pouces (pour une zone visualisable de 16 pouces) déflection à 90 ° pas de masque de 0,25 mm revêtement AGARAS (anti-éblouissement, anti-reflet et anti-statique) Fréquence horiz. 30 - 71kHz (Automatique) Fréquence vertic.
Fonctions Écran cathodique à masque perforé ClearFlat™ Vous offre une vision exceptionnelle avec une image virtuellement plate, en éliminant la distorsion et en réduisant les reflets, ainsi ce que vous voyez à l’écran est aussi réaliste et proche de la réalité que ce que vous pouvez voir sur une copie imprimée. L’écran cathodique breveté ClearFlat offre également un écran à contraste élevé avec un pas de masque grille, des textes et un graphisme impeccables et éclatants.
Dépannage Pas d'image • La carte vidéo doit être complètement introduite dans sa fente. • La touche d'alimentation et le commutateur d'alimentation de l'ordinateur doivent être en position ON (Marche). • Le câble de signal doit être bien connecté à la carte vidéo /l'ordinateur. • Vérifier si le connecteur n'est pas plié ou si les broches ne sont pas renfoncées. L'image défile ou est instable • Le câble de signal doit être bien fixé à l'ordinateur.
Références Service à la clientèle et assistance technique du moniteur NEC-Mitsubishi Service à la clientèle et assistance technique: (800) 632-4662 Télécopieur: (800) 695-3044 Pièces et accessoires/adaptateur de câble Macintosh: Politiques et processus du service à la clientèle: Base de connaissance de l’assistance technique en lign: Adresse électronique du service à la clientèle et de l’assistance technique: (888) NEC-MITS [888-632-6487] http://www.necmitsubishi.com/ css/ServicePolicies/ServicePolicies.
Garantie limitée NEC-Mitsubishi Electronics Display of America, Inc. (ci-après «NMD-A») garantit que ce produit est exempt de vice de fabrication et de main-d’oeuvre et, selon les conditions énoncées ci-dessous, accepte de réparer ou remplacer, à sa discrétion, toute pièce de l’appareil concerné qui s’avérerait défectueuse et ce, pendant une période de trois (3) ans à partir de la date d’achat initial. Les pièces de rechange sont garanties pendant quatre-vingt dix (90) jours.
Déclaration du fabricant Nous certifions par la présente que les moniteurs AccuSync 750F (AS750F) conformes à la directive 73/23/EEC du Counseil: – EN 60950 la directive 89/336/EEC du Counseil: – EN 55022 – EN 61000-3-2 – EN 61000-3-3 – EN 55024 et porte le sigle NEC-Mitsubishi Electric Visual Systems Corporation 4-13-23, Shibaura, Minato-Ku Tokyo 108-0023, Japan 34 AS750Fmanualfinal.
™ Série AccuSync NEC Avis de propriété exclusive et de dégagement de responsabilité Les informations contenues dans ce document, y compris tous les designs et matériel s'y rapportant, sont la propriété de NEC-Mitsubishi Electronics Display of America et/ou ses concédants.
NEC AccuSync™ Series PROPRIETARY NOTICE AND LIABILITY DISCLAIMER The information disclosed in this document, including all designs and related materials, is the valuable property of NEC-Mitsubishi Electronics Display of America and/or its licensors, as appropriate, reserve all patent, copyright and other proprietary rights to this document, including all design, manufacturing, reproduction, use and sales rights thereto, except to the extent said rights are expressly granted to others.