AccuSy nc 70 USER'S MANUAL AccuSync 50-70-90 ™ To learn about other special offers, register your product online at www.necmitsubishi.com/productregistration AS507090.
Index Warning .................................................................................................. 1 Contents ............................................................................................... 2 Quick Start ........................................................................................... 3 Controls ................................................................................................. 7 Recommended Use ...........................................................
WARNING TO PREVENT FIRE OR SHOCK HAZARDS, DO NOT EXPOSE THIS UNIT TO RAIN OR MOISTURE. ALSO, DO NOT USE THIS UNIT'S POLARIZED PLUG WITH AN EXTENSION CORD RECEPTACLE OR OTHER OUTLETS UNLESS THE PRONGS CAN BE FULLY INSERTED. REFRAIN FROM OPENING THE CABINET AS THERE ARE HIGH VOLTAGE COMPONENTS INSIDE. REFER SERVICING TO QUALIFIED SERVICE PERSONNEL. CAUTION CAUTION: TO REDUCE THE RISK OF ELECTRIC SHOCK, MAKE SURE POWER CORD IS UNPLUGGED FROM WALL SOCKET.
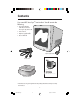
Contents Your new NEC AccuSyncTM monitor box* should contain the following: • AccuSync Monitor with tilt/swivel base AccuSync 50, 70 or 90 • Power Cord • Captive Signal Cable • User’s Manual Captive Signal Cable Power Cord AccuSyn c 70 USER'S MANUAL AccuSync 50-70-90 ™ To learn about other special offers, register your product online at www.necmitsubishi.
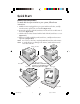
Quick Start Attach Tilt/Swivel Base To attach the AccuSync monitor to your system, follow these instructions: 1. With the monitor unplugged from your system and the wall outlet, carefully turn the monitor upside fown on a firm table (Figure TS.1). 2. Position the six hooks of the tilt/swivel base into the six holes on the bottom of the monitor (Figure TS.2). 3. Slide the tilt/swivel base forward until the latch of the tilt/swivel base is secure (Figure TS.3). 4.
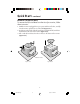
Quick Start –continued Remove Tilt/Swivel Base To remove the tilt/swivel base from the AccuSync monitor, follow these instruction: 1. With the monitor unplugged from your system and the wall outlet, carefully turn the monitor upside down on a firm table (Figure TS.1). 2. Push down on the latch of the tilt/swivel base and slide the tilt/swivel base backward from the front of the monitor (Figure TS.5). 3. Pull out the tilt/swivel base from the six holes on the bottom of the monitor (Figure TS.6).
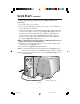
Quick Start –continued To attach the AccuSync monitor to your system, follow these instructions: 1. Turn off the power to your computer. 2. If necessary, install the display card into your system. For more information, refer to the display card manual. 3. For the PC: Connect the 15-pin mini D-SUB of the captive signal cable to the connector of the display card in your system (Figure A.1). Tighten all screws.
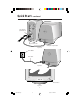
Quick Start –continued Mac Adapter (Not Included) 15-pin mini D-SUB Captive Signal Cable Figure B.1 Power Outlet Power Cord Figure C.1 Power Button Figure D.1 6 AS507090.
Controls OSM™ (On-Screen Manager) control buttons on the front of the monitor function as follows: SELECT Enters and exits the OSM menu. CONTROL –/+ Selects one of the controls and increases or decreases the adjustment. RESET Resets the highlighted control to the factory setting. Adjusts the overall image and background screen brightness. Adjusts the image brightness in relation to the background.
Controls –continued Increases or decreases the curvature of the sides either to the left or right. Rotates the entire display clockwise or counterclockwise. Degauss Control: Eliminates the buildup of stray magnetic fields that alter the correct scan of the electron beams and affect the purity of the screen colors, focus and convergence. When activated, your screen image will jump and waver a bit as the screen is demagnetized.
Recommended Use Safety Precautions and Maintenance FOR OPTIMUM PERFORMANCE, PLEASE NOTE THE FOLLOWING WHEN SETTING UP AND USING THE ACCUSYNCTM COLOR MONITOR: • DO NOT OPEN THE MONITOR. There are no user serviceable parts inside and opening or removing covers may expose you to dangerous shock hazards or other risks. Refer all servicing to qualified service personnel. • Do not spill any liquids into the cabinet or use your monitor near water.
Recommended Use –continued CORRECT PLACEMENT AND ADJUSTMENT OF THE MONITOR CAN REDUCE EYE, SHOULDER AND NECK FATIGUE. CHECK THE FOLLOWING WHEN YOU POSITION THE MONITOR: • Adjust the monitor height so that the top of the screen is at or slightly below eye level. Your eyes should look slightly downward when viewing the middle of the screen. • Position your monitor no closer than 12 inches and no further away than 28 inches from your eyes. The optimal distance is 18 inches.
Specifications AccuSyncTM 50 Monitor Monitor Specifications Picture Tube Diagonal: Viewable Image Size: Radius: Input Signal Video: Sync: Display Colors Synchronization Range 15 inch 14 inch 1080 mm 90° deflection, 0.28 mm trio dot pitch, medium short persistence phosphor, multi-layered, anti-static screen coating, semi-tint screen, Invar Shadow Mask and OptiClear® screen surface. ANALOG 0.7 Vp-p/75 Ohms Separate sync. TTL Level Horizontal sync. Positive/Negative Vertical sync.
Specifications –continued AccuSyncTM 70 Monitor Monitor Specifications Picture Tube Diagonal: Viewable Image Size: Radius: Input Signal Video: Sync: Display Colors Synchronization Range 17 inch 16 inch 1210 mm 90° deflection, 0.27 mm trio dot pitch, medium short persistence phosphor, multi-layered, anti-static screen coating, semi-tint screen, Invar Shadow Mask and OptiClear® screen. ANALOG 0.7 Vp-p/75 Ohms Separate sync. TTL Level Horizontal sync. Positive/Negative Vertical sync.
Specifications –continued AccuSyncTM 90 Monitor Monitor Specifications Picture Tube Diagonal: Viewable Image Size: Radius: Input Signal Video: Sync: Display Colors Synchronization Range 19 inch 18 inch 1360 mm 90° deflection, 0.26 mm trio dot pitch, medium short persistence phosphor, multi-layered, anti-static screen coating, semi-tint screen, Invar Shadow Mask and OptiClear® screen surface. ANALOG 0.7 Vp-p/75 Ohms Separate sync. TTL Level Horizontal sync. Positive/Negative Vertical sync.
Features OptiClear® Screen Surface: Reduces reflection and glare and increases contrast without sacrificing focus level, clarity or brightness. Along with the flat square technology CRT, a high contrast screen delivers crisp, clean text and graphics.
Troubleshooting No • • • • picture Display card should be completely seated in its slot. Power Button and computer power switch should be in the ON position. Signal cable should be completely connected to display card/computer. Check connector for bent or pushed-in pins. Image is scrolling or unstable • Signal cable should be completely attached to the computer. • Check pin assignments and signal timings of the monitor and your display card with respect to recommended timings and pin assignments.
References • BBS (978) 742-8706 NEC-Mitsubishi Electronics Display of America, Inc. Remote Bulletin Board System is an electronic service accessible with your system and a modem. Communication parameters are: 300/1200/2400/9600/14.4k/28.8k/33.
Limited Warranty NEC-Mitsubishi Electronics Display of America, Inc. (hereinafter “NMD-A”) warrants this Product to be free from defects in material and workmanship and, subject to the conditions set forth below, agrees to repair or replace (at NMD-A’s sole option) any part of the enclosed unit which proves defective for a period of three (3) years from the date of first consumer purchase. Spare parts are warranted for ninety (90) days.
Notes 18 AS507090.
AVERTISSEMENT AFIN D’ÉVITER TOUT RISQUE D’INCENDIE OU D’ÉLECTROCUTION, NE PAS EXPOSER CET APPAREIL À LA PLUIE OU À L’HUMIDITÉ. NE PAS UTILISER LA FICHE D’ALIMENTATION POLARISÉE AVEC UNE PRISE DE CORDON DE RALLONGE OU AUTRE PRISE SAUF SI LES BROCHES PEUVENT ÊTRE ENTIÈREMENT INTRODUITES. NE PAS OUVRIR LE BOÎTIER, LEQUEL CONTIENT DES COMPOSANTS À HAUTE TENSION. CONFIER TOUS TRAVAUX À DU PERSONNEL TECHNIQUE QUALIFIÉ.
Contenu La boîte de votre nouveau moniteur NEC AccuSyncMC contient : • Moniteur AccuSync avec socle inclinable/rotatif AccuSync 50, 70 au 90 • Cordon d'alimentation • Câble de signal captif • Manuel de l’utilisateur Câble de signal captif Cordon d'alimentation AccuSyn c 70 USER'S MANUAL AccuSync 50-70-90 ™ To learn about other special offers, register your product online at www.necmitsubishi.
Mise en marche rapide Raccorder Socle Inclinable/Rotatif Pour raccorder le socle inclinable/rotatif au le moniteur AccuSyncMC, suivre les directives ciaprès : 1. Le moniteur étant débranché du système et de la prise de courant, renverser soigneusement le moniteur sur une table solide (Figure TS.1). 2. Placez les six crochets de le socle inclinable/rotatif dans les six trous sur le bas du moniteur (Figure TS.2). 3.
Mise en marche rapide (suite) Déposée Socle Inclinable/Rotatif 1. Le moniteur étant débranché du système et de la prise de courant, renverser soigneusement le moniteur sur une table solide (Figure TS.1). 2. Appuyez sur le verrou de le socle inclinable/rotatif et glissez le socle inclinable/rotatif vers l”arriére de l’avant du moniteur (Figure TS.5). 3. Retirez le socle inclinable/rotatif des six trous sur le bas du moniteur (Figure TS.6). l’avant du moniteur Figure TS.5 Figure TS.6 22 AS507090.
Mise en marche rapide (suite) Pour raccorder le moniteur AccuSyncMC au système, suivre les directives ci-après : 1. Mettre l'ordinateur hors tension. 2. Si nécessaire, installer la carte vidéo dans le système. Pour plus d'informations, se reporter au mode d'emploi de la carte vidéo. 3. Pour le PC : Connecter la mini-fiche D-SUB à 15 broches du câble d’interface au connecteur de la carte vidéo du système (Figure A.1). Serrer toutes les vis.
Mise en marche rapide (suite) Adaptateur Mac (non fourni) Mini-fiche D-SUB à 15 broches Câble d’interface Figure B.1 Prise de courant Cordon d’alimentation Figure C.1 Figure C.1 Bouton d’alimentation Figure D.1 24 AS507090.
Commandes Les touches de commandes OSMMC (Gestionnaire à l'écran) à l'avant du moniteur fonctionnent comme suit : SELECT Entre et quitte le menu OSM. CONTROL –/+ Déplace la barre dans le sens – ou + pour augmenter ou diminuer le réglage. RESET Remet la commande en surbrillance au réglage d'usine. Règle la luminosité de l'image générale et de l'écran d'arrière-plan. Règle la luminosité de l'image par rapport à l'arrière-plan. Contraste de la couleur rouge : Règle le contraste rouge de l’affichage.
Commandes (suite) Commande Degauss : Élimine l'accumulation de champs magnétiques parasites qui modifieraient le balayage correct du faisceau d'électrons et affecteraient la pureté des couleurs de l'écran, la netteté et la convergence. Lorsque l'image d'écran est activée, celle-ci saute et tremble un peu pendant la démagnétisation de l'écran. Attention : Prière de laisser s'écouler un minimum de 20 minutes entre chaque utilisation de la commande Degauss.
Usage recommandé Consignes de sécurité et d’entretien POUR UN FONCTIONNEMENT OPTIMAL, PRIÈRE DE NOTER CE QUI SUIT POUR LE RÉGLAGE ET L'UTILISATION DU MONITEUR COULEUR ACCUSYNCMC : • NE PAS OUVRIR LE MONITEUR. Aucune pièce intérieure ne nécessite l'intervention de l'utilisateur, et l'ouverture ou la dépose des couvercles peut entraîner des risques de décharges électriques dangereuses ou d'autres risques. Confier tous travaux à du personnel technique qualifié.
Usage recommandé (suite) LA MODIFICATION DE LA POSITION ET DU RÉGLAGE DU MONITEUR PEUT RÉDUIRE LA FATIGUE DES YEUX, DES ÉPAULES ET DE LA NUQUE. OBSERVER LES DIRECTIVES CI-APRÈS LORS DU POSITIONNEMENT DU MONITEUR : • Régler la hauteur du moniteur de sorte que le dessus de l'écran soit au niveau ou légèrement en-dessous du niveau des yeux. Les yeux doivent regarder légèrement vers le bas lorsque l'on regarde le milieu de l'écran.
Fiche techniques Caractér. techn. du moniteur Tube cathodique Diagonale : Format de l'image visible : Radius : Signal d'entrée Vidéo : Remarques 15 po 14 po 1 080 mm Déflexion de 90°, écran semi-teinté avec espacement des triplets de points de 0,28 mm; luminophore à persistance moyenne-courte; revêtement d’écran multicouche antistatique; masque perforé d'invar et surface d’écran OptiClear®. ANALOGIQUE O,7 Vp-p/75 Ohms Sync : Niveau TTL. sync. séparé Positif/négatif sync.
Fiche techniques (suite) Caractér. techn. du moniteur Tube cathodique Diagonale : Format de l'image visible : Radius : Signal d'entrée Vidéo : Remarques 17 po 16 po 1210 mm Déflexion de 90°, écran semi-teinté avec espacement des triplets de points de 0,27 mm; luminophore à persistance moyenne-courte; revêtement d’écran multicouche antistatique; masque perforé d'invar et surface d’écran OptiClear®. ANALOGIQUE O,7 Vp-p/75 Ohms Sync : Niveau TTL. sync. séparé Positif/négatif sync.
Fiche techniques (suite) Caractér. techn. du moniteur Tube cathodique Diagonale : Format de l'image visible : Radius : Signal d'entrée Vidéo : Sync : Remarques 482 mm (19 po) 456 mm (18 po) 1360 mm Déflexion de 90°, écran semi-teinté avec espacement des triplets de points de 0,26 mm; luminophore à persistance moyenne-courte; revêtement d’écran multicouche antistatique; masque perforé d'invar et surface d’écran OptiClear®. ANALOGIQUE O,7 Vp-p/75 Ohms Niveau TTL. sync. séparé Positif/négatif sync.
Fonctions Surface d'écran OptiClear® : Réduit la réflexion et l'éblouissement et augmente le contraste sans sacrifier le niveau de netteté, la clarté ni la luminosité. Doté de la technologie TRC d'écran plat carré, un écran à haut contraste avec une taille procure des textes et des graphiques clairs et détaillés.
Dépannage Pas d'image • La carte vidéo doit être complètement introduite dans sa fente. • La touche d'alimentation et le commutateur d'alimentation de l'ordinateur doivent être en position ON (Marche). • Le câble de signal doit être bien connecté à la carte vidéo /l'ordinateur. • Vérifier si le connecteur n'est pas plié ou si les broches ne sont pas renfoncées. L'image défile ou est instable • Le câble de signal doit être bien fixé à l'ordinateur.
Références • BBS (978) 742-8706 Le système de babillard électronique NEC-Mitsubishi Electronics Display of America, Inc. est un service électronique accessible avec votre système et un modem. Les paramètres de communication sont : 300/1200/2400/9600/ 1,4 k/28,8 k/33,6 k bps, pas de parité, 8 bits de données, 1 bit d'arrêt • Service à la clientèle/ Assistance technique (800) 632-4662 Télécopieur (978) 742-7049 • Canaux électroniques : Courrier électronique Internet (e-mail) : tech-support@necmitsubishi.
Garantie limitée NEC-Mitsubishi Electronics Display of America, Inc. (ci-après «NMD-A») garantit que ce produit est exempt de vice de fabrication et de main-d’oeuvre et, selon les conditions énoncées ci-dessous, accepte de réparer ou remplacer, à sa discrétion, toute pièce de l’appareil concerné qui s’avérerait défectueuse et ce, pendant une période de trois (3) ans à partir de la date d’achat initial. Les pièces de rechange sont garanties pendant quatre-vingt dix (90) jours.
Notes 36 AS507090.
MC Série AccuSync NEC Avis de propriété exclusive et de dégagement de responsabilité Les informations reprises dans ce document, y compris tous les designs et ce qui s'y rapporte, sont la propriété matérielle de NEC-Mitsubishi Electronics Display of America, Inc.
NEC AccuSyncTM Series PROPRIETARY NOTICE AND LIABILITY DISCLAIMER The information disclosed in this document, including all designs and related materials, is the valuable property of NEC-Mitsubishi Electronics Display of America, Inc. and/or its licensors, as appropriate, reserve all patent, copyright and other proprietary rights to this document, including all design, manufacturing, reproduction, use and sales rights thereto, except to the extent said rights are expressly granted to others.