Desktop Monitor MultiSync EA295WMi User’s Manual Please find your model name in the label on the backside of monitor.
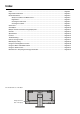
Index Index.............................................................................................................................................English-ii Registration Information ...............................................................................................................English-2 Recommended use ......................................................................................................................English-3 Safety Precautions and Maintenance ........................
TO PREVENT FIRE OR SHOCK HAZARDS, DO NOT EXPOSE THIS UNIT TO RAIN OR MOISTURE. ALSO, DO NOT USE THIS UNIT’S POLARIZED PLUG WITH AN EXTENSION CORD RECEPTACLE OR OTHER OUTLETS UNLESS THE PRONGS CAN BE FULLY INSERTED. REFRAIN FROM OPENING THE CABINET AS THERE ARE HIGH VOLTAGE COMPONENTS INSIDE. REFER SERVICING TO QUALIFIED SERVICE PERSONNEL. CAUTION CAUTION: TO REDUCE THE RISK OF ELECTRIC SHOCK, MAKE SURE POWER CORD IS UNPLUGGED FROM WALL SOCKET.
Registration Information FCC Information 1. Use the attached specified cables with this monitor so as not to interfere with radio and television reception. (1) The power supply cord you use must have been approved by and comply with the safety standards of U.S.A., and meet the following condition. Power supply cord Non shield type, 3-conductor Plug shape U.S.A (2) 2. Please use the supplied shielded video signal cable.
Safety Precautions and Maintenance FOR OPTIMUM PERFORMANCE, PLEASE NOTE THE FOLLOWING WHEN SETTING UP AND USING THE LCD COLOR MONITOR: • DO NOT OPEN THE MONITOR. There are no user serviceable parts inside and opening or removing covers may expose you to dangerous shock hazards or other risks. Refer all servicing to qualified service personnel. • Do not spill any liquids into the cabinet or use your monitor near water.
CORRECT PLACEMENT AND ADJUSTMENT OF THE MONITOR CAN REDUCE EYE, SHOULDER AND NECK FATIGUE. CHECK THE FOLLOWING WHEN YOU POSITION THE MONITOR: • For optimum performance of the monitor, allow 20 minutes for warming up. • Adjust the monitor height so that the top of the screen is at or slightly below eye level. Your eyes should look slightly downward when viewing the middle of the screen. • Position your monitor no closer than 40 cm (15.75 inches) and no further away than 70 cm (27.
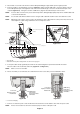
English Quick Start For contents, please refer to the contents sheet. To attach the Base to the LCD stand: 1. Place monitor face down on a non-abrasive surface (Figure 1). 2. Please rotate the stand 90 degrees as shown in Figure 1. NOTE: Handle with care when pulling the stand. 3. Attach the base to the stand and lock screw at the base’s bottom (Figure 2). NOTE: Figure 1 Reverse this procedure if you need to re-pack the monitor.
3. Place hands on each side of the monitor to tilt the LCD panel 30-degree angle and lift up to the highest position. 4. Connect all cables to the appropriate connectors (Figure C.1). When using the USB cable, connect the B type connector to the USB upstream port on the right back side of the monitor and the A type connector to the downstream port on the computer (Figure C.1a). If using the cord from a USB device, plug into the downstream port of the monitor.
. No Touch Auto Adjust automatically adjusts the monitor to optimal settings upon initial setup. For further adjustments, use the following OSD controls: • AUTO CONTRAST (Analog input only) • AUTO ADJUST (Analog input only) Refer to the Controls section of this User’s Manual for a full description of these OSD controls. NOTE: If you have any problems, please refer to the Troubleshooting section of this User’s Manual. Power key Figure E.
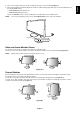
Tilt and Swivel Grasp the top and bottom sides of the monitor screen with your hands and adjust the tilt and swivel as desired (Figure TS.1). Figure TS.1 NOTE: Handle with care when tilting the monitor screen. Flexible Arm Installation This LCD monitor is designed for use with a flexible arm. To prepare the monitor for alternate mounting purposes: • Follow the instructions provided by the manufacturer of the display mount.
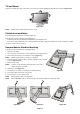
This LCD monitor is designed for use with a flexible arm. 1. Follow the instructions on how Remove Monitor Stand for Mounting to remove the stand. 2. Use the 4 screws removed from the stand or the specified screws to attach the arm to the monitor (Figure F.1). Caution: Use ONLY the screws (4 pcs) that were removed from the stand or the specified screws (Figure F.1) to avoid damage to the monitor or stand.
ControlSync ControlSync works controlling all connected sub monitors from master monitor simultaneously but also controlling a target monitor from master monitor by setting INDIVIDUAL ADJUST function (see page 22). Controlling all connected sub monitor (Synchronized control): 1. Connect the master monitor with a sub monitor via a ControlSync cable (ø 2.5) into ControlSync IN/OUT. 2. Follow the steps of DATA COPY.
ECO TOOLS SCREEN COLOR TOOLS MENU TOOLS MULTI DISPLAY ECO INFORMATION BRIGHTNESS* CONTRAST ECO MODE AUTO BRIGHTNESS BLACK LEVEL OFF MODE SETTING OFF MODE SENSOR SETTING OFF MODE START TIME HUMAN SENSING HUMAN SENSOR SETTING HUMAN SENSOR START TIME DV MODE AUTO ADJUST AUTO CONTRAST LEFT/RIGHT DOWN/UP H.SIZE FINE INPUT RESOLUTION H.RESOLUTION V.
Multiple monitors connection using DisplayPort You can connect multiple monitors by using DisplayPort daisy-chain connection. For using as multiple monitors in MST (multi-stream transport) mode, setting should be DP OUT MULTISTREAM “AUTO” at each connected monitor. Please change the monitor setting which is connected to a computer last in the connected monitors. If monitors have no image, turn off the monitor who is connected to a computer then turn it on. Some DisplayPort configuration may be required.
OSD (On-Screen Display) control keys on the front of the monitor function are as follows: To access OSD menu, touch any of the control keys. To change signal input, touch the INPUT/SELECT key. NOTE: Exit OSD in order to change signal input. 1 Ambient Light Sensor Human Sensor Detects the level of ambient lighting and the presence of a user, allowing the monitor to make adjustments to various settings resulting in a more comfortable viewing experience. Do not cover this sensor.
ECO TOOLS BRIGHTNESS Adjusts the overall image and background screen brightness. If ECO MODE is set to 1 or 2, a bar for CARBON FOOTPRINT will appear. CONTRAST Adjusts the overall image and background screen brightness by input signal level. NOTE: CONTRAST and DV MODE can be adjusted when other than L/B is selected for COLOR CONTROL. ECO MODE Decreases the amount of power consumption by reducing the brightness level. OFF: No function. 1: Sets brightness variable range from 0% to 70%.
The sensor detects the movement of a person by using the HUMAN SENSING function. The HUMAN SENSING has three settings: OFF: No human sensing. 1 (LIGHT): After it is detected that there is no person after a period of time, the monitor shifts to low brightness mode automatically to reduce the power consumption. When a person comes near the monitor again, the monitor will automatically return to normal mode. START TIME adjusts the wait time to react.
H.SIZE (Analog input only) Adjusts the horizontal size by increasing or decreasing this setting. If the “AUTO ADJUST” function does not give you a satisfactory picture setting, a further tuning can be performed by using the “H.SIZE” function (dot clock). For this a Moiré test pattern could be used. This function may alter the width of the picture. Use LEFT/RIGHT key to center the image on the screen. If the H.SIZE is wrongly calibrated, the result would look like the left drawing.
Sets the Zoom method. FULL: The image is expanded to full screen regardless of the resolution. ASPECT: The image is expanded without changing the aspect ratio. OFF: The image is not expanded. NOTE: Full does not work when MULTI PICTURE is Left or Right. When MULTI PICTURE is sub, FULL does not change picture height and makes aspect size 21:9.
VIDEO DETECT Selects the method of video detection when more than one video inputs are connected. FIRST: When current video input signal is not present, then the monitor searches for a video signal from the other video input ports. If the video signal is present in another port, then the monitor switches the video source input port to the new found video source automatically. The monitor will not look for other video signals while the current video source is present.
Determines where the sub screen appears on the screen. Touch SELECT key for entering PICTURE POSITION mode (Figure 1). Using LEFT, RIGHT, UP and DOWN keys, controls the horizontal and vertical position of the sub screen within a half of the monitor that the sub screen is (Figure 2). Figure 1 Figure 2 RESPONSE IMPROVE Turns the Response Improve function on or off. Response Improve may reduce blurring that occurs in some moving images.
MENU Tools LANGUAGE Selects the language used by the OSD. OSD TURN OFF The OSD menu will stay on as long as it is in use. You can select how long the monitor waits after the last touch of a key to shut off the OSD menu. The preset choices are 10-120 seconds by 5-second increments. OSD LOCK OUT This control completely locks out the access to all OSD control functions except for BRIGHTNESS, CONTRAST and VOLUME.
English MULTI DISPLAY H MONITOR Selects the number of horizontal displays. V MONITOR Selects the number of vertical displays. MONITOR NO. This function is for image expansion with multi screen but also used for INDIVIDUAL ADJUST. Image expansion with multi screen: To set monitor number to each monitors, please refer to Example of installation and monitor number. When H.MONITOR and V.MONITOR are set, an assumed installation figure is shown under OSD menu.
TILE MATRIX ENABLE Allows one image to be displayed over multiple screens. This feature can be used with up to 25 monitors (5 vertical and 5 horizontal). Using TILE MATRIX ENABLE requires the PC output signal be sent through a distribution amplifier to each individual monitor. TARGET MONITOR NO. Controls sub monitor’s OSD by using master monitor’s control keys. Sets the sub monitor number that is set at MONITOR NO. By touching the “INPUT/SELECT” key, each sub monitor displays its monitor number.
Monitor Specifications MultiSync EA295WMi Notes LCD Module 73.02 cm/29 inches 73.02 cm/29 inches 2560 x 1080 Active matrix; thin film transistor (TFT) liquid crystal display (LCD); 0.263 mm dot pitch; 300 cd/m2 white luminance; 1000:1 contrast ratio (typical), (5000:1 Contrast ratio, Dynamic). Digital RGB DisplayPort Complies with Standard V1.
Features Picture By Picture/Picture In Picture: Two different input sources can simultaneously be screened side by side (Picture By Picture) or a small sub screen on a large main screen (Picture In Picture), which increases job productivity. DisplayPort OUT: This monitor has a DisplayPort out connector for daisy-chain connection. Multiple monitors can be connected without complicated cable management.
No picture • The signal cable should be completely connected to the display card/computer. • The display card should be completely seated in its slot. • The monitor does not support DisplayPort converter adapter. • When you use DisplayPort signal, check to make sure not to plug the input signal cable in DisplayPort out connector. • Power Switch and computer power switch should be in the ON position.
Display image is not sized properly • Use the OSD Image Adjust controls to increase or decrease the Coarse adjustment. • Check to make sure that a supported mode has been selected on the display card or system being used. (Please consult display card or system manual to change graphics mode.) • When using an HDMI input, please change “OVER SCAN”. • Check to make sure that the appropriate resolution has been selected in H.RESOLUTION and V.RESOLUTION.
English Human sensing function Human sensing function reduces power consumption by detecting the movement of a person. The HUMAN SENSING has following two settings: MODE HUMAN SENSING SETTING No person in front of the monitor LIGHT 1 BRIGHTNESS 0% DEEP 2 Power saving mode Image of human sensing operation A. When sensor detects no person in front of the monitor, the monitor stays for a period of time which is set at HUMAN SENSING > START TIME (see page 15). B.
Multi Display setting You can display a image by using multiple monitors with any input signals. [Example of V MONITOR 5, H MONITOR 5 (See page 21)] 1. Touch the MENU/EXIT key to display OSD menu. 2. Move the LEFT/RIGHT key left or right to select MULTI DISPLAY. 3. Move the DOWN/UP key down to select H MONITOR. Move the LEFT/RIGHT key left or right to set H MONITOR 5. 4. Move the DOWN/UP key down to select V MONITOR. Move the LEFT/RIGHT key left or right to set V MONITOR 5. 5.
English Using ControlSync function with multi screen configuration To control sub monitor from master monitor, control keys of the master monitor is used. Please install master monitor at accessible place. Mounting multi screen configuration When monitors are used in a multi screen configuration for a longer time, slight expansion of the displays may happen due to temperature changes. Due to this it is recommended that over one millimeter gap is kept between adjacent display edges.
Using the Auto Brightness function The brightness of the LCD screen can be set to increase or decrease depending on the amount of ambient lighting within the room. If the room is bright, the monitor becomes correspondingly bright. If the room is dim, then the monitor will dim accordingly. The purpose of this function is to make the viewing experience more comfortable to the eye in a variety of lighting conditions.
This monitor can display split screens from two sources by using any one of the input combinations shown on page 18. NOTE: Please see MULTI PICTURE (page 18) and PICTURE PATTERN (page 18). BRIGHTNESS and SOUND INPUT settings are set to be the same for both screens. SETUP 1. Touch MENU to show OSD menu. 2. Select MULTI PICTURE. In a picture by picture case, select Left as an adjustable screen. In a picture in picture case, select Main as an adjustable screen. Exit OSD in order to change signal input.
Using the Zoom function Allows you to use the entire screen area, significantly expanding the size. Allows the picture displayed in the center to expand. NOTE: When LEFT or RIGHT is set at MULTI PICTURE, the other picture is expanded or reduced automatically. SETUP 1. Select FULL or ASPECT in EXPANSION to activate the Zoom function (see page 17). EXPANSION OFF 2. Set a resolution via H.RESOLUTION or V.RESOLUTION (see page 16). Vertical expanding Horizontal expanding 3.
To enlarge the split images: use the following procedures to reduce the black area and enlarge the split images. 1. In case A, a priority image is set to be on the right side. The size of the black area can be reduced by adjusting the resolution (see page 16). 2. Move the priority image to the left side. English-33 English B. The left image is set to be the main one. In this case, the priority image is set to be on the left side. The size of the image on the right side with black area is reduced.
Manufacturer’s Recycling and Energy Information NEC DISPLAY SOLUTIONS is strongly committed to environmental protection and sees recycling as one of the company’s top priorities in trying to minimize the burden placed on the environment. We are engaged in developing environmentallyfriendly products, and always strive to help define and comply with the latest independent standards from agencies such as ISO (International Organisation for Standardization) and TCO (Swedish Trades Union).