
User's Guide


Upgrading Your Server 9-27
Installation
Install a DIMM in the following procedure.
IMPORTANT: The server supports DIMMs of only the low-profile
type (30 mm (1.2 inches) in height). It does not support DIMMs
exceeding the specified height.
1. See the section "Preparing for Installation and Removal" described earlier to prepare.
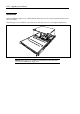
2. Pull out the server from the rack.
3. Remove the logic cover.
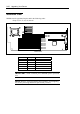
4. Locate the DIMM socket which you are going to install DIMM.
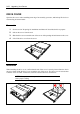
5. Make sure the clips at either end of the DIMM socket(s) are pushed outward to the open
position.
6. Holding the DIMM by the edges, remove it from its anti-static package.
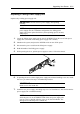
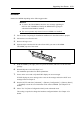
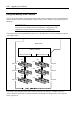
7. Position the DIMM above the socket. Align the small notch at the bottom edge of the
DIMM with the key in the socket.
NOTE: Make sure of the orientation of the DIMM.
Position the DIMM so that a notch in the bottom edge of the DIMM
aligns with the keyed socket. Applying too much pressure can damage
the socket. Keyed DIMMs insert only one way.
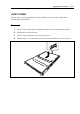
8. Insert the bottom edge of the DIMM into the socket.
9. When the DIMM is inserted, push down on the top edge of the DIMM until the retaining
clips snap into place.
IMPORTANT:
To avoid damage to the socket, do not apply excessive force while
pressing the DIMM.
Make sure the clips are firmly in place.
Key slot
Key