
User's Guide


5-15
Upgrades and Options
2. Remove the terminator card from the CPU 2 socket.
3. Position the heat sink on the processor module and
insert the heat sink clips that secure the heat sink to
the processor.
4. The processor module is keyed so it can only be
inserted one way. Position the processor over the
CPU 2 socket on the board and press down evenly on
the processor until the latches on both sides lock in
place correctly.
Note: Be sure the Pentium II module side latches
are pushed all the way out. Otherwise, the module
will not be locked into the socket.
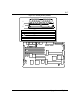
5. Locate the voltage module. The connector for the
module (Figure 5-6) is keyed so it can only be
inserted one way. Position the module over the
socket on the board and press down evenly on the
module until it seats correctly.
6. Move the CPU 2 jumper J50 from pins 2-3 to pins 1-2
(Figure 4-1).
7. Replace the side panel and turn on the system.
Removing a Processor
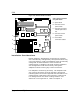
Refer to Figure 5-6 while performing the following
procedures. To remove an Pentium II processor:
1. Power off the system and remove the side panel as
described earlier in this chapter.
Notice: Observe static precautions. Use an antistatic
wrist strap.
2. Remove the processor module from the CPU 2 socket
by pressing the release latches on either side of the
module and pulling the module out of the mounting
bracket.
3. Remove the heat sink support pins from the heat
sink support base and remove the heat sink base.