
User's Guide


5-35
Upgrades and Options
Installing a 5 1/4-Inch Device or 3 1/2-Inch Diskette Drive
!
Caution: CD-ROM devices contain a laser system and
are classified as CLASS 1 LASER PRODUCTS. In case
of any trouble with a CD-ROM, please contact your
nearest service representative. To prevent direct
exposure to the laser beam, do not try to open the
enclosure.
Use of controls or adjustments or performance of
procedures other than those recommended by the
manufacturer may result in hazardous radiation
exposure
Note: Contact your sales representative or dealer for a
list of approved optional peripheral devices.
1. Power off the system and remove the left side panel
(as viewed from front) described earlier in this
chapter.
2. Observe the safety and ESD precautions listed at
the beginning of this chapter.
3. Unlock and open the short bay door.
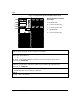
4. Each empty media or diskette drive bay has a blank
panel tray. To remove a blank panel tray from the
chassis, you must first remove the front plastic cover
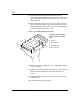
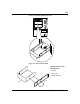
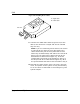
from the front of the chassis. To remove the front
plastic cover, first loosen the thumbscrew located in
the middle of the front plastic cover (Figure 5-15).
5. Carefully pull out on the thumbscrew until the
middle and the top of the front cover are released,
then remove it from the chassis by pulling it
straight up and out of the hinge tabs at the bottom
edge of the cover.
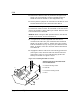
6. Place the frame face down on a soft surface to
prevent marring it.