
User's Guide


5-8
Upgrades and Options
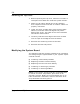
Installing the Top Cover
1. Before replacing the top cover, make sure no tools or
loose parts have been left inside the system chassis.
2. Make sure all option boards are firmly seated in
their respective slots and that all interior cables are
properly connected.
3. Lower the cover straight down with the front edge
about 1/2 inch back from the edge of the plastic
bezel (front cover). The sides of the cover should be
outside the chassis metal.
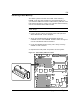
4. Carefully slide the front edge of the cover forward
until it stops at the edge of the front bezels.
5. Reinstall two retaining screws at the back.
6. Reinstall the two side panels.
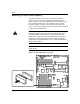
Modifying the System Board
The following sections provide procedures for upgrading
and configuring the system board in your system. Topics
covered include:
■ Installing video memory DRAMs
■ Replacing the Non-Volatile Memory
■ Replacing the real-time clock battery
■ Installing or removing a processor
■ Installing or removing DIMMs.
Notice:
Electrostatic discharge (ESD) can damage add-
in boards and other components; place them on an
antistatic surface. Modify the system board only at an
ESD workstation. Otherwise, wear an antistatic wrist
strap attached to chassis ground.