
LCD Projector User's Manual GT1150

E – 2
R
E
M
O
T
E
1
P
C
C
O
N
T
R
O
L
REM
OTE
2
A
C
IN
S
C
,
T
R
IG
G
E
R
O
U
TO
U
T
IN
I
N
D
V
IL
/
M
O
N
O
L
/
M
O
N
O
R
G
B
1
R
G
B
2
V
I
D
E
O
1
V
I
D
E
O
2
S
-
V
I
D
E
O
A
U
D
I
O
O
U
T
R
/
C
r
G
/
Y
B
/
C
b
V
H
/H
V
M
O
N
IT
O
R
O
U
T
R
L
/M
O
N
O
R
L
/
M
O
N
O
R
L
/
M
O
N
O
R
R
M
E
N
U
E
N
T
E
R
C
A
N
C
E
L
S
E
L
E
C
T
L
E
N
S
S
H
IF
T
L
E
F
T
Z
O
O
M
F
O
C
U
S
U
P
D
O
W
N
R
IG
H
T
A
U
T
O
A
D
J
U
S
T
L
A
M
P
S
T
A
T
U
S
P
O
W
E
R
O
N
/S
T
A
N
D
B
Y
S
O
U
R
C
E
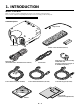
Getting to Know Your GT1150 Projector
Lens hood
Remote sensor
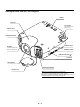
Terminal panel (Left)
AC INPUT
Connect the supplied power
cable’s three-pin plug here.
Lens (optional)
Lens hood cap
Controls
PC Card slot
Open the cover to access
the PC card slot.
Remote sensor
Ventilation (outlet)
Built-in Security Slot ( )*
Foot (four)
Rotate to fine-adjust the height of each foot.
Terminal panel (Right)
*NOTE: Slot for Kensington MicroSaver Security System
This security slot supports the MicroSaver
®
Security System.
MicroSaver
®
is a registered trademark of Kensington Microware Inc. The logo
is trademarked and owned by Kensington Microware Inc.