
LCD Projector User's Manual GT1150


E – 5
E
N
T
E
R
C
A
N
C
E
L
LENS SHIFT
LEFT
ZOOM
FOCUS
UP
DOWN
RIGHT
A
U
T
O
A
D
JU
S
T
L
A
M
P
S
T
A
T
U
S
P
O
W
ER
O
N
/S
T
A
N
D
B
Y
S
O
U
R
C
E
SELECT
M
E
N
U
10
9
8
7
6
5
4
2
3
11
12
13
1
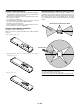
1. Power Button (ON / STAND BY)
Use this button to turn the power on and off when the power is sup-
plied and the projector is in standby mode.
NOTE: To turn off the projector, press and hold this button for a minimum of
two seconds.
2. Auto Adjust Button (RGB only)
Use this button to adjust Position-H/V and Pixel Clock/Phase for an
optimal picture. Some signals may not be displayed correctly or take
time to switch between sources.
3. Source Button
Use this button to select a video source such as a PC, VCR, DVD
player or PC Card Viewer (PC card).
Each time this button is pressed, the input source will change as fol-
lows:
→ RGB1 → RGB2 → Video1 → Video2 → S-Video → DVI digital →
DVI analog → PC Card Viewer
If no input signal is present, the input will be skipped.
4. Menu Button
Displays the menu.
5. Select ▲▼
䊴
䊳
/ Volume (+) (-) Buttons
▲▼: Use these buttons to select the menu of the item you wish to
adjust.
When no menus appear, these buttons work as a volume con-
trol.
䊴
䊳
: Use these buttons to change the level of a selected menu item.
A press of the
䊳
button executes the selection.
When the menus or the Viewer tool bar is not displayed, these
䊴
䊳
buttons can be used to select a slide, or to move the cur-
sor in Folder List or Slide List.
When the pointer is displayed, these ▲▼
䊴
䊳
buttons move
the pointer.
6. Enter Button
Executes your menu selection and activates items selected from the
menu.
Top Features
7. Cancel Button
Press this button to exit “Menus”. Press this button to return the adjust-
ments to the last condition while you are in the adjustment or setting
menu.
8 Lens Shift Button
Adjust the lens offset by shifting the projected image position horizon-
tally and / or vertically.
9 Zoom Button
Zoom the lens in and out.
10 Focus Button
Adjust the lens focus.
11. Lamp Remaining Indicator
Indicates the lamp remaining amount. See the Lamp Light Messages
on page E-62 for more details.
12. Status Indicator
When this is lit red (orange in Eco mode) continually, it‘s warning you
that the projection lamp has reached the end of its usable life (1500
hours in High-Bright mode and up to 2000 hours in Eco mode). After
this light appears, it is advisable to replace the projection lamp as soon
as possible. (See page E-58 or 60). In addition the message "The lamp
has reached the end of its usable life. Please replace the lamp." ap-
pears continually until the lamp is replaced.
If the projector is in Eco mode or something out of the ordinary takes
place, this indicator is lit or blinks. For example, If this light blinks red
rapidly, it indicates that the lamp cover is not attached properly or the
projector is overheated.
See the Power / Status Light Messages on page E-62 for more details.
13. Power Indicator ( )
When this indicator is green, the projector is on; when the indicator is
orange, it is in standby mode.