
LCD Projector User's Manual GT1150


E – 8
OFF
+
-
PICTURE
ADJUST
ABC DEF
GHI
JKL MNO PQR
STU
,.
UNDO CANCEL
TEST
PICTURE
KEYSTONE AMPLITUDE ENTRYLIST
SOUND OSD
MUTE
MAGNIFY
HELPINFO.
POSITION AUTOPIXEL
VWX YZ?
WHITE BAL.
IMAGE
ON
POWER
MENU
ENTER
123
456
7
0
8
9
ADDRESS
PROJECTOR
R G B
LENS
SHUTTER
BS
+
-
+
-
FOCUS ZOOM
CTL
LENS
2
5
6
7
9
10
12
13
17
20
21
22
24
26
2
5
2
3
1
9
1
8
1
6
1
5
1
4
11
8
4
3
1
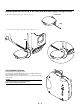
Remote Control Features
1. POWER ON Button
Press this button to turn on the projector when the power is supplied
and the projector is in standby mode.
2. POWER OFF Button
Press and hold this button for a minimum of two seconds to turn off the
projector.
3. MENU Button
Press to display the main menu.
While pressing and holding CTL, press this button to display the Re-
mote Control ID dialog box to specify the remote control ID. See page
E-33.
4. ENTER Button
Executes the menu selection and activates items selected from the
menu. When the slider or dialog box is displayed:
Pressing this button confirms adjustments/setting and returns to the
previous menu display.
5. Select (Up/Down/Left/Right) Button
▲▼: Use these buttons to select the menu of the item you wish to
adjust.
When no menus appear, these buttons work as a volume con-
trol.
䊴
䊳
: Use these buttons to change the level of a selected menu item.
A press of the
䊳
button executes the selection.
When the menus or the Viewer tool bar is not displayed, these
䊴
䊳
buttons can be used to select a slide, or to move the cursor in
Folder List or Slide List.
When the pointer is displayed, these ▲▼
䊴
䊳
buttons move the pointer.
See page E-35 for displaying the pointer.
Pressing and holding CTL, then pressing
䊴
button works as a Back
Space key in the entry screen.
Pressing and holding CTL, then pressing this button moves the menu,
slider, toolbar or dialog box.
6. ADJUST WHITE BAL Button
Press to display the color adjustment screen. Pressing this button se-
quentially selects "Color Temperature" → "White Balance" → "Switcher
Gain".
7. ADJUST PICTURE Button
Press to display the Picture screen.
8. IMAGE/PROJECTOR Button
Press to display the Image Options screen.
Pressing this button sequentially selects "Gamma Correction" → "As-
pect Ratio" → "Noise Reduction" → "Color Matrix" → "Resolution" →
"Video Filter" → "Overscan" → "Clamp Timing” → "Y/C Delay" → "YTR
Adjustment" → "CTR Adjustment" → "HD Delay".
While pressing and holding CTL, pressing this button rotates "On/Off
Timer" → "Sleep Timer" → "Menu" → "Setup" → "Link Mode" →
"Switcher Control" → "LAN mode" (optional).
9. Source / Alphanumeric Buttons
Press to select input or to name a signal.
1 .................. Selects RGB 1 input.
2 .................. Selects RGB 2 input.
3 .................. Selects VIDEO 1 input.
4 .................. Selects VIDEO 2 input.
5 .................. Selects S-VIDEO 1 input.
6 .................. Selects DVI digital input.
7 .................. Selects DVI analog input.
8 .................. Selects PC Card Viewer.
9 .................. Selects RGB1 (VIDEO) input
0 .................. Selects RGB2 (S-VIDEO) input