
LCD Projector User's Manual GT1150


E – 9
OFF
+
-
PICTURE
ADJUST
ABC DEF
G
JKL
MN
S
TU
WHITE BAL.
IMAGE
ON
POWER
MENU
ENTER
12
4
A
D
D
R
E
S
S
P
R
O
J
E
BS
27
28
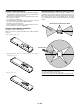
10. UNDO
Press to return the adjustments and settings to the previous condition.
While pressing and holding CTL, pressing this button clears the entire
menus or adjustment/setting screen. At this time the adjustments/set-
tings are stored in memory except the items on the setting screen with
"OK" and "Cancel" buttons such as the Menu and the Setup screen.
11. CANCEL
Press to exit the menu.
Press this button with CTL to return to the previous menu without clos-
ing adjustment/setting screen while the menus appear. This feature
allows you to adjust or set several items concurrently.
12. INFO
Displays the Information screen.
13. TEST
Press to display the test pattern. Pressing this button sequentially se-
lects nine test patterns.
14. HELP
Provides online help.
15. PIXEL
Displays the Position/Clock screen to adjust the clock and phase.
16. AUTO (RGB only)
Press to adjust Position-H/V and Pixel Clock/Phase for an optimal pic-
ture.
17. POSITION
Press to display the Position/Clock screen.
While pressing and holding CTL, pressing this button displays the Lens
Shift adjustment screen.
18. MUTE SOUND
Turns off the sound for a short period of time. Press again to restore
the sound.
19. MUTE OSD
Press to turn off the on-screen display. Press again to restore the on-
screen display.
NOTE: You can also turn off the on-screen display forcefully by pressing and
holding CTL and then pressing MUTE OSD (Forced On-Screen Mute Mode) ;
doing this again restores it. In this case any adjustment will still change the
projector's memory settings. This mode is available even when input is switched
to another or the power is turned off the main power.
20. MUTE PICTURE
Press to turn off the picture for a short period of time. Press again to
restore the picture.
21. KEYSTONE (R)
Press to display the Keystone Correction screen.
When the test pattern is displayed, while pressing and holding CTL,
pressing this button displays a red test pattern.
22. AMPLITUDE (G)
Service personnel only.
When the test pattern is displayed, while pressing and holding CTL,
pressing this button displays a green test pattern.
23. ENTRY LIST (B)
Press to display the Entry List screen.
When the test pattern is displayed, while pressing and holding CTL,
pressing this button displays a blue test pattern.
24. FOCUS (+/–)
While pressing and holding CTL, pressing this button allows you to
adjust the lens focus.
25. MAGNIFY/ZOOM (+/–)
Magnify the size of a target portion.
While pressing and holding CTL, pressing this button allows you to
zoom the lens in and out.
26. CTL
Used in conjunction with other buttons, similar to a shift key on a com-
puter.
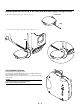
27. Remote Jack
Connect your remote control cable here for wired operation.
28. Infrared Transmitter
Direct the remote control toward the remote sensor on the projector
cabinet.