
LCD Projector User's Manual GT1150


E – 26
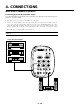
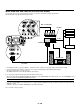
Connecting an External Monitor
You can connect a separate, external monitor to your GT1150 projec-
tor to simultaneously view on a monitor the RGB analog, DVI analog,
or component image you're projecting. To do so:
1. Turn off the power to your projector, monitor and computer.
2. Use a 15-pin cable to connect your monitor to the RGB MONI-
TOR OUTPUT (Mini D-Sub 15 pin) connector on your projector.
3. Turn on the projector, monitor and the computer.
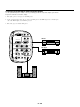
NOTE:
* The MONITOR OUT connector outputs RGB signal during standby. When
the projector goes into standby, the image on an external monitor disap-
pears for a moment.
* The DVI digital output signal from the MONITOR OUT connector is muted.
DVI L/MONO
L/MONO
RGB 2
RGB 1
VIDEO 1
VIDEO 2
S
-
VIDEO AUDIO OUT
R/Cr G/Y B/Cb
VH/HV
MONITOR OUT
R
L/MONO R L/MONO R
L/MONO R L/MONO R
R
DVI L/MONO
L/MONO
RGB 2
RGB 1
VIDEO 1
VIDEO 2
S
-
VIDEO AUDIO OUT
R/Cr G/Y B/Cb
VH/HV
MONITOR OUT
R
L/MONO R L/MONO R
L/MONO R L/MONO R
R
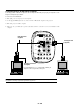
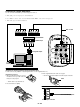
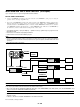
To DVI digital or DVI analog
Connecting a PC with DVI output
The DVI (digital) input accepts up to the XGA signal.
NOTE: The Auto Adjust feature does not work for DVI digital signal. When DVI
signal is selected and the image position is not corrected, adjust the horizontal
and vertical position using the Position/Clock screen. See page E-43 for more
details.
DVI cable (not supplied)