
LCD Projector User's Manual GT1150


E – 27
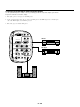
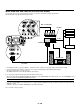
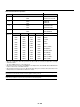
Connecting to a Single Workstation
You can connect a workstation to your GT1150 projector. To do so:
1. Turn off the power to your projector and workstation.
2. Use a BNC x 5 cable to connect your workstation and the RGB 1 connectors on your projector.
3. Turn on the projector and a workstation.
DVI L/MONO
L/MONO
RGB 2
RGB 1
VIDEO 1
VIDEO 2
S
-
VIDEO AUDIO OUT
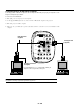
R/Cr G/Y B/Cb
VH/HV
MONITOR OUT
R
L/MONO R L/MONO R
L/MONO R L/MONO R
R
To RGBHV output To RGBHV output
Signal distribution
BNC⳯5 cable
To analog RGB output
To analog
RGB input
Workstation
To RGBHV input
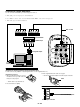
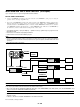
Installation Instructions
1. Open and attach the ferrite core to a sig-
nal cable as close as possible to the end
that goes to the projector.
Information for Reducing Radiation of Electromagnetic Waves
To reduce unnecessary radiation of electromagnetic waves, use the supplied ferrite core,
* Push the catch to open the ferrite core.
2. Close the ferrite core tightly.
Band
3. Fix the supplied band to the cable as a stopper.
* Pull the end of the band to tighten it. Cut off the surplus of the band.
NOTE: Be sure to use the ferrite core at the end of the signal cable.
To RGB2 input of GT1150
To a connected equipment
NOTE: All cables mentioned above are sold separately.