
LCD Projector User's Manual GT1150


E – 46
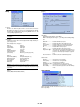
[Page 3]
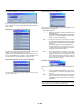
Projector Pointer:
This option is avaiable on the optional presentaion remote control
(PR50KIT) only.
This enables you to select from eight different Pointer icons for the
"Pointer" button on your remote control.
After moving your Pointer icon to the area you want on the screen,
press the Magnify button on the remote control to enlarge the se-
lected area on the screen.
NOTE: There may be cases where the Pointer function is not available (ex. A
non-interlace signal at 15kHz such as video game.)
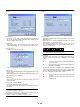
Direct Button:
Volume Bar: This option turns on or off the volume bar when you
adjust the sound volume using Select ▲▼ button on the remote
control.
On ................ You can increase or decrease the sound volume with the vol-
ume bar on screen.
Off ................ You can increase or decrease the sound volume without hav-
ing to use the volume bar.
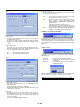
Keystone Bar: This option is avaiable on the optional presentaion
remote control (PR50KIT) only. This option turns on or off the key-
stone bar when you adjust the keystone using KEYSTONE +/- but-
ton on the optional presentation remote control.
On ................ You can increase or decrease the level with the keystone bar
on screen.
Off ................ You can increase or decrease the level without having to use
the keystone bar.
[Page 2]
Display Select:
You can choose the desired status information to be displayed on
the screen. The desired status information will be displayed each
time you switch between sources.
Date Format:
Eight display formats can be selected. This date format sets the
current date that appears on the upper left corner of the screen.
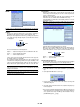
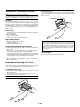
Date, Time Preset:
Setting the Current Date and Time
You can set the current time, month, date, and year.
1. Type in date.
Enter month, date and year in this order using INPUT buttons on the
remote control.
Month and date must be entered in two digits. For example, to dis-
play "February", press "0" and "2".
2. Type in time.
Time is expressed in the 24-hour format. For example, 6:00 p.m. is
entered as 18:00.
3. Select "OK" and press ENTER.
Closing the window allows the clock to start.
The current year, month, date and time are displayed on the top of
the screen.
NOTE: The projector has a built-in clock. The clock will keep working for about
3 days after the main power is turned off.
If the main power is off for 3 days or more, the built-in clock will be reset. If the
built-in clock is reset, set the date and time again.
The built-in clock will not reset while in the standby condition.