
LCD Projector User's Manual GT1150

E – 63
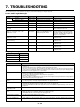
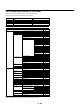
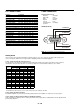
• Is “PC Card Viewer” selected from the Source menu?
• Is the PC card seated in the PC CARD slot completely?
• Are slide data stored in the PC card?
• Have the contents of the PC card been destroyed?
• While an image with over 1024⳯768 dots is projected, several lines of information will be lost. Use the
supplied software change the image to 1024⳯768 dots in size.
• Use a computer, etc., to repair the data.
Condition Status
When using the PC Card Viewer function
For more information contact your dealer.
No picture
Part of a slide is not displayed
Contents of PC Card are
damaged
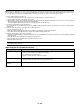
䡵 Selecting a new signal that is close to one of the listed signals in horizontal and vertical frequency may not display the image correctly because
the new signal is considered as one of the registered signals listed in the Entry List. (In this case the Auto Adjust feature may not work correctly.)
To use both signals, use different input terminal (RGB 1 or RGB 2) respectively, or assign specific remote keys for signals.
1. Cut an existing signal from the Entry List.
1) Select another signal other than the one currently projected because the currently projected signal cannot be cut.
2) Press the ENTRY LIST button on the supplied remote control.
3) After selecting the existing signal, press and hold down the CTL button and then the ENTER button simultaneously on the remote control. The Entry Edit
Command window will appear. Select "Cut" and press the ENTER button.
The selected signal will be deleted from the Entry List. (The signal data is stored in the clipboard.)
2. Select the new signal and enter it in the Entry List.
Press and hold down the CTL button and then press the ENTRY LIST button simultaneously on the supplied remote control to enter the signal in
the Entry List.
3. Paste the signal data that was cut and placed in the clipboard in Step 1.
1) Select a vacant line in the Entry List.
2) Press and hold down the CTL and then ENTER buttons simultaneously to display the Entry Edit Command window.
3) Select "Paste" and press the ENTER button on the remote control to add the signal to the Entry List.
4. Assign the listed signals for direct keys respectively.
1) Select the one signal in the Entry List, and press and hold down the CTL and the ENTER buttons simultaneously on the remote control to display the Entry Edit
Command window.
2) Select "Edit" and then press the ENTER button to display the Entry Edit screen
3) Select "Direct Key" and press the ENTER button to display the Direct Key screen.
4) Assign the signals for direct keys.
NOTE: Be sure not to disconnect the power cable while you are performing step 1 to 3. Failure to do so will delete the signal data stored in the clipboard. See also
pages E-40 and E-41 for Entry List.